


Dustbane Products Limited
Dustbane Products Limited * 25 Pickering Place Ottawa ON K1G 5P4 * 1-800-387-8226 *
www.dustbane.ca
OPERATING MANUAL
GENERAL INFORMATION ABOUT THIS CHARGER
•
The device is a electronic automatic battery charger suitable for deep cycle flooded batteries.
•
Fully automatic charging with electronic control, it is protected against overload, short-circuit and reversed
polarity.
WARNINGS
•
Never disconnect the battery while charging: this could cause sparks.
•
Never use the equipment in the rain, in areas used for washing or in damp areas.
•
Caution: the gases generated duing recharging are explosive. Do not smoke in the vicinity of batteries.
When working with cables and electrical euiment - avoid open flames or sparks.
•
Before starting to charge, make sure the voltage of the equipment suits the voltage of the battery, that the
charging current suits the capacity of the battery. In addition, make sure the rated input voltage of the charger
suits the available supply voltage and the system is grounded.
•
If necessary, replace the fuse with another of the same type and value as indicated on the rating plate.
•
Use battery chargers only in well ventilated areas.
•
Pay attention to any warnings and recomendations of the battery manufacturer.
BATTERY CARE
•
Attention: Use protective glasses and gloves during battery maintenance. Battery acid causes injuries. In
case of contact with battery acid, wash the affected parts with fresh water and consult a doctor if necessary.
•
Check fluid level before charging to make sure plates are covered.
•
Top up the water level only after charging.
•
Refill with distilled water only. Do not use tap water.
•
Keep terminals and battery casing clean.
OPERATION
•
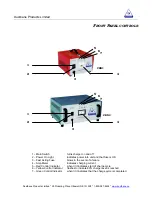
Put the main switch (1) in the “ OFF” position and connect the AC cord to the power supply.
•
Connect the battery charger to the batteries – observing correct polarity.
•
Move the switch (1) to “ON”, thus starting the automatic charging cycle. The status of the charging cycle is
indicated by the red, yellow and green indicators (5), (6), and (7).
•
At the end of the charge, when the green indicator is on, put the main switch (1) in the “OFF” position and
disconnect the battery.
Troubleshooting
PROBLEMS POSSIBLE
SOLUTIONS
The power on light (2) does not switch on.
Check that the charger is connected to the mains supply.
Check that the fuse is not blown.
The charging cycle does not start:: the amp meter (4)
reads “0”, the power on light (2) is on and the red
control indicator (5) is off.
Check the connection to the battery and make sure that the
polarity is correct.
The charging cycle does not start:: the amp meter (4)
reads “0”, the power on light (2) is on and the red
control indicator (5) is lit.
Check the battery for possible faults or defects. Make sure the
battery is not too low in voltage – charging can only start if
battery voltage is > 4V.
The yelow control indicator (6) does not light, even 15
hours after the start of the cycle.
Check the battery for faults or defects..
If the above guide does not resolve the problem, call your distributor for technical service.


