background image

Short thread cutter

86

Service Instructions 1767 - 00.0 - 12/2016

10. Loosen all 4 screws (6) on the clamping ring and push the clamping 

ring (6) as far as it will go and against the control cam (7).

11. Tighten all 4 screws on the clamping ring (6).

12. Check the loop stroke (

p. 54

).

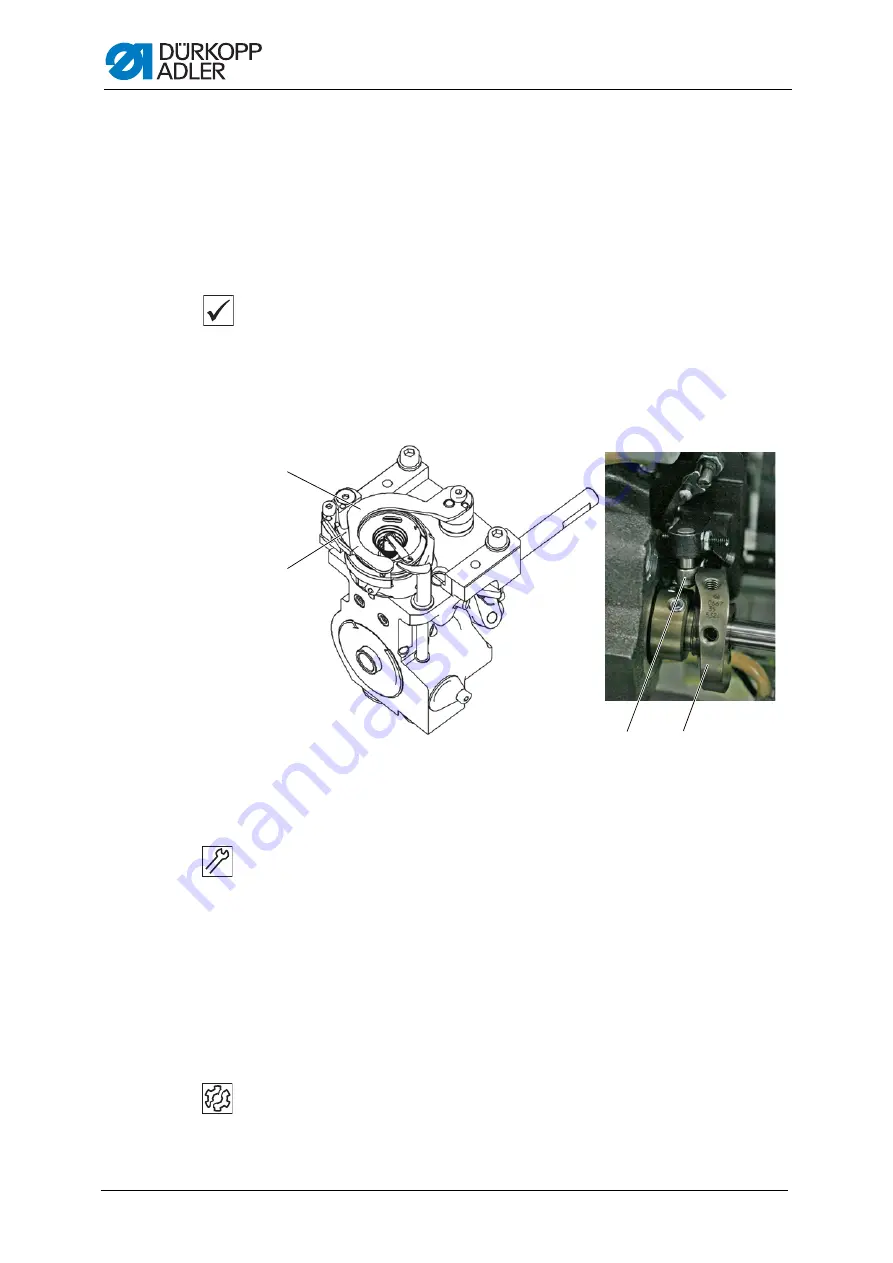
17.3 Setting the counter blade

Proper setting

The thread must be reliably cut using little pressure. The pressure is built 
up starting at the marking (2).

Any 2 threads with the greatest strength used for sewing can be neatly cut 
simultaneously.

Fig. 69: Setting the counter blade

To set the counter blade:

1.

Turn the handwheel until the thread-pulling knife (1) can be swung out 
after the latch is triggered.

2.

Swing out the thread-pulling knife (1) manually. To do this, press the 
clamp with the roller (3) to the right against the control cam (4).

3.

Insert 2 threads into the thread-pulling knife (1).

4.

Turn the handwheel until the cutter swivels down.

5.

Check whether the sewing threads have been cleanly cut and pressure 
is built up starting at the marking (2).

Disturbance

• Increased knife wear when the pressure is too great

• Problems in cutting the thread

(1)

- Thread-pulling knife

(2)

- Marking

(3)

- Roller

(4)

- Control cam

③ ④

Содержание 1767

Страница 1: ...1767 Service Instructions ...

Страница 2: ...ler AG and protected by copyright Any reuse of these contents including extracts is prohibited without the prior written approval of Dürkopp Adler AG Copyright Dürkopp Adler AG 2016 IMPORTANT READ CAREFULLY BEFORE USE KEEP FOR FUTURE REFERENCE ...

Страница 3: ...nd assembling the throat plate 22 3 3 10 Disassembling and assembling the feed dog 23 3 4 Flats on shafts 24 3 5 Locking the machine in place 24 3 6 Setting the handwheel into position 26 4 Positioning the arm shaft 27 5 Positioning the toothed belt wheels 29 5 1 Positioning the toothed belt wheel on the motor shaft 29 5 2 Positioning the upper toothed belt wheel 30 5 3 Positioning the lower tooth...

Страница 4: ...sioning spring 69 15 Winder 70 15 1 Setting the winder 70 15 2 Setting the winder wheel 73 15 3 Setting the hook thread guide 74 16 Thread cutter 75 16 1 Setting the height of the thread pulling knife 75 16 2 Setting the cutoff curve 76 16 3 Setting the cutting pressure 78 16 4 Setting point in time for cutting 79 17 Short thread cutter 81 17 1 Setting the locking latch 84 17 2 Setting the thread ...

Страница 5: ... 19 3 1 Setting the bobbin piece counter 102 20 Maintenance 105 20 1 Cleaning 106 20 1 1 Areas requiring special cleaning 107 20 1 2 Cleaning the motor fan mesh 108 20 2 Lubricating 109 20 2 1 Checking the oil level 110 20 2 2 Lubricating the gear 111 20 3 Servicing the pneumatic system 113 20 3 1 Setting the operating pressure 113 20 3 2 Draining the water condensation 114 20 3 3 Cleaning the fil...

Страница 6: ...Table of Contents 4 Service Instructions 1767 00 0 12 2016 ...

Страница 7: ...nstructions intended These instructions are intended for Specialists This group has the appropriate technical training for performing maintenance or repairing malfunctions With regard to minimum qualification and other requirements to be met by personnel please also follow the chapter Safety p 9 1 2 Representation conventions symbols and characters Various information in these instructions is repr...

Страница 8: ...y control panel Important Special attention must be paid to this point when performing a step Information Additional information e g on alternative operating options Order Specifies the work to be performed before or after a setting References Reference to another section in these instructions Safety Important warnings for the user of the machine are specifically marked Since safety is of particul...

Страница 9: ...dards and regulations Dürkopp Adler cannot be held liable for any damage resulting from Breakage and damage during transport Failure to observe these instructions Improper use Unauthorized modifications to the machine Use of untrained personnel Use of unapproved parts Transport Dürkopp Adler cannot be held liable for breakage and transport damages Inspect the delivery immediately upon receiving it...

Страница 10: ...About these instructions 8 Service Instructions 1767 00 0 12 2016 ...

Страница 11: ...ts could impair safety and damage the machine Only use original parts from the manufacturer Transport Use a lifting carriage or forklift to transport the machine Raise the machine max 20 mm and secure it to prevent it from slipping off Setup The connecting cable must have a power plug approved in the relevant country The power plug may only be assembled to the power cable by qualified specialists ...

Страница 12: ...d in warnings Warnings in the text are distinguished by color bars The color scheme is based on the severity of the danger Signal words indicate the severity of the danger Signal words Signal words and the hazard they describe Symbols The following symbols indicate the type of danger to personnel Signal word Meaning DANGER with hazard symbol If ignored fatal or serious injury will result WARNING w...

Страница 13: ... fatal injury if ignored This is what a warning looks like for a hazard that could result in moderate or minor injury if the warning is ignored Puncture Crushing Environmental damage Symbol Type of danger DANGER Type and source of danger Consequences of non compliance Measures for avoiding the danger WARNING Type and source of danger Consequences of non compliance Measures for avoiding the danger ...

Страница 14: ...vi ronmental damage if ignored This is what a warning looks like for a hazard that could result in property damage if ignored CAUTION Type and source of danger Consequences of non compliance Measures for avoiding the danger NOTICE Type and source of danger Consequences of non compliance Measures for avoiding the danger ...

Страница 15: ... neatly in proper cable snakes 2 Bind together the cable loops with cable ties Important Tie loops wherever possible to fixed parts The cables must be secured firmly 3 Cut off any overlapping cable ties NOTICE Property damage may occur Risk of machine damage from incorrect order It is essential to follow the working order specified in these instructions NOTICE Property damage may occur Machine dam...

Страница 16: ...he individual covers The text for each type of setting work then specifies only the cover that needs to be removed at that particular time 3 3 1 Access to the underside of the machine In order to access the components at the machine bottom section you must first tilt the machine head Fig 1 Access to the underside of the machine CAUTION Risk of injury from moving parts Crushing possible Switch off ...

Страница 17: ...machine head 1 Erect the machine head 3 3 2 Removing and placing the arm cover Fig 2 Removing and placing the arm cover Removing the arm cover To remove the arm cover 2 Loosen the screws 1 3 Remove the arm cover 2 The arm cover and control panel holder are removed jointly Placing the arm cover To place the arm cover 4 Place arm cover 2 and control panel holder 1 Screws 2 Arm cover 3 Slots ...

Страница 18: ...out being pinched 6 Tighten the screws 1 3 3 3 Removing and placing the head cover Fig 3 Removing and placing the head cover Removing the head cover To remove the head cover 1 Loosen the screws 1 2 Remove the head cover 2 Placing the head cover To place the head cover 1 Place the head cover 2 2 Tighten the screws 1 1 Screws 2 Head cover ...

Страница 19: ...ing and placing the rear cover Removing the rear cover To remove the rear cover 1 Loosen the screws 1 2 Remove the rear cover 2 Placing the rear cover To place the rear cover 1 Place the rear cover 2 2 Tighten the screws 1 Important When placing the cover make sure not to pinch any cables 1 Screws 2 Rear cover ...

Страница 20: ...osen the screw 3 2 Pull off the stitch adjustment lever handle 2 3 Switch on the winder 1 4 Loosen the screws 5 5 Remove the front cover 4 Placing the front cover To place the front cover 1 Switch on the winder 1 2 Place the front cover 4 3 Tighten the screws 5 4 Fit the stitch adjustment lever handle 2 5 Tighten the screw 3 1 Winder 2 Stitch adjustment lever handle 3 Screw 4 Front cover 5 Screws ...

Страница 21: ...read regulator 4 Remove the thread guide 2 5 Loosen the equipotential bonding 3 6 Pull off plug 4 and 5 7 Disconnect the compressed air line 6 8 Loosen the screws 1 9 Remove the tensioning plate 7 Assembling the tensioning plate To assemble the tensioning plate 1 Place the tensioning plate 7 2 Tighten the screws 1 3 Connect the compressed air line 6 4 Insert plug 4 and 5 5 Assemble the equipotenti...

Страница 22: ...5 3 3 7 Removing and placing the belt cover Fig 7 Removing and placing the belt cover Removing the belt cover To remove the belt cover 1 Loosen and slightly raise the arm cover 1 2 Loosen screws 2 and 3 3 Remove the belt cover 4 Placing the the belt cover To place the belt cover 1 Place the belt cover 4 2 Tighten screws 2 and 3 1 Arm cover 2 Screw 3 Screws 4 Belt cover ...

Страница 23: ...slide Fig 8 Opening and closing the throat plate slide Opening the throat plate slide To open the throat plate slide 1 Press the clamping spring 3 downwards 2 Push the throat plate slide 1 apart Closing the throat plate slide To close the throat plate slide 1 Slide the throat plate slide 1 up to the throat plate 2 1 Throat plate slide 2 Throat plate 3 Clamping spring ...

Страница 24: ...both screws 1 3 Remove the throat plate 2 Assembling the throat plate To assemble the throat plate 1 Insert the throat plate 2 Ensure that the nose 3 of the bobbin case 4 is in the cutout of the throat plate 2 Tighten both screws 1 3 Close the throat plate slide p 21 CAUTION Risk of injury from sharp and moving parts Puncture or crushing possible Switch off the machine before you disassemble or as...

Страница 25: ...he feed dog To assemble the feed dog 1 Place the feed dog 1 onto the feed dog carrier 2 2 Tighten the screws 3 3 Insert the throat plate p 22 Important Check the feed dog position in its movement at maximum stitch length depending on the equipment 6 9 or 12 by turning the handwheel The feed dog must not hit against the throat plate CAUTION Risk of injury from sharp and moving parts Puncture or cru...

Страница 26: ... connection and makes setting easier Important Ensure that the screws are completely flush with the surface 3 5 Locking the machine in place For some settings the machine must be locked in place To do this the locking peg from the accessory pack is inserted into a slot on the arm shaft crank blocking the arm shaft Fig 12 Locking the machine in place 1 1 Flat 2 Shaft 2 1 1 Locking peg 2 Large arres...

Страница 27: ... needle bar Fig 13 Locking the machine in place 2 Locking the machine in place To lock the machine in place 1 Remove the plug from the locking opening 6 2 Turn the handwheel until the appropriateslot 5 is in front of thelocking opening 6 Small slot at handwheel position 0 Large slot at handwheel position 200 205 3 Insert the locking peg 7 with the appropriate end into the slot 5 Removing the lock ...

Страница 28: ... For some settings the graduated scale on the handwheel has to be moved to a certain position Fig 14 Setting the handwheel into position To set the handwheel into position 1 Turn the handwheel until the required number on the graduated scale 2 is next to the marking 1 1 Marking 2 Graduated scale ...

Страница 29: ...s flush with the flat of the arm shaft 5 or offset slightly toward the rear Cover Remove the arm cover p 15 Remove the head cover p 16 Remove the front cover p 18 Disassemble the tensioning plate p 19 Fig 15 Positioning the arm shaft crank CAUTION Risk of injury from moving parts Crushing possible Switch off the machine before you check and set the position of the arm shaft crank 1 Ball bearing 2 ...

Страница 30: ...016 To position the arm shaft 1 Loosen the threaded pins 3 2 Turn the arm shaft so that the threaded pins 3 are seated flush on the flat 3 Position the arm shaft so that the face of the arm shaft 5 is flush with the face of the crank 4 4 Tighten the threaded pins 3 ...

Страница 31: ...emove the belt cover p 20 Fig 16 Positioning the toothed belt wheel on the motor shaft To position the toothed belt wheel on the motor shaft 1 Fit the adjusting spring 3 into the slot 2 of the toothed belt wheel 4 2 Push the toothed belt wheel 4 with the adjusting spring 3 up against the motor shaft 3 Tighten the threaded pins 1 CAUTION Risk of injury from moving parts Crushing possible Switch off...

Страница 32: ...g 2 abuts on the locking ring 1 Cover Remove the arm cover p 15 Remove the front cover p 18 Remove the belt cover p 20 Fig 17 Positioning the upper toothed belt wheel To position the upper toothed belt wheel 1 Loosen the threaded pins 4 2 Turn the toothed belt wheel 3 such that the threaded pins 4 are seated flush on the flat of the arm shaft 3 Tighten the threaded pins 4 1 Locking ring 2 Ball bea...

Страница 33: ...g 3 Cover Remove the belt cover p 20 Tilt the machine head p 14 Fig 18 Positioning the lower toothed belt wheel To position the lower toothed belt wheel 1 Unscrew the lower belt cover 2 Loosen the threaded pins 2 3 Turn the toothed belt wheel 1 such that the threaded pins 2 are seated on the flat of the arm shaft 4 Tighten the threaded pins 2 such that the first screw in the direction of rotation ...

Страница 34: ...e toothed belt tension To set the toothed belt tension 1 Loosen the screw 2 2 Turn the eccentric 1 3 Check and if necessary readjust the toothed belt tension Information The toothed belt tension is set to the optimum value when the belt oscillates at 75 Hz Check the oscillation for instance using a device made by Contitech 4 Tighten the screw 2 1 Eccentric 2 Screw ...

Страница 35: ...scale Cover Remove the arm cover p 15 Remove the front cover p 18 Remove the belt cover p 20 Fig 20 Setting the handwheel scale 1 To set the handwheel scale 1 Place the handwheel flange 1 on the shaft The handwheel flange 1 abuts on the toothed belt wheel 2 2 Loosen the screws 3 CAUTION Risk of injury from moving parts Crushing possible Switch off the machine before you check and set the position ...

Страница 36: ...l scale 34 Service Instructions 1767 00 0 12 2016 3 Lock the machine in place at position 2 Fig 21 Setting the handwheel scale 2 4 Turn the handwheel to the 0 position 5 5 Tighten the screws 3 5 Handwheel in the 0 position ...

Страница 37: ...ed or damaged Proper setting The threaded pins 1 next to the safety snap on coupling 2 must be parallel to one another After the coupling has disengaged they are no longer parallel Cover Tilt the machine head p 14 Fig 22 Latching the safety snap on coupling 1 CAUTION Risk of injury from moving parts Crushing possible Switch off the machine before you latch check or set the safety snap on coupling ...

Страница 38: ...y snap on coupling 2 So latch the safety snap on coupling 1 Press and hold the button 3 on the upper side of the throat plate The pin 4 must be seated in the hole 5 2 Turn the handwheel until the threaded pins 1 are in parallel position The safety snap on coupling latches into place 3 Button 4 Pin 5 Hole ...

Страница 39: ... 18 Fig 24 Setting the stitch length adjusting wheel CAUTION Risk of injury from moving parts Crushing possible Switch off the machine before you set the stitch length adjusting wheel NOTICE Property damage may occur Risk of machine damage if the shaft is turned too hard If you turn the shaft too far parts on the stitch regulator gear may bend or get stuck Turn the shaft carefully and stop as soon...

Страница 40: ...wise as far as it will go The stitch length is 0 9 Place the stitch length adjusting wheel 1 on the spindle 4 10 Tighten the stitch length adjusting wheel 1 using the screw 2 8 1 Setting the stitch length limit Not all stitch lengths may be available depending on the sewing equipment used Proper setting 1 Turn the stitch length counterclockwise as far as it will go The stitch length adjusting whee...

Страница 41: ...emove the stitch length adjusting wheel 1 5 Loosen the threaded pin from one of the holes 3 or 4 6 Screw the threaded pin into the hole for the required maximum stitch length The holes are marked with numbers for the stitch length 7 Turn the scale so that the 0 is exactly next to the adjusting mark 8 Assemble the stitch length adjusting wheel 1 and hold it in place 9 Tighten the screw 2 1 Stitch l...

Страница 42: ...h 1 To set the basic eccentric setting for forward stitch and backward stitch 1 Set the stitch length adjusting wheel to 0 2 Loosen the screw 1 3 Insert the locking pin 4 into the hole 3 and center it in the slot 2 4 Tighten the screw 1 Fig 27 Setting the basic eccentric setting for forward stitch and backward stitch 2 5 Tilt the machine p 14 6 Loosen the screw 5 7 Set the clips 6 to parallel posi...

Страница 43: ...s set to 0 the feed dog is exactly in the center of the throat plate cutout both sideways and in the sewing direction The needle must enter the needle hole precisely in the center Various settings can be made depending on how far the position of the feed dog differs from the correct setting For minimal deviations it suffices to move the feed dog on the carrier p 42 If this is not sufficient move t...

Страница 44: ... Fig 28 Moving the feed dog To move the feed dog 1 Loosen the screws 3 2 Move the feed dog 1 on the feed dog carrier 2 Place the removed throat plate next to it as an aid for orientation so that the feed dog can be screwed on straight 3 Tighten the screws 3 1 Feed dog 2 Feed dog carrier 3 Screws 2 3 1 ...

Страница 45: ...5 Move the feed dog carrier perpendicular to the sewing direction so that the feed dog is exactly in the center of the throat plate cutout 6 Push the adjusting rings 4 toward each other as far as they will go Important Make sure that the sliding shaft 3 is tightened by the adjusting rings 7 Tighten the threaded pins for the adjusting rings 4 8 Move the feed dog carrier in the sewing direction such...

Страница 46: ...ht and the stroke movement of the feed dog all have to be set Order First check the following setting Feed dog position p 41 9 2 1 Setting the feed eccentric Cover Remove the front cover p 18 Fig 30 Setting the feed eccentric CAUTION Risk of injury from moving parts Crushing possible Switch off the machine before you set the feed dog movement 1 Locking pin 2 Markings 3 Eccentric 4 Screws ...

Страница 47: ...t the following setting first Set the feed eccentric p 44 Proper setting The screw of the compensating weight 2 must be parallel to the 1st screw in the rotational direction 5 of the eccentric 4 Cover Remove the front cover p 18 Fig 31 Setting the compensating weight To set the compensating weight 1 Loosen the screw 1 2 Turn the compensating weight 2 until the screw of the compensating weight 1 is...

Страница 48: ...ic Cover Tilt the machine head p 14 Fig 32 Setting the feed stroke eccentric To set the feed stroke eccentric 1 Lock the machine in place in the loop stroke position using the locking pin 1 The needle is in the loop stroke position 2 Loosen the screws 4 on the eccentric 3 3 Turn the eccentric 3 until the markings 2 line up 4 Tighten the screws 4 1 Locking pin 2 Markings 3 Eccentric 4 Screws ...

Страница 49: ... throat plate In machines with short thread cutters KFA the upper edge of the feed dog protrudes 0 8 mm above the throat plate Cover Disassemble the tensioning plate p 19 Tilt the machine head p 14 Fig 33 Setting the feed dog height at top dead center To set the feed dog height at top dead center 1 Move the handwheel into the 185 position 2 Loosen the threaded pins 2 for the lever 1 3 Turn the lev...

Страница 50: ...ting wheel to 0 The needle pierces exactly in the center of the feed dog needle hole 10 1 Aligning the needle bar linkage sideways Cover Remove the arm cover p 15 Remove the head cover p 16 Disassemble the tensioning plate p 19 Remove the front cover p 18 Fig 34 Aligning the needle bar linkage sideways 1 CAUTION Risk of injury from moving parts Crushing possible Switch off the machine before align...

Страница 51: ...ng the needle bar linkage sideways 2 4 Loosen both threaded pins 8 on the arm shaft crank 9 Make sure that the threaded pins stay on the surface 5 Move the needle bar linkage 4 sideways such that the needle pierces exactly in the center of the needle hole for the feed dog 6 Push the two adjusting rings 2 inwards as far as they will go and tighten them 7 Tighten the threaded pins 1 on the two adjus...

Страница 52: ... thread lever 5 relative to the arm shaft crank 9 There is an equal amount of space on either side Once the tensioning plate has been assembled the thread lever 5 is positioned in the center of the slot 9 Tighten both threaded pins 8 on the arm shaft crank 9 Order Then check the following settings Distance between hook and needle p 52 ...

Страница 53: ...t the machine head p 14 Fig 37 Aligning the needle bar linkage in the sewing direction To align the needle bar linkage in the sewing direction 1 Loosen the screw 1 2 Move the needle bar linkage 2 such that the needle pierces in the center of the needle hole 3 Tighten the screw 1 Order Then check the following setting Loop stroke position p 54 1 Screw 2 Needle bar linkage ...

Страница 54: ...p and the groove of the needle is 0 1 mm Cover Tilt the machine head p 14 Open the throat plate slide p 21 CAUTION Risk of injury from sharp and moving parts Puncture or crushing possible Switch off the machine before adjusting the hook and needle settings NOTICE Property damage may occur There is a risk of machine damage needle breakage or damage to the thread if the distance between hook and nee...

Страница 55: ...clockwise to swivel down the needle guard 8 4 Move the hook support 4 sideways such that the distance between the hook tip 6 and the groove for the needle 5 is 0 1 mm at most without the hook tip 6 touching the needle 5 Tighten the screws 3 Important 6 Check the loop stroke position p 54 7 Tighten the threaded pins 2 for the clamping ring 1 8 Remove the lock p 24 1 Clamping ring 2 Threaded pins 3 ...

Страница 56: ...he hook tip is exactly on the vertical center line of the groove for the needle Checking the position of the hook tip Order First check the following settings Needle bar linkage p 48 A straight and undamaged needle has to be inserted Operating Instructions Latch the safety snap on coupling p 35 Proper setting 1 Lock the machine in place at position 1 p 24 The hook tip 2 points exactly to the verti...

Страница 57: ...he hook tip Setting the loop stroke position Cover Tilt the machine head p 14 Disassemble the throat plate p 22 Disassemble the feed dog p 23 Fig 41 Setting the loop stroke position 1 Vertical center line of the needle 2 Hook tip 1 Clamping ring 2 Threaded pins 3 Vertical center line of the needle 4 Hook tip ...

Страница 58: ... p 24 Order Then check the following settings Position of the needle guard p 58 Timing of cutting by the thread cutter p 79 11 3 Setting the needle bar height Order First check the following settings Loop stroke position p 54 A straight and undamaged needle has to be inserted Operating Instructions Proper setting 1 Lock the machine in place at position 1 p 24 2 Set the stitch length adjusting whee...

Страница 59: ...e screw 2 of the needle bar 1 4 Move the height of the needle bar 1 such that the hook tip 4 is level with the lower third of the groove for the needle Important When doing so take care not to twist the needle bar to the side The groove 3 must face toward the hook 5 Tighten the screw 2 for the needle bar 1 6 Remove the lock p 24 Order Then check the following setting Position of the needle guard p...

Страница 60: ...uctions Proper setting 1 Lock the machine in place at position 1 p 24 The needle guard pushes the needle just enough away so that it cannot be touched by the hook tip Cover Disassemble the feed dog p 23 Fig 43 Setting the needle guard NOTICE Property damage may occur There is a risk of machine damage needle breakage or damage to the thread if the distance between needle groove and hook tip is inco...

Страница 61: ...d 1 Turn the handwheel and check how far the needle guard 2 pushes the needle away 2 Turn the screw 1 such that the needle guard 2 just pushes the needle 3 far away enough so that it cannot be touched by the hook tip For pushing away more Turn counterclockwise For pushing away less Turn clockwise ...

Страница 62: ...tip is located below the bobbin case lifter the bobbin case lifter must open so that the thread can also slide past in that position So that the thread can slip through without a problem the width of the lifting gap and the timing of opening have to be set Disturbance Thread breaking Formation of loops on the bottom side of the seam Loud machine noise CAUTION Risk of injury from moving parts Crush...

Страница 63: ...14 Open the throat plate slide p 21 Fig 45 Setting the lifting gap To set the lifting gap 1 Loosen the screw 3 2 Push the cover 2 downwards 3 Loosen the threaded pin 1 4 Set the bobbin case lifter such that the gap between the nose of the bobbin case and the slot in the throat plate is just big enough to allow the needle thread to slip through without a problem Important Ensure that the gap is not...

Страница 64: ...d p 14 Fig 46 Setting the timing for opening To set the timing for opening 1 Remove the plug 1 on the bottom side of the hook housing 2 2 Loosen the threaded pin 4 through the slot 3 Turn the handwheel until the hook tip is exactly below the bobbin case lifter 4 Use the hex key to turn the control cam 3 such that the bobbin case lifter opens at the correct point in time 5 Tighten the threaded pin ...

Страница 65: ...ing the stroke movement for the feeding foot In order to ensure a correct feed the stroke movement for the feeding foot must be aligned to the stroke movement for the feed dog Order First check the following settings Feed dog movement p 44 Even sewing foot stroke p 65 CAUTION Risk of injury from sharp and moving parts Puncture or crushing possible Switch off the machine before adjusting the sewing...

Страница 66: ... the feed dog 2 when the downward movement of the needle tip 3 reaches the upper edge of the feeding foot This will occur when the handwheel is in the 95 position Fig 48 Checking the stroke movement for the feeding foot Setting the eccentric Cover Remove the front cover p 18 Fig 49 Setting the stroke movement for the feeding foot 1 Feeding foot 2 Feed dog 3 Needle tip 2 1 3 1 Screw 2 Eccentric 3 M...

Страница 67: ... sewing foot stroke Proper setting For sewing foot stroke 3 the presser foot and feeding foot are raised by the same height Cover Remove the arm cover p 15 Fig 50 Setting an even sewing foot stroke To set an even sewing foot stroke 1 Check the sewing foot stroke 2 Loosen the screw 3 NOTICE Property damage may occur Machine can be damaged if the adjusting wheels are forced Do not attempt to use for...

Страница 68: ...tting the adjusting frame Fig 51 Setting the adjusting frame To set the adjusting frame 1 Turn the handwheel to the 0 position 2 Place a 3 mm hex key under the feeding foot 3 Loosen the screws 3 4 Position the adjusting wheel for the sewing foot stroke 1 to level 3 5 Manually lower the feeding foot down onto the hex key 6 Center the stroke lever 4 in the slot 2 7 Tighten the screws 3 Important 8 E...

Страница 69: ...distance between the raised sewing feet and the throat plate is preset to 20 mm on delivery Cover Remove the rear cover p 17 Fig 52 Setting the sewing foot lifting height To set the lifting height of the sewing foot 1 Loosen the counternut 2 for the adjusting screw 1 CAUTION Risk of injury from moving parts The machine must remain switched on so that the sewing feet can be raised Crushing possible...

Страница 70: ...n the adjusting screw 1 to set the distance between the raised sewing feet and the throat plate To raise the sewing feet to a lesser height Turn clockwise To raise the sewing feet higher Turn counterclockwise 3 Tighten the counternut 2 for the adjusting screw 1 ...

Страница 71: ... material Important The setting for the thread tensioning spring must be varied according to the sewing material and the required sewing result Fig 53 Setting the thread tensioning spring To set the thread tensioning spring 1 Loosen the screw 4 2 To set the spring travel Turn the stop collar 1 Longer spring travel Turn counterclockwise Shorter spring travel Turn clockwise 3 To set the spring tensi...

Страница 72: ...bbin is reached Cover Remove the arm cover p 15 Disassembling the winder and setting the winder filling quantity Fig 54 Disassembling the winder and setting the winder filling quantity To disassemble the winder and set the winder filling quantity 1 Loosen the screws 1 2 Remove the winder CAUTION Risk of injury from moving parts Crushing possible Switch off the machine before setting the winder 1 S...

Страница 73: ...o the thread Setting the winder spacing Fig 55 Setting the winder spacing To set the winder spacing 6 Turn the winder spindle 12 such that the thread pulling knife 11 is at the top right and is facing the right hand screw hole 13 7 Loosen the threaded pin in the block 5 8 Set the winder lever 3 such that the upper arm is above the marking for the XXL hook 15 The distance between the winder lever a...

Страница 74: ...is just contacting the leaf spring 10 when the block 5 has engaged in the locking disk 14 Set the switch cam 9 such that the winder lever 3 has no axial play 15 Tighten the threaded pin 8 Assembling the winder Fig 57 Assembling the winder To assemble the winder 16 Place the winder on the machine arm 17 Tighten the screws 1 5 Block 6 Winder wheel 7 Threaded pin 8 Threaded pin 9 Switch cam 10 Leaf s...

Страница 75: ...ing the winder wheel Cover Remove the front cover p 18 Fig 58 Setting the winder wheel To set the winder wheel 1 Loosen the screws 3 2 Switch off the winder 1 3 Set the distance 2 between the wheels to 0 8 mm 4 Tighten the screws 3 1 Winder 2 Distance 3 Screws ...

Страница 76: ...o the winder Proper setting The thread is wound on evenly over the entire width of the bobbin Fig 59 Setting the hook thread guide To set the hook thread guide 1 Loosen the screw 1 2 Turn the hook thread guide 2 To the front The thread will be wound on further to the front To the rear The thread will be wound on further to the rear 1 Screw 2 Hook thread guide ...

Страница 77: ...he thread pulling knife 2 Important When changing the knives make sure that you do not lose the washers Proper setting The thread pulling knife 2 pivots as close as possible above the hook and is at the same height as the counter blade 1 Cover Open the throat plate slide p 21 Fig 60 Setting the height of the thread pulling knife CAUTION Risk of injury from sharp and moving parts Puncture or crushi...

Страница 78: ...ing The control cam 4 makes direct contact with the clamping ring 1 The distance between the widest extent 6 of the control cam 4 and the roller 3 is 0 1 mm at most In resting position the circle mark on the cutting edge of the thread pulling knife is exactly next to the tip of the counter blade Cover Tilt the machine head p 14 Open the throat plate slide p 21 Fig 61 Setting the cutoff curve 1 To ...

Страница 79: ...idest extent 6 and the roller 3 is 0 1 mm at most 8 Tighten the threaded pins 5 9 Loosen the clamping screw 8 on the actuating lever 7 Fig 62 Setting the cutoff curve 2 10 Turn the thread pulling knife 12 such that the circle mark is exactly next to the tip of the counter blade 11 11 Tighten the clamping screw 8 on the actuating lever 7 such that the actuating lever 7 has no axial play 12 Loosen a...

Страница 80: ...e pressure is too great Problems when sewing on if the hook thread clamp is too high Problems in cutting the thread Cover Open the throat plate slide p 21 Fig 63 Setting the cutting pressure To set the cutting pressure 1 Turn the handwheel until the thread pulling knife 3 can be swung out by hand 2 Loosen the screw 1 3 Position the thread pulling knife 3 such that the arrow mark is exactly next to...

Страница 81: ...right hand needle or the right hand hook support is identified by an R and an arrow for the direction of rotation The control cam for the left hand needle or the left hand hook support is identified by an L and an arrow for the direction of rotation Cover Tilt the machine head p 14 Open the throat plate slide p 21 Fig 64 Setting point in time for cutting To set the point in time for cutting 1 Loos...

Страница 82: ... clamping ring 2 6 Turn the control cam 3 such that the roller 1 runs up at the contour of the control cam 3 and the widest extent of the control cam is at handwheel position 60 at the highest point 7 Tighten the threaded pins 4 8 Check setting Insert the thread into the thread pulling knife 6 and slowly turn the handwheel Check the handwheel position at which the thread is cut If necessary repeat...

Страница 83: ...bar must be at the top dead center when the handwheel position is 0 p 33 The hook bearing must be set correctly p 52 CAUTION Risk of injury from sharp and moving parts Puncture or crushing possible Switch off the machine before adjusting the thread cutter settings NOTICE Property damage may occur Risk of breakage The reverse motion lock for the bobbin case is on the thread pulling knife Never oper...

Страница 84: ...n set at the factory using adjusting washers between thread pulling knife 1 and knife carrier 3 When changing the knives make sure that you do not lose the adjusting washers Important The height of the thread pulling knife is determined by the height of the counter blade The upper edges of the two knives must be on the same level 1 Thread pulling knife 2 Counter blade 3 Knife carrier ...

Страница 85: ...is rotated by 180 In rest position the thread pulling knife 1 completely covers the cutting edge of the counter blade 2 This prevents the needle thread from being damaged The pivot range of the thread pulling knife is 23 The control cam 5 is designed for operating with the large hook and the XXL hook The control cam 5 can be on the right hand side label is right side up or on the left side label i...

Страница 86: ...2 Press the roller 2 against the control cam 3 The locking latch 1 can be swung out without clamping and the distance between the locking latch 1 and locking pin 6 is not greater than 0 1 mm Fig 67 Setting the locking latch To set the locking latch 1 Loosen the nut 4 2 Turn the screw 5 and set the distance 3 Tighten the nut 4 1 Locking latch 2 Roller 3 Control cam 4 Nut 5 Screw 6 Locking pin ...

Страница 87: ...crews on the clamping ring 6 and push the clamping ring 6 toward the hook bearing 2 Tighten all 4 screws on the clamping ring 6 3 Loosen both threaded pins on the control cam 7 4 Turn the lever 8 as far as it will go against the screw 10 5 Set the distance between the roller 5 and the highest point of the control cam 7 to 0 1 mm 6 Tighten both threaded pins on the control cam 7 7 Loosen the clampi...

Страница 88: ...be neatly cut simultaneously Fig 69 Setting the counter blade To set the counter blade 1 Turn the handwheel until the thread pulling knife 1 can be swung out after the latch is triggered 2 Swing out the thread pulling knife 1 manually To do this press the clamp with the roller 3 to the right against the control cam 4 3 Insert 2 threads into the thread pulling knife 1 4 Turn the handwheel until the...

Страница 89: ...etting the cutting pressure To set the cutting pressure 1 Swing out the thread pulling knife 1 until the marking 2 is next to the cutting edge of the counter blade 5 2 Loosen the screw 6 3 Place the counter blade 5 in position against the thread pulling knife 1 4 Tighten the screw 6 1 Thread pulling knife 2 Marking 5 Counter blade 6 Screw ...

Страница 90: ...7 with the roller to the right 3 against the control cam 5 4 Insert a thread into the thread pulling knife 1 5 Use the handwheel to turn the machine until the thread is cut shortly before reaching the marking 2 6 Check if the cut was made at the 65 position on the handwheel To set the cutoff position 1 Loosen the threaded pins 6 on the control cam 5 2 Move the control cam 5 towards the clamping ri...

Страница 91: ...next to it Cover Remove the arm cover p 15 Fig 72 Setting the potentiometer 1 To set the potentiometer 1 Switch off the machine 2 Keep the P button 2 button and the Reset button 4 pressed down simultaneously and switch on the machine at the main power switch in doing so The display starts 3 Release the P button 2 and the Reset button 4 The display indicates the current level WARNING Increased risk...

Страница 92: ...otentiometer 2 6 Turn the adjusting wheel for the sewing foot stroke 6 to 3 7 Loosen the threaded pin 7 8 Turn the potentiometer axle such that the left display shows 4 in the first instance and the relevant maximum speed next to it 9 Tighten the threaded pin 7 without changing the value shown in the display Important Ensure that the potentiometer 8 is guided on the pin 9 10 Press the ESC button 2...

Страница 93: ...rol panel OP1000 19 1 1 Display The display of the control panel is divided into User levels Categories Parameters Parameter list Fig 75 Display The user level A includes 0 user t technician 1 Thread button group 2 Function button 3 Programming button group 4 Seam program button group 5 LED for second stitch length 6 POWER LED 7 Display A User level B Category D Parameter ...

Страница 94: ...ns and functions No Button Function Reference Thread button group Start bartack Sets the start bartack p 96 Multiple start bartack Sets the multiple start bartack p 97 End bartack Sets the end bartack p 98 Multiple end bartack Sets the multiple end bartack p 99 Thread cutter Activates or deactivates the thread cutter p 99 Thread clamp Activates or deactivates the thread clamp p 99 Needle position ...

Страница 95: ...on Activates or deactivates any stored function Programming button group ESC Ends parameter mode A Increases parameter Changes user level Selects subprogram B Increases parameter Changes to next higher category Selects subprogram C Increases parameter Selects subprogram D Increases parameter Selects subprogram OK Calls parameter or saves it P Starts or ends the parameter mode A Decreases parameter...

Страница 96: ...m D Decreases parameter Selects subprogram Reset Resets the piece counter Seam program button group Seam program I Activates seam program I Instructions for use DAC basic classic Seam program II Activates seam program II Instructions for use DAC basic classic Seam program III Sets seam program III Instructions for use DAC basic classic No Button Function Reference ...

Страница 97: ...on 1 Press the corresponding button on the control panel You will recognize which machine function has been activated by the LED in the respective button When the LED illuminates you can sew Changes are only possible outside of a seam Button group Use Thread For sewing only Activate machine functions Set simple machine functions Programming For the entire sewing process Set advanced machine functi...

Страница 98: ...eam of forward and backward stitches is called a double bartack Single bartack To set the single bartack 1 Press The LED at the lower right illuminates 2 Press the B button from the Programming button group repeatedly until the required number of backward stitches is reached You can begin sewing press the pedal forward to pedal position 1 Double bartack To set the double bartack 1 Press twice Both...

Страница 99: ...d number of repetitions is reached 5 Confirm your selection with 19 2 3 Using the multiple start bartack as the darning program Information The darning program is only supported by certain classes Order If you want to use the multiple start bartack as the darning program it has to be released in advance by qualified specialists The darning program offers the following functions The thread is cut a...

Страница 100: ...the C button from the Programming button group repeatedly until the required number of forward stitches is reached You can begin sewing press the pedal forward to pedal position 1 At the end of the seam press the pedal back to pedal position 2 Double bartack To set the double bartack 1 Press twice Both LEDs illuminate 2 Press the C button from the Programming button group repeatedly until the requ...

Страница 101: ...ed number of backward stitches is reached 4 Press the A button repeatedly until the required number of repetitions is reached 5 Confirm your selection with You can begin sewing press the pedal forward to pedal position 1 At the end of the seam press the pedal back to pedal position 2 19 2 6 Activating the thread cutter The thread cutter automatically cuts the thread at the seam end To activate the...

Страница 102: ...tes i e the needle is raised after a sewing stop If the needle is to be in the bottom dead center after a sewing stop press again 19 2 9 Activating sewing foot lift after thread cutter The sewing foot lift after thread cutter lifts the sewing foot after the thread is cut To activate the sewing foot lift after thread cutter 1 Press The LED illuminates 19 2 10Activating sewing foot lift after sewing...

Страница 103: ...t 1 Press The LED illuminates 19 2 12Reducing speed The reduced speed protects the motor with an ongoing lower speed Reduced speed is set at the factory as the default To activate the reduced speed 1 Press The LED illuminates To adjust the speed 1 Press 2 Press the C button from the Programming button group The reduced speed increases by one hundredth 3 Press the D button The reduced speed increas...

Страница 104: ...bobbin piece counter outputs a message when the entered number of stitches is reached The number of stitches should approximately deter mine when the hook thread is depleted Thus you avoid having to repeat work processes The bobbin stitch counter must be set for every thread type The value to be set i e 8000 is the product of the default value reset value and the number of stitches factor Button U...

Страница 105: ...e parameter 01 to set the reset value for bobbin stitch counter A 3 Press The LED of the button flashes 4 Use the D or D button to set the reset value to 400 5 Confirm your selection with 6 Press the D button repeatedly until 04 appears on the display Use parameter 04 to set the factor 7 Press The LED of the button flashes 8 Use the D or D button to set the factor to 20 9 Confirm your selection wi...

Страница 106: ...er 1 Press Parameter mode is started 2 Press the B button of the Programming button group repeatedly until 06 appears on the display If parameter 00 does not appear Press the D button repeatedly until the parameter appears on the display 3 Press The LED of the button flashes 0 appears on the display 4 Press the D button 1 appears on the display 5 Confirm your selection with The bobbin stitch count...

Страница 107: ...intenance work switch off the machine or set the machine to threading mode WARNING Risk of injury from moving parts Crushing possible Prior to any maintenance work switch off the machine or set the machine to threading mode Work to be carried out Operating hours 8 40 160 500 1000 Machine head Remove fluff lint and thread remnants Clean the motor fan mesh Check the oil level Lubricating the gear Pn...

Страница 108: ... the compressed air gun so that the particles do not fly close to people Make sure no particles fly into the oil pan NOTICE Property damage from soiling Lint and thread remnants can impair the operation of the machine Clean the machine as described NOTICE Property damage from solvent based cleaners Solvent based cleaners will damage paintwork Use only solvent free substances for cleaning ...

Страница 109: ...aterial the machine should be cleaned more frequently Fig 76 Areas requiring special cleaning Check and clean daily Cutter on the winder 4 Area under the throat plate 3 Hook 2 Area around the needle 1 To clean areas that are susceptible to soiling 1 Switch off the machine 2 Remove any lint and thread remnants using a compressed air gun or a brush 1 Area around the needle 2 Hook 3 Area under the th...

Страница 110: ...0 operating hours using a compressed air gun If very fluffy sewing material is being sewn the motor fan mesh must be cleaned more frequently Fig 77 Cleaning the motor fan mesh To clean the motor fan mesh 1 Switch off the machine 2 Remove the arm cover 3 Remove any lint and thread remnants using a brush 1 Areas requiring cleaning 2 Motor ...

Страница 111: ...of injury from contact with oil Oil can cause a rash if it comes into contact with skin Avoid skin contact with oil If oil has come into contact with your skin wash the affected areas thoroughly NOTICE Property damage from incorrect oil Incorrect oil types can result in damage to the machine Only use oil that complies with the data in the instructions CAUTION Risk of environmental damage from oil ...

Страница 112: ...l 1 Check the oil level indicator every day The oil level must be between the minimum level mark 3 and the maximum level mark 2 Topping off the oil To top off the oil 1 Pour in oil through the refill opening 1 Add oil up to but not past the maximum level marking 1 Refill opening 2 Maximum level marking 3 Minimum level marking MAX M I N ...

Страница 113: ...111 20 2 2 Lubricating the gear Lubricating the upper gear Cover Remove the arm cover p 15 Fig 79 Lubricating the upper gear To lubricate the upper gear 1 Loosen the screws 1 2 Remove the plate 2 3 Spread grease across the gear 3 1 Screws 2 Plate 3 Gear ...

Страница 114: ...nce 112 Service Instructions 1767 00 0 12 2016 Lubricating the lower gear Cover Remove the front cover p 18 Fig 80 Lubricating the lower gear To lubricate the lower gear 1 Spread grease across the gear 1 1 Gear ...

Страница 115: ... Fig 81 Setting the operating pressure To set the operating pressure 1 Pull the pressure controller 1 up 2 Turn the pressure controller until the pressure gage 2 indicates the proper setting Increase pressure turn clockwise Reduce pressure turn counterclockwise 3 Push the pressure controller 1 down NOTICE Property damage from incorrect setting Incorrect operating pressure can result in damage to t...

Страница 116: ...n a daily basis Fig 82 Draining the water condensation To drain water condensation 1 Disconnect the machine from the compressed air supply 2 Place the collection tray under the drain screw 3 3 Loosen the drain screw 3 completely 4 Allow water to drain into the collection tray 5 Tighten the drain screw 3 6 Connect the machine to the compressed air supply NOTICE Property damage from excess water Exc...

Страница 117: ...osen the filter element 1 5 Blow out the filter element 1 using a compressed air gun 6 Wash out the filter tray using benzine 7 Tighten the filter element 1 8 Tighten the water separator 2 9 Tighten the drain screw 3 10 Connect the machine to the compressed air supply NOTICE Damage to the paintwork from solvent based cleaners Solvent based cleaners damage the filter Use only solvent free substance...

Страница 118: ...Maintenance 116 Service Instructions 1767 00 0 12 2016 20 4 Parts list A parts list can be ordered from Dürkopp Adler Or visit our website for further information at www duerkopp adler com ...

Страница 119: ...rom soiling 6 Cover the control to protect it from soiling 7 Cover the entire machine if possible to protect it from contamination and damage WARNING Risk of injury from a lack of care Serious injuries may occur ONLY clean the machine when it is switched off Allow ONLY trained personnel to disconnect the machine CAUTION Risk of injury from contact with oil Oil can cause a rash if it comes into con...

Страница 120: ...Decommissioning 118 Service Instructions 1767 00 0 12 2016 ...

Страница 121: ...le national regulations When disposing of the machine be aware that it consists of a range of different materials steel plastic electronic components etc Follow the national regulations when disposing these materials CAUTION Risk of environmental damage from improper disposal Improper disposal of the machine can result in serious environmental damage ALWAYS comply with the national regulations reg...

Страница 122: ...Disposal 120 Service Instructions 1767 00 0 12 2016 ...

Страница 123: ...on is too firm Check needle thread tension Thread breaking Needle thread and hook thread have not been threaded correctly Check threading path Needle is bent or sharp edged Replace the needle Needle is not inserted correctly into the needle bar Insert the needle correctly into the needle bar The thread used is unsuitable Use recommended thread Thread tensions are too tight for the thread used Chec...

Страница 124: ...installed incorrectly Check the assembly of the reel stand Thread tensions are too tight Check thread tensions Throat plate hook or spread have been damaged by the needle Have parts reworked by qualified specialists Loose stitches Thread tensions are not adjusted to the sewing material the sewing material thickness or the thread used Check thread tensions Needle thread and hook thread have not bee...

Страница 125: ... the machine and the hook All subclasses are equipped with a bar holding 6 push buttons An additional button panel has been placed within easy reach of the sewer and allows the sewer to assign the same 6 functions of the buttons housed in the button bar Technical data Unit Class Machine type 1767 Type of stitches Double lockstitch 301 Hook type Vertical hook XXL Number of needles 1 2 Needle system...

Страница 126: ...Technical data 124 Service Instructions 1767 00 0 12 2016 ...

Страница 127: ......

Страница 128: ... with additional equipment Printed in Germany Dürkopp Adler AG Original Instructions 7911 767640 EN 00 0 12 2016 DÜRKOPP ADLER AG Potsdamer Straße 190 33719 Bielefeld GERMANY Phone 49 0 521 925 00 E mail service duerkopp adler com www duerkopp adler com ...

Отзывы: