background image

de ELEkTroINSTaLLaTIoN

 gEfahr!

 Die Elektroinstallation darf nur von einer konzessionierten 

Elektroinstallationsfachkraft  vorgenommen  werden.  Länderspezifische 
Normen, örtliche Vorschriften und die Niederspannungsrichtlinien sind 
uneingeschränkt einzuhalten.

ELEkTrISchEraNSchLuSS INSTaLLIErEN

1.  Zuleitung  verlegen  (Combi/Jet  L  mit  Temperaturmodul  zwei 

Zuleitungen):

Spannung 

 50 Hz: 230 V~AC


• 

60 Hz: 220 V~AC

Absicherung: 

I

• 

N

 = 16 A, RCD max. 30 mA

über allpolig trennenden Hauptschalter abschaltbar, ausserhalb der 

• 

Schutzzonen 0, 1 und 2 (Bild B)
3000 mm

• 

2. Potenzialausgleich verlegen, 3000 mm

whIrLwaNNE aNSchLIESSEN, poTENTIaLauSgLEIch hErSTELLEN

1.  Zuleitung(en) an die Netzanschlussdose(n) der Whirlwanne anschließen 

(Bild A), um Störungen zu vermeiden:

 Zuleitung nicht parallel zu den aus der Steuerung kommenden elek-

• 

trischen Leitungen verlegen.
Kabel nicht mit Kabelbindern zusammenfassen.

• 

2.  Potentialausgleich der Whirlwanne mit dem Hauptpotenzialausgleich 

verbinden.

fr raccorDEMENT ELEcTrIQuE

 DaNgEr !   

Le raccordement électrique ne pourra être réalisé que 

par un installateur habilité et  agréé. L‘installation doit être exécutée con-
formément aux normes en vigueur dans le pays, aux recommandations 
locales et aux directives d‘installation d‘un réseau basse tension.

prEparEr LE cIrcuIT prIMaIrE (LIgNE INDIVIDuELLE au DéparT Du 
TaBLEau)

1.  Circuit primaire, recommandation particulière (2 lignes individuelles 

au départ du tableau en présence d‘un module température dans les 

versions Combi L / Jet L):

Voltage 

 50 Hz: 230 V~AC


• 

60 Hz: 220 V~AC

Protection 

 I

• 

N

 = 16 A, RCD max. 30 mA

Circuit interrompable par interrupteur bipolaire à placer en-dehors 

• 

des volumes 0,1,2 (croquis B).
Laisser 3 ml de fil en attente

• 

2. Laisser 3 ml de fil à la terre en attente

raccorDEr La BaIgNoIrE BaLNEo au rESEau ET LIaISoN EQuIpoTEN-
TIELLE

1.  Relier les fils entre réseau et boîtier ( selon croquis A )  L= phase

Eviter de poser les fils du primaire éventuellement en réserve à pro-

• 

ximité du câblage sortant du boîtier électronique.
Eviter également de les regrouper à l‘aide d‘un collier

• 

2. Etablir la liaison équipotentielle.

de 

Elektroinstallation  

en 

Electrical Installation  

en ELEcTrIcaL INSTaLLaTIoN

  DaNgEr! 

The  electrical  installation  may  only  be  carried  out  by  an 

authorized and certified electrician.
The electrical installation has to be carried out in accordance with the coun-
try specific standards for low voltage installations, the local electric power 
company as well as the country-specific standards.

INSTaLL ThE SuppLy LINE

1.  Lay  the  supply  line  (Combi/Jet  L  with  temperature  module  lay  second 

supply lines):

Voltage 

 50 Hz: 230 V~AC


• 

60 Hz: 220 V~AC

Fuse protection   IN = 16 A, RCD max. 30 mA

• 

 must  be  able  to  be  switched  off  with  a  main  switch  separating  all 

• 

poles outside of Zone 0, 1 and 2 (sketch B)
3000 mm

• 

2. Lay the equipotential earth, 3000 mm

coNNEcT ThE whIrLTuB

1.  Connect the supply line(s) to the mains connection box (sketch A), not 

causing operational faults with the control:

Do not position mains cable parallel to extra-low voltage cables of 

• 

the control.
Do not bind the electrical cables together with cable ties.

• 

2. Connect the equipotential earth wire to the connection point.

nl ELEkTrISchE aaNSLuITINg


gEVaar!   

De  elektrische  aansluiting  mag  enkel  door  een  erkend 

lektrotechnicus uitgevoerd worden. De elektrische aansluiting moet over-
eenkomstig de lokale energielever, de nationale normen anciers evenals de 
normen voor laagspanning uitgevoerd worden.

STrooMToEVoEr

1.  Stroomtoevoer  voldoen  (whirlsysteem  Combi/Jet-Systeem  L  met 

temperatuurmodule bijkomende leiding):

Voltage  

 50 Hz: 

230 V~AC


• 

60 Hz: 220 V~AC

beveiliging: 

 I

• 

N

 = 16 A, RCD max. 30 mA

moet  met  een  meerpolige  scheidende  hoofdschakelaar  met  een 

• 

contactopeningsbreedte uitschakelbaar zijn, buiten de zones 0,1 en 
2 van de badkamer aangebracht (afbeelding B)
3000 mm

• 

2. Aarding, 3000 mm

aaNSLuITINg VaN DE STrooMToEVoEr aaN hET BaD

1.  Stroomtoevoerleiding(en) aan de aansluitbox(en) van het whirlsysteem 

aansluiten (Afb. A), om storingen te vermijden:

 Stroomtoevoerleiding  niet  parallel  aan  de  uit  de  sturing  vertrek-

• 

kende elektrische kabels leggen.
Kabels niet met kabelstrips samenvoegen.

• 

2. Aarding van het whirlsysteem met de hoofdaarding verbinden.

10 

MAL_53457/01.10.5

Содержание Combi L Darling New 710238

Страница 1: ...ontage baignoires baln o encastrer Montagehandleiding baden whirlpools inbouwversie Istruzioni di montaggio vasche idromassaggio da incasso Instrucciones de montaje para ba eras de hidromasaje empotra...

Страница 2: ...ispezione 5 Nota 9 Installazione Idraulica 9 Installazione Elettrica 11 Montaggio 14 en Table of contents Explanations of the symbols 3 Scope of delivery 4 Accessories 4 Access Panels 6 Indications 6...

Страница 3: ...di questa avvertenza pu causare lievi infortuni o danni materiali NOTA Indica consigli d uso e altre informazioni utili en Explanations of the symbols Danger Indicates a possible imminent danger Non o...

Страница 4: ...on nl optionele it opzionale es opcional de Lieferumfang en Scope of delivery de Zubeh r en Accessories fr Les accessoires nl Toebehoren it Accessorio es Accesorios fr Mat riel livr nl Standaardpakket...

Страница 5: ...ure di ispezione es Tama o de los registros 5 0 0 500 1 2 200 2 0 0 500 500 200 2 0 0 1 2 de Einsitzer en Individual seat fr Baignoire simple nl 1 persoon it Monoposto es Monoplaza de Doppelsitzer en...

Страница 6: ...ten erlischt die Garantiezusage Es darf auf keinen Fall die Sicherheitsschlaufe des Air Schlauches von der Whirlwanne gel st werden PANELLING OF THE WHIRLPOOL The whirlpool has to be panelled in so th...

Страница 7: ...HET BAD Het systeembad dient zodanig bekleedt te worden dat alle belangrijke aggregaten zoals pompen blower en sturing toegankelijk blijven Indien het bad zou ommuurd worden dient men revisieopeninge...

Страница 8: ...caso smontare l anello di sicurezza del tubo flessibile dell aria REVESTIMIENTO DE LA BA ERA La ba era de hidromasaje debe tener un revestimiento que permita el acceso a todos los grupos importantes c...

Страница 9: ...che con alimentazione integrata si deve installare un tubo fles sibile di allacciamento Per evitare il rischio di rotture tra la vasca idro massaggio e le tubature dell acqua non devono esserci tubi r...

Страница 10: ...t de les regrouper l aide d un collier 2 Etablir la liaison quipotentielle de Elektroinstallation en Electrical Installation en Electrical Installation Danger The electrical installation may only be c...

Страница 11: ...nire i cavi con dei fissacavi 2 Allacciare il collegamento equipotenziale della vasca idromassaggio a quello principale es Instalaci n Electrica PELIGRO La instalaci n el ctrica debe ser realiza confo...

Страница 12: ...n der Wannenanker die Oberkante der Wanne an der Wand anzeichnen Mark the upper edge of the tub on the wall for the wall brackets 7 F r Seadream Wannenankerl cher anzeichnen For Seadream Mark holes fo...

Страница 13: ...den op de muur 7 Pour Seadream Marquer les trous pour les appliques Voor Seadream Teken op de muur aan waar de gaten voor de muursteunen geboord moe ten worden 8 Pour Happy D 700172 700174 Marquer les...

Страница 14: ...superior de la ba era en la pared 7 Per Seadream Segnare la posizione dei fori per le staffe Para Seadream Marque los taladros para los soportes murales 8 Per Happy D 700172 700174 Segnare la posizio...

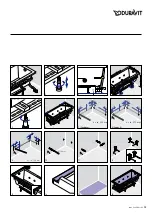
Страница 15: ...10 x ca 70 ca 70 ca 70 X X ca 105 mm 10 mm x ca 105 mm x ca 170 mm 1 2 3 4 5 7 8 Happy D 6 9 10 11 12 13 15 16 14 Seadream MAL_53457 01 10 5 15...

Страница 16: ...tigkeit zu pr fen System 30 Minuten aktivieren Fill the tub to check if the outlet and overflow fittings are water tight Activate system for 30 minutes in order to check water tightness 23 Vor dem Ein...

Страница 17: ...syst me en route durant 30 minute Vul de badkuip helemaal met water om te controleren of het dicht is Het systeem gedurende 30 minuten activeren 23 Evacuer l eau avant l installation d finitive On peu...

Страница 18: ...stema per 30 minuti Llenar la ba era hasta el rebosadero con agua para comprobar la estan queidad Activar el sistema durante 30 minutos 23 Prima di eseguire il lavoro di muratura fare defluire l acqua...

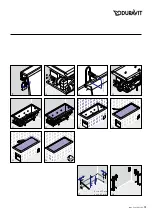
Страница 19: ...24h min 150 mm ca 75 ca 75 X y X ca 437 mm y ca 85 mm 17 18 19 20 21 22 23 24 25 26 27 28 MAL_53457 01 10 5 19...

Страница 20: ...36 78132 Hornberg Germany Phone 49 78 33 70 0 Fax 49 78 33 70 289 info duravit de www duravit de Best Nr 53457 01 10 5 We reserve the right to make technical improvements and enhance the appearance o...

Отзывы: