background image

63

FR

Cher client, 

Toutes nos félicitations pour l’acquisition de ce nouvel 
appareil. Veuillez lire attentivement les instructions 

suivantes  de  branchement  et  d’utilisation  afin  d’éviter 

d’éventuels dommages. Le fabricant ne saurait être tenu 
pour responsable des dommages dus au non-respect 
des consignes de sécurité et à la mauvaise utilisation de 
l’appareil. Scannez le code QR pour avoir accès au dernier 
manuel de l‘utilisateur et à d‘autres informations sur le 
produit.

SOMMAIRE

Consignes de sécurité 64
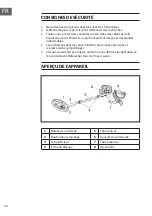
Aperçu de l‘appareil 64
Assemblage 65

Affichages du panneau de commande 68

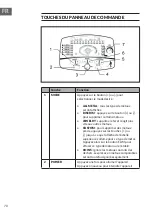
Touches du panneau de commande 70
Mise en marche et test 72
Utilisation a l‘extérieur 77

Identification et résolution des problèmes 81

Conseils pour le recyclage 82

FICHE TECHNIQUE

Numéro d'article

10032724

Alimentation 

4 piles AA (non fournies)

Bobine de recherche

8,5 pouces (~21,5 cm), étanche

DÉCLARATION DE CONFORMITÉ

Fabricant : 

Chal-Tec GmbH, Wallstraße 16, 10179 Berlin, 
Allemagne.

Ce produit est conforme aux directives européennes 
suivantes :

2014/30/UE (CEM)
2011/65/UE (RoHS)

Содержание 10032724

Страница 1: ...10032724 Metalldetektor Metal Detector Detector de metales D tecteur de m taux Metal detector...

Страница 2: ......

Страница 3: ...und weitere Informationen rund um das Produkt zu erhalten INHALTSVERZEICHNIS Sicherheitshinweise 4 Ger te bersicht 4 Zusammenbau 5 Bedienfeld Anzeigen 8 Bedienfeld Tasten 10 Inbetriebnahme und Test 12...

Страница 4: ...olchen die brennbare Gase und Fl ssigkeiten transportieren Das Suchen in milit rische Gebiete ist nicht erlaubt und stellt eine gro e Gefahr da Achten Sie bei der Ausgrabung eines Objektes darauf dass...

Страница 5: ...eraus Befestigen Sie die Suchspule am Unterrohr und verriegeln sie Sie Hinweis Die Gummidichtung muss korrekt montiert sein siehe Bild 2 L sen Sie die Feststellmutter am Mittelrohr dr cken Sie dann de...

Страница 6: ...er fest 4 Stellen Sie die volle L nge des Detektors so ein dass Ihre Arme beim Suchen gerade sind Sobald die gew nschte L nge bestimmt ist ziehen Sie die Feststellmuttern an Dadurch wird die Erkennung...

Страница 7: ...Detektor l ngere Zeit nicht benutzt wird entfernen Sie bitte die Batterien damit sie nicht auslaufen oder rosten 1 2 3 Dr cken Sie die Taste am Batteriefach und schieben Sie es auf Entnehmen Sie das B...

Страница 8: ...steht aus 12 Pfeilen die es erlauben das Zielobjekt m glichst genau zu identifizieren und zu unterschieden Im ALL METAL Modus leuchten alle 12 Anzeigen auf Bei der Wahl der Modi leuchten die ausgeschi...

Страница 9: ...eine starke Leistung an bei geringer Leistung erl schen die Lichter 7 Empfindlichkeit Aanzeige Besteht aus 8 Anzeigen Wenn alle 8 leuchten ist die Empfindlichkeit am h chsten W hlen Sie die Empfindli...

Страница 10: ...chneller auf andere Metalle CUSTOM Um bestimmte Metallarten zu eliminieren dr cken Sie die Taste oder bis der Pfeil der oberen Skala unter dieser Metallart leuchtet Dr cken Sie dann die Taste ELIM um...

Страница 11: ...e Anzeige leuchtet auf dem Bildschirm auf und best tigt die Aktivierung 5 DISCRIM Entfernen Sie Metallarten durch Dr cken der Tasten DISCRIM oder 6 SENS W hlen Sie zwischen 8 verschiedenen Empfindlich...

Страница 12: ...hspule mindestens 30 cm ber das Ende hinausragen sollte Halten Sie die Testobjekte m glichst mittig ber der Suchspule Wichtig Halten Sie den Detektor von anderen Stromquellen fern Bitte entfernen Sie...

Страница 13: ...e Taste DISCRIM bis der Pfeil der oberen Skala unter dem Metall leuchtet das ausgeschlossen werden soll Dr cken Sie erneut die Taste DISCRIM und das Segment in der unteren Skala erlischt wodurch der E...

Страница 14: ...t Um z B die 1 Pfund M nze zu entfernen dr cken Sie die Taste DISCRIM weiter bis der Pfeil der oberen Skala auf die 1 Pfund M nze zeigt Dr cken Sie die Taste ELIM und das Segment in der unteren Skala...

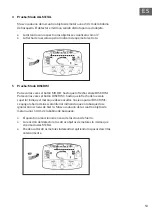
Страница 15: ...talle enthalten werden ebenfalls eliminiert Der Detektor reagiert nicht auf den Eisennagel Die Reaktion des Detektors auf die anderen drei Metallobjekte ist die gleiche wie im ALL METAL Modus 9 Test P...

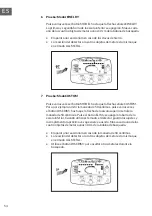
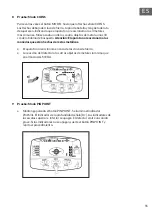
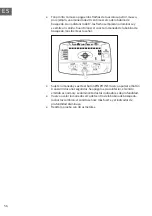
Страница 16: ...kommt desto lauter wird der Ton Halten Sie die M nze fest und lassen Sie die Taste PINPOINT los Dr cken Sie die Taste nach einigen Sekunden erneut Der untere Skala erlischt der Ton wird wieder normal...

Страница 17: ...in bestimmtes Metall gew nscht wird stellen Sie den Detektor auf einen der zuvor beschriebenen Modi ein Da die Bodenbedingungen unterschiedlich sind ist es manchmal eine gute Idee Proben von bestimmte...

Страница 18: ...her als der Blick auf den Bildschirm Es gibt vier Tonh hen die Ihnen helfen zu erkennen welche Art von Metall entdeckt wurde Niedrige Tonh he Eisenmetalle wie Eisen Deckel etc Mittelniedrige Tonh he Z...

Страница 19: ...ut Die Anzeige erlischt und es ert nt ein einziger niedriger Ton Bewegen Sie die Suchspule langsam um das Ziel bis der Ton lauter und die Tiefenanzeige wieder heller wird Wiederholen Sie diesen Vorgan...

Страница 20: ...t zu verringern Hinweis In stark mineralisierten oder magnetischen B den kann es schwierig sein die korrekte Ground Balance zu erreichen 8 Tiefe und Zielort Die f nf Betriebsarten die mit der Taste MO...

Страница 21: ...n Modus Dies ist die reaktionsschnellste Art der Erkennung In stark mineralisierten B den oder an engen Stellen kann der PINPOINT Modus die beste Wahl f r die Erkennung von Objekten sein Bewegen Sie d...

Страница 22: ...einen gro en vergrabenen Metallgegenstand Das Ger t ert nt wenn sich die Spule vom Boden entfernt Die Bodenbalance ist zu empfindlich eingestellt Drehen Sie den Drehknopf gegen den Uhrzeigersinn HINW...

Страница 23: ...test user manual and other information about the product CONTENT Safety Instructions 24 Device Overview 24 Assembly 25 Control Panel Displays 28 Control Panel Buttons 30 Commissioning and Test 32 Outd...

Страница 24: ...especially those that carry flammable gases and liquids Searching in military areas is not allowed and poses a great danger When excavating an object be careful not to destroy vegetation or the enviro...

Страница 25: ...he screw Attach the search coil to the lower tube and lock it Note The rubber seal must be correctly mounted see picture 2 Loosen the lock nut on the center tube then press the silver button on the lo...

Страница 26: ...again 4 Adjust the full length of the detector so that your arms are straight when searching Once the desired length has been determined tighten the locknuts This makes detection easier and more comfo...

Страница 27: ...ctor is not going to be used for a long time please remove the batteries so they do not leak or rust 1 2 3 Press the button on the battery compartment and slide it open Remove the battery compartment...

Страница 28: ...s of 12 arrows that allow you to identify and distinguish the target object as accurately as possible In ALL METAL mode all 12 indicators will light up When selecting the modes the eliminated metals w...

Страница 29: ...et 6 Battery indicator 4 illuminated segments indicate a high power at low power the lights will go out 7 Sensitivity indicator Consists of 8 indicators When all 8 are lit the sensitivity is highest S...

Страница 30: ...minates iron and reacts faster to other metals CUSTOM To eliminate certain types of metals press the or until the arrow on the upper scale lights up under this type of metal Then press the ELIM key to...

Страница 31: ...d hold the ELIM button for three seconds An indicator will light up on the screen to confirm activation 5 DISCRIM Remove metal types by pressing DISCRIM or 6 SENS Choose between 8 different levels of...

Страница 32: ...h coil protruding at least 30 cm beyond the end Hold the test objects as centrally as possible over the search coil Important Keep the detector away from other power sources Please remove all personal...

Страница 33: ...the arrow points to DISCRIM Press the DISCRIM button until the top scale arrow lights below the metal you wish to exclude Press the DISCRIM button again and the segment on the lower scale will go off...

Страница 34: ...the arrow points to CUSTOM For example to remove the 1 pound coin press the DISCRIM button until the top scale arrow points to the 1 pound coin Press the ELIM button and the segment in the lower scale...

Страница 35: ...n one of the three waste metals will also be eliminated Der Detektor reagiert nicht auf den Eisennagel Die Reaktion des Detektors auf die anderen drei Metallobjekte ist die gleiche wie im ALL METAL Mo...

Страница 36: ...search coil the louder the sound will become Hold the coin and release the PINPOINT button Press the button again after a few seconds The lower scale will disappear the sound will return to normal and...

Страница 37: ...et the operating mode Start with the mode ALL METAL If a particular metal is desired set the detector to one of the previously described modes As soil conditions vary it is sometimes a good idea to ta...

Страница 38: ...elpful than looking at the screen There are four pitches that will help you recognize what kind of metal has been discovered Low pitch ferrous metals such as iron lids etc Medium low pitch pull tabs 1...

Страница 39: ...e indicator will go off and a single low tone will sound Move the search coil slowly around the target until the sound becomes louder and the depth indicator brightens again Repeat this process severa...

Страница 40: ...n lowering Adjust the ground balance slowly so as not to over adjust and reduce the sensitivity Note In heavily mineralized or magnetic soils it may be difficult to achieve the correct ground balance...

Страница 41: ...e detector will show different results depending on the soil type and composition of the found objects Certain types of metals may need to be eliminated to avoid missing metals 9 The use of non motion...

Страница 42: ...when the coil moves away from the ground The ground balance is too sensitive Turn the knob counterclockwise HINTS ON DISPOSAL According to the European waste regulation 2012 19 EU this symbol on the...

Страница 43: ...otra informaci n sobre el producto NDICE DE CONTENIDOS Indicaciones de seguridad 44 Ger te bersicht 44 Montaje 45 Panel de control display 48 Panel de control botones 50 Uso en el exterior 57 Detecci...

Страница 44: ...e todo si transportan gas inflamable o l quidos No est permitido realizar b squedas en instalaciones militares y adem s es muy peligroso Desentierre los objetos con cuidado Aseg rese de no da ar la ve...

Страница 45: ...en la barra inferior y bloqu ela con el bot n de bloqueo Atenci n Aseg rese de que la junta de goma est colocada correctamente ver imagen 2 Afloje la tuerca de bloqueo en la barra central presione el...

Страница 46: ...Ajuste la longitud de la barra de tal manera que pueda sujetarla c modamente con el brazo estirado Cuando haya encontrado la longitud deseada ajuste de nuevo la tuerca de bloqueo De esta manera le se...

Страница 47: ...no va a utilizar el detector de metales durante un periodo de tiempo prolongado para evitar que se oxidan o rezuman 1 2 3 Pulse el bot n en el compartimento de pilas y deslice la tapa Retire el compa...

Страница 48: ...que permiten identificar el objeto de b squeda de manera m s exacta y a diferenciarlo de otros En modo ALL METAL se iluminan las 12 flechas Durante la elecci n de los modos los metales no se iluminan...

Страница 49: ...ican el nivel restante de las pilas Cuando las pilas se agotan las luces se apagan 7 Indicador de sensibilidad Se compone de 8 niveles Cuando se iluminan los 8 niveles la sensibilidad est en el nivel...

Страница 50: ...os metales CUSTOM Para eliminar distintos tipos de metal pulse el bot n o hasta que la flecha de la escala superior se ilumine bajo dicho metal A continuaci n pulse ELIM para eliminar este grupo de me...

Страница 51: ...IM durante 3 segundos Se iluminar un indicador en el display y se confirmar la activaci n 5 DISCRIM Si desea ocultar alg n tipo de metal pulse el bot n DISCRIM o 6 SENS Elija uno de los 8 niveles de s...

Страница 52: ...dera Deje colgando la bobina de b squeda a 30 cm del borde Si es posible mantenga los objetos de prueba cerca del centro de la bobina de b squeda Importante Mantenga el detector lejos de otras fuentes...

Страница 53: ...ale DISCRIM Pulse varias veces el bot n DISCRIM hasta que la flecha de la escala superior indique el metal que desea ocultar Vuelva a pulsar DISCRIM se apaga la barra de la escala inferior indicando...

Страница 54: ...lecha se ale CUSTOM Para por ejemplo omitir la moneda de 50 c ntimos pulse varias veces el bot n DISCRIM hasta que la flecha de la escala superior se ale la moneda de 50 c ntimos Pulse el bot n ELIM y...

Страница 55: ...n El aparato no reaccionar a las monedas que est n hechas de restos met licos El aparato no reaccionar en caso de los clavos de hierro La reacci n del detector a los otros objetos de metal es la mism...

Страница 56: ...eda de la bobina de b squeda m s fuerte es la se al Sujete la moneda y suelte el bot n PINPOINT Vuelva a pulsar el bot n transcurridos unos segundos Se apaga la escala inferior el sonido emitido es no...

Страница 57: ...igurar el modo Empiece con el modo ALL METAL Si desea buscar un metal determinado elija uno de los modos descritos anteriormente Dado que las propiedades del suelo son variadas le recomendamos realiza...

Страница 58: ...a a veces el sonido es m s importante que la imagen en el display Existen 4 niveles de sonido que le pueden ayudar a reconocer el tipo de metal Nivel bajo metales ferrosos como hierro tapas etc Nivel...

Страница 59: ...n sonido d bil Acerque lentamente la bobina hacia el objeto hasta que el sonido se haga m s fuerte y el indicador de profundidad m s claro Repita estos pasos hasta determinar exactamente la ubicaci n...

Страница 60: ...que sea m s dif cil configurar correctamente Ground Balance 8 Intensidad y ubicaci n Los 5 modos de funcionamiento que se eligen con el bot n MODE son modos que permiten libre movimiento Muestran el t...

Страница 61: ...itir el metal deseado 9 Uso del modo Non Motion Este modo es el m s r pido para detectar un objeto En suelos ricos en minerales o en una ubicaci n estrecha el modo PINPOINT puede ser la mejor opci n p...

Страница 62: ...o emite un sonido cuando la bobina se aleja del suelo La sensibilidad de Ground Balance es muy alta Gire el regulador en sentido contrario a las agujas del reloj RETIRADA DEL APARATO Si el aparato lle...

Страница 63: ...eur et d autres informations sur le produit SOMMAIRE Consignes de s curit 64 Aper u de l appareil 64 Assemblage 65 Affichages du panneau de commande 68 Touches du panneau de commande 70 Mise en marche...

Страница 64: ...qui transportent des gaz et des liquides inflammables Les recherches dans les zones militaires ne sont pas autoris es et repr sentent un grand danger Lorsque vous d terrez un objet veillez ne pas d tr...

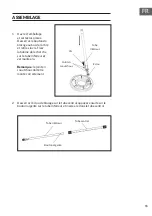
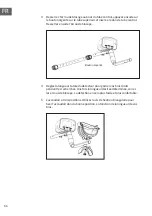
Страница 65: ...de recherche sur le tube inf rieur et verrouillez la Remarque le joint en caoutchouc doit tre mont correctement 2 Desserrez l crou de blocage sur le tube central appuyez ensuite sur le bouton argent s...

Страница 66: ...ge 4 R glez la longueur totale du d tecteur pour garder vos bras droits pendant les recherches Une fois la longueur d sir e d termin e serrez les crous de blocage La d tection en sera plus facile et p...

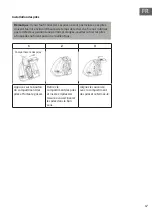
Страница 67: ...d tecteur pendant une p riode prolong e veuillez retirer les piles afin qu elles ne fuient pas ou ne rouillent pas 1 2 3 Appuyez sur le bouton du compartiment des piles et faites le glisser Retirez le...

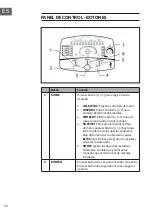
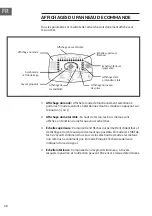
Страница 68: ...qui permettent d identifier et de distinguer la cible aussi pr cis ment que possible En mode ALL METAL les 12 voyants s allument tous Lors de la s lection des modes les m taux non retenus ne s allumen...

Страница 69: ...4 segments lumineux indiquent une forte performance faible puissance les voyants s teignent 7 Affichage du niveau de sensibilit Se compose de 8 voyants Lorsque tous les 8 sont allum s la sensibilit es...

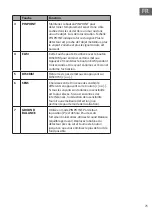
Страница 70: ...r agit plus vite aux autres m taux CUSTOM pour supprimer des m taux pr cis appuyez sur les touches ou jusqu ce que la fl che de l chelle sup rieure s allume pour ce type de m tal Appuyez alors sur le...

Страница 71: ...Un voyant s allume sur l cran et confirme l activation 5 DISCRIM Retirer les types de m taux en appuyant sur DISCRIM ou 6 SENS Choisissez entre 8 niveaux de sensibilit diff rents en appuyant sur le bo...

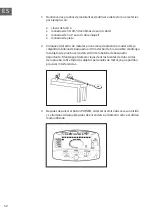
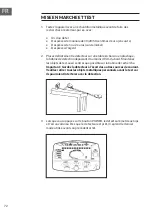
Страница 72: ...is ou en plastique la bobine de d tection d passant d au moins 30 cm du bord Maintenez les objets de test aussi centr s que possible sur la bobine de recherche Important Gardez le d tecteur l cart des...

Страница 73: ...ISCRIM Appuyez sur le bouton DISCRIM jusqu ce que la fl che de l chelle sup rieure s allume sous le m tal que vous voulez exclure Appuyez de nouveau sur le bouton DISCRIM et le segment sur l chelle in...

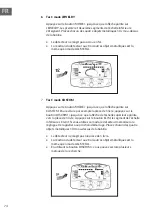
Страница 74: ...e pointe sur CUSTOM Pour exclure par exemple la pi ce de 1 livre appuyez sur le bouton DISCRIM jusqu ce que la fl che de l chelle sup rieure pointe vers la pi ce de 1 livre Appuyez sur le bouton ELIM...

Страница 75: ...marque les pi ces contenant l un des trois m taux consid r s comme des d chets sont galement limin es Le d tecteur ne r agit pas au clou en fer La r action du d tecteur aux trois autres objets m talli...

Страница 76: ...e de recherche plus le son devient fort Tenez bien la pi ce et rel chez le bouton PINPOINT Appuyez nouveau sur le bouton au bout de quelques secondes L chelle inf rieure dispara t le son revient la no...

Страница 77: ...glage du mode d utilisation Commencez avec le mode ALL METAL Si vous recherchez un m tal particulier r glez le d tecteur sur l un des modes pr c demment d crits Comme les conditions du sol varient il...

Страница 78: ...n est parfois plus utile que de regarder l cran Quatre hauteurs de son peuvent vous aider reconna tre quel type de m tal a t d couvert son grave m taux ferreux tels que le fer les couvercles etc son m...

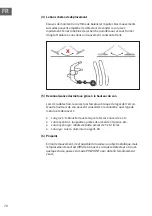
Страница 79: ...eur met un seul son grave D placez lentement la bobine de recherche autour de la cible jusqu ce que le son soit plus fort et que le voyant de profondeur soi plus lumineux R p tez ce processus plusieur...

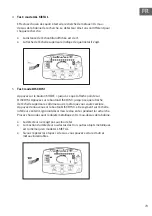
Страница 80: ...sols fortement min ralis s ou magn tiques il peut tre difficile d obtenir le bon r glage de Ground Balance 8 Profondeur et lieu cible Les cinq modes s lectionn s avec le bouton MODE sont tous des mod...

Страница 81: ...pe de d tection le plus r actif Dans les sols fortement min ralis s ou dans des espaces confin s le mode PINPOINT peut tre le meilleur choix pour la d tection d objets D placez lentement la bobine de...

Страница 82: ...que enterr L appareil met un son lorsque la bobine s loigne du sol L quilibre du sol est r gl trop sensible Tournez le bouton dans le sens antihoraire CONSEILS POUR LE RECYCLAGE Le pictogramme ci cont...

Страница 83: ...oni sul prodotto INDICE Avvertenze di sicurezza 84 Descrizione del dispositivo 84 Montaggio 85 Indicazioni del pannello di controllo 88 Tasti del pannello di controllo 90 Messa in funzione e test 92 U...

Страница 84: ...o liquidi L esplorazione in settori militari proibito e rappresenta un grande pericolo Fare attenzione a non rovinare vegetazione e ambiente circostante quando si dissotterrano oggetti Riempire nuova...

Страница 85: ...bobina di esplorazione al tubo inferiore e bloccarla Avvertenza la guarnizione in gomma deve essere montata correttamente v immagine 2 Allentare il dado di arresto sul tubo centrale premere il tasto a...

Страница 86: ...lunghezza del metal detector in modo da avere le braccia diritte durante l esplorazione Non appena stata definita la lunghezza desiderata stringere il dado di arresto In questo modo la rilevazione sa...

Страница 87: ...detector non viene utilizzato per tempi prolungati togliere le batterie in modo che non vi siano perdite e che non arrugginiscano 1 2 3 Premere il tasto sul vano delle batterie e aprirlo facendolo sco...

Страница 88: ...iduare con la massima precisione possibile e di differenziare l oggetto che si sta cercando In modalit ALL METAL tutte e 12 le frecce si illuminano Selezionando la modalit le frecce dei metalli esclus...

Страница 89: ...4 segmenti luminosi indicano una carica elevata Quando la carica diminuisce i segmenti si spengono progressivamente 7 Indicazione della sensibilit composta da 8 indicazioni Quando tutte le 8 luci son...

Страница 90: ...pi rapidamente ad altri metalli CUSTOM per eliminare determinati tipi di metalli premere o fino a quando la freccia della scala superiore in corrispondenza di quel metallo si illumina Premere poi ELI...

Страница 91: ...si illumina sullo schermo e conferma l attivazione 5 DISCRIM Rimuovere tipi di metallo premendo DISCRIM o 6 SENS Selezionare tra 8 livelli di sensibilit premendo o Se tutte le indicazioni si illuminan...

Страница 92: ...odo che la bobina sporga di almeno 30 cm dall estremit Tenere l oggetto per il test possibilmente centrato sopra alla bobina Importante tenere il metal detector lontano da altre fonti di corrente Dura...

Страница 93: ...M Premere il tasto DISCRIM fino a quando la freccia della scala superiore si illumina sotto al metallo che deve essere escluso Premere di nuovo il tasto DISCRIM e il segmento nella scala inferiore si...

Страница 94: ...a freccia indica su CUSTOM Per escludere ad es la moneta da un pound premere il tasto DISCRIM fino a quando la freccia della scala superiore indica la moneta da 1 pound Premere il tasto ELIM e il segm...

Страница 95: ...ntengono uno dei tre metalli di scarto vengono escluse Il metal detector non reagisce all ago di ferro La reazione del metal detector agli altri tre oggetti metallici uguale a quella in modalit ALL ME...

Страница 96: ...olume del segnale acustico Tenere saldamente la moneta e lasciare andare il tasto PINPOINT Premere nuovamente il tasto dopo alcuni secondi La scala inferiore si spegne il segnale acustico torna a un l...

Страница 97: ...Iniziare con la modalit ALL METAL Se si desidera un tipo particolare di metallo impostare il metal detector su una delle modalit descritte in precedenza Le condizioni del terreno possono essere diffe...

Страница 98: ...i che mostra lo schermo Ci sono quattro altezze del segnale acustico che aiutano a riconoscere il tipo di metallo rilevato Suono basso metalli ferrei come ferro coperchi ecc Suono medio basso linguett...

Страница 99: ...il tasto dopo alcuni secondi L indicazione si spegne e viene emesso un unico suono pi basso Muovere lentamente la bobina intorno all obbiettivo fino a quando diventer pi forte e l indicazione di profo...

Страница 100: ...ente 8 Profondit e luogo da raggiungere Le 5 modalit di funzionamento selezionabili con il tasto MODE sono tutte modalit in movimento Indicano approssimativamente un tipo di metallo la profondit e la...

Страница 101: ...pida In terreni ricchi di minerali o in punti stretti la modalit PINPOINT pu essere la scelta migliore per rilevare oggetti In modalit PINPOINT muovere la bobina lentamente RICERCA E CORREZIONE DEGLI...

Страница 102: ...i un grande oggetto metallico sotterrato Il dispositivo emette un segnale acustico quando la bobina si allontana dal terreno Balance Ground troppo sensibile Ruotare la manopola in senso antiorario SMA...

Страница 103: ......

Страница 104: ......

Отзывы: