background image

12

Dear Customer,

Congratulations on purchasing this product. Please read and follow these instructions, in order 

to avoid damaging the item. We do not cover any damages that may arise from improper use 

of the item or the disregard of the safety instructions.

Important Safety Instructions

•  Read all instructions before using.

•  Do not use attachments that are not recommended by the manufacturer.

•  Do not open the unit by removing any cover parts. Do not attempt to repair the unit. Any 

repairs or servicing should be done by qualified personnel only.  Only qualified persons 

may perform technical work on the product. The product may not be opened or changed. 

The components cannot be serviced by the user.

•  The appliance is not a toy. Do not let children play with it.

•  Never clean the surface of the device with solvents, paint thinners, cleansers or other 

chemical products. Instead, use a soft, dry cloth or soft brush.

•  This appliance is not intended for use by persons (including children) with reduced physi-

cal, sensory or mental capabilities, or lack of experience and knowledge, unless they have 

been given supervision or instruction concerning use of the appliances by a person respon-

sible for their safety.

•  Do not expose the appliance to extreme temperatures. The appliance shall be used in 

moderate climates.

•  Use the original package in order to avoid damages to the device when transporting it.

•  Save these instructions.

Small objects: 

Keep small objects (i.e. screws, mounting material, memory cards etc.) and 

packaging out of the range of children. Do not let Children play with foil. Choking hazard!

Transporting the device: 

Please keep the original packaging. To gain sufficient protection of 

the device while shipment or transportation, make sure to put it back in its original packaging.

Cleaning the surface: 

Do not use any volatile liquids, detergents or the like. Use a clean dry 

cloth.

Basics

This device is meant for the use in combination with all cameras with an EXT PWR IN socket 

which complies to the specified rating as below).

IMPORTANT - Please note: 

The use of this device may only happen in harmony with local 

laws to the monitoring, surveillance and visual capturing of the potential object (i.e. of loca-

tions, people, buildings, animals and so forth).

Содержание 10028944

Страница 1: ...10028944 Solar Power Kit...

Страница 2: ...rch unqualifizierte Wartung oder Reparatur Versuche ist der Hersteller nicht haftbar und die Gew hrleistung verf llt Lassen Sie keine Kinder mit dem Ger t spielen Stellen Sie keine Quellen offener Fla...

Страница 3: ...Stativ Bauteil B 4 10 Fl gelmutter Gurt 5 11 Kabel Montageklammer 6 Technische Eigenschaften Artikelnummer 10028944 Maximaler Energieerzeugung Solarpanel 3W Abgaberate PowerPack 6V 3000mAh Ladezeit 5...

Страница 4: ...Montage Schritt 1 Legen Sie das Panel mit der Vorderseite auf eine ebene Oberfl che Montieren Sie das Stativ Bauteil A an das Solar Panel und verschrauben Sie mit Schraube A x4 4...

Страница 5: ...Schritt 2 Montieren Sie die Montageklammer 6 an das Stativ Bauteil B und verschrauben Sie mit Schraube B x4 5...

Страница 6: ...Schritt 3 Bringen Sie die Teile nun zusammen Fixieren Sie mit Schraube B x1 Schraube C und der Fl gelmutter 6...

Страница 7: ...Fertig 7...

Страница 8: ...Montage im Freien Beispiele Achten Sie bei der Aufstellung darauf dass der Aufstellort m glichst viel Sonneneinstrahlung abbekommt Am besten frontal 8...

Страница 9: ...Ladeverlauf in Prozent an Bedienung Dr cken Sie die POWER Taste f r 2 Sekunden um die Stromzufuhr zur Kamera zu aktivie ren 6V 1A Das Display leuchtet auf und zeigt die aktuelle Kapazit t an Dr cken S...

Страница 10: ...ER IN und POWER OUT Anschl sse sich auf der Unterseite befinden so dass Regen oder Tauwasser nicht hineinlaufen kann Verbinden Sie den POWER OUT des Solar Panels mit dem POWER IN des PowerPacks Verbin...

Страница 11: ...nd elektronischer Ger tschaften Richten Sie sich nach den rtlichen Re gelungen und entsorgen Sie Altger te nicht ber den Hausm ll Durch die regelkonforme Entsorgung der Altger te werden Umwelt und die...

Страница 12: ...pabilities or lack of experience and knowledge unless they have been given supervision or instruction concerning use of the appliances by a person respon sible for their safety Do not expose the appli...

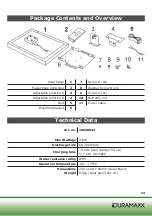
Страница 13: ...ustable junction B 4 10 Butterfly nut Belt 5 11 Power cable Mounting bracket 6 Technical Data Art no 10028944 Max Wattage 3 6W Discharge rate 6V 3000mAh Charging time 5 std wall charger 5V 1A 5 7 std...

Страница 14: ...Assembly Step 1 Attach the adjustable junction A to the solar panel and fasten with 4x screw A 14...

Страница 15: ...Step 2 Attach the mounting bracket to the adjustable junction B and fasten with 4x washer screw B 15...

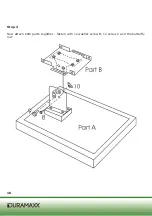
Страница 16: ...Step 3 Now attach both parts together fasten with 1x washer screw B 1x screw C and the butterfly nut 16...

Страница 17: ...Done 17...

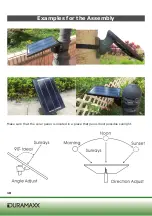
Страница 18: ...Examples for the Assembly Make sure that the solar panel is located in a place that gains most possible sunlight 18...

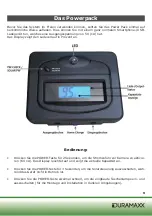
Страница 19: ...nt Operation Press and hold the POWER button for 2 secs to activate the power delivery to the camera The display lightens up and shows the current electric capacity Press and hold POWER for 3 secs to...

Страница 20: ...curcuit instantly Attach the solar panel to a sun lighten place near above the camera Make sure all POWER IN and POWER OUT sockets are facing down to avoid rain or dew to get in Connect the POWER OUT...

Страница 21: ...product is disposed of correctly you will help prevent potential negative consequences for the environment and human health which could otherwise be caused by in appropriate waste handling of this pro...

Отзывы: