background image

Troubleshooting 


EN-53 


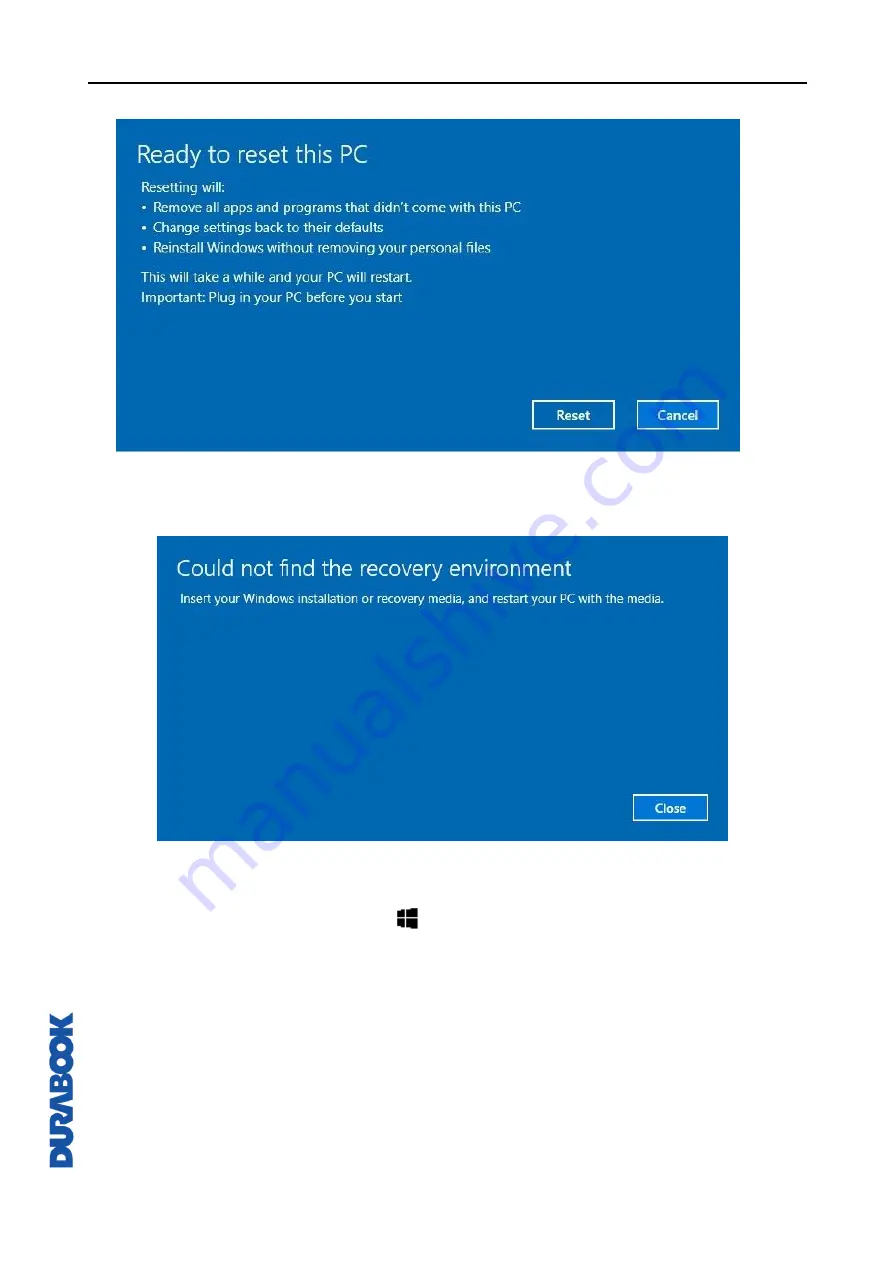
6.


Click “

Reset

” to start resetting. 


Note: 

If you see a message as shown below that means 

WinRE (Windows 

Reset)


is disabled. 


7.


To enable resetting Windows, follow the steps below: 

a.


Hover mouse over 

Start  

  menu. 

b.


Select 

Command Prompt (Admin) 

from the pop-up menu. 

c.


Key in the following command: Reagentc /enable 

d.


Press 

Enter

. Wait until you see the “Operation Successful” status on 

the screen. 

e.


Follow steps 1 to 7 to reset your device. 

Содержание R11L

Страница 1: ... 2019 Twinhead International Corp and or its affiliates All rights reserved Rugged Tablet PC R11L User Manual ...

Страница 2: ... Off Your Device 13 OPERATING YOUR TABLET PC 14 USING THE QUICK MENU 14 Quick Menu Overview 14 Viewing the Version Information 15 Viewing the Battery Charge Cycles 15 Configuring the Function Button Barcode Camera 15 Configuring the Programmable Button P 16 Configuring the Up Down Button 16 Assigning an Application to the P Button 17 Accessing the Mobility Center 18 Configuring External Antenna Sw...

Страница 3: ...43 MAINTAINING AND CARING FOR YOUR TABLET PC 44 PROTECTING YOUR TABLET PC 44 STORING AND HANDLING YOUR TABLET PC 44 CLEANING YOUR TABLET PC 46 TRAVELING WITH YOUR TABLET PC 47 TROUBLESHOOTING 48 PRELIMINARY CHECKLIST 48 SOLVING COMMON PROBLEMS 48 DISPLAY PROBLEMS 50 HARD DISK PROBLEMS 50 OTHER PROBLEMS 54 APPENDIX 55 COPYRIGHT 55 SPECIFICATIONS 55 REGULATORY STATEMENT 57 Federal Communications Com...

Страница 4: ...perience in a wide range of working environments Before you begin using your tablet PC read this chapter to familiarize yourself with the main components installed in the system Package Contents If any of following items is damaged please contact your retailer Tablet PC AC adapter Power cord Hand strap NOTE The pictures are for reference only actual items may slightly differ ...

Страница 5: ... light sensor Use to detect the current level of visible light in the surrounding environment 4 Microphone Record the surrounding sound 5 Function button The button functionality can be assigned via Quick Menu Barcode trigger button Press to trigger the Barcode scan function if the barcode scanner is enabled Launch Windows Camera Application button Disable 6 Window button Tap to return to the Star...

Страница 6: ...s 2 Camera light Provide additional lighting when taking pictures under low light environment 3 Rear camera Use to take pictures 4 Battery Pack Battery Pack 5 Battery latch release button Press and hold the button to slide the battery latch to the unlock position 6 Speaker Emit sound ...

Страница 7: ...c and data between your Tablet PC and flash compatible devices 4 SIM card slot Use to insert a SIM card for WWAN module connection Left View No Item Description 1 Power button Press to turn your tablet PC on or off 2 Up Down buttons The button functionality can be assigned via Quick Menu Brightness adjustment Press to adjust the brightness level Volume adjustment Press to adjust the volume level D...

Страница 8: ...buttons simultaneously By pressing the two button combination it will switch to Windows Security screen which lets you lock the device switch to different user sign out change a password enter Task Manager or shutdown Restart the device Bottom View No Item Description 1 Docking connector Connect the tablet PC to a docking station 2 DC IN jack Connect the power adapter ...

Страница 9: ...p mode the LED blinks Battery Indicate the battery status Green when battery is fully charged 95 or above Orange when battery is charging Flashing Red when battery capacity is lower than 10 Off when discharged RF Blue LED lights on when any of RF features WLAN Bluetooth WWAN GPS is on Blue LED lights off when none of RF features WLAN Bluetooth WWAN GPS are on NOTE On Windows 10 OS you need to inst...

Страница 10: ... until the battery locks into place 3 Slide the battery latch to the lock position to secure the battery Charging the Battery The Lithium ion battery is not fully charged upon purchase To charge the battery follow the steps below 1 Install the battery to your tablet PC See procedures above 2 Connect the AC adapter to the DC IN jack of your tablet PC 3 Connect the AC adapter to the power cord 4 Plu...

Страница 11: ...me and usage We recommend you to replace your battery pack after 18 to 24 months of usage Removing the Battery To remove the battery follow the steps below 1 Press and hold the battery latch release button to slide the battery latch to the unlock position 2 Remove the battery out of the battery compartment ...

Страница 12: ...ter to the DC IN jack of your tablet PC 2 Connect the AC adapter to the power cord 3 Plug the power cord to an electrical outlet Using Battery Power 1 Install a charged battery in the battery compartment 2 Remove the AC adapter if plugged Your tablet PC will automatically use the battery power NOTE If your tablet PC is connected to an electrical outlet and the battery is installed your tablet PC u...

Страница 13: ...e Power LED lights up Turning Off Your Device It is important to properly shut down your tablet PC to avoid the loss of unsaved data To shut down your tablet PC do the following Tap Power Shut down Wait for your notebook to turn off power completely before removing the power source if necessary ...

Страница 14: ...e your Tablet PC Using the Quick Menu To enter the Quick menu tap the arrow on the task bar to display hidden icons Then tap the Quick Menu icon You can also access the Quick menu in the All apps list Quick Menu Overview NOTE If the tab is green i e this indicates the current function is activated ...

Страница 15: ...you can view the battery charge cycle and battery status Configuring the Function Button Barcode Camera On the Barcode Camera Button Setting section you can assign the function for the Barcode Camera button There are three available options Barcode trigger Scan the barcode if the barcode scanner is integrated Launch Windows Camera Application Shortcut key for launching the Windows Camera applicati...

Страница 16: ...devices Launch Application Shortcut key for launching a specific application To assign the application refer to the Assigning an Application to the P Button section Disable No function Configuring the Up Down Button On the Up Down Button Setting section you can assign the function for the Up Down button There are three available options Brightness adjustment To adjust screen brightness level Volum...

Страница 17: ...Operating Your Tablet PC EN 17 Assigning an Application to the P Button Tap the P Key tab to assign an application to the P button Select the desired application and click Open ...

Страница 18: ...na Switching Mode Select the respective external antenna tab to configure the setting Tap the LTE Antenna tab to enable disable the device to automatically switch to the external WWAN antenna when it is affixed on a docking station Tap the GPS Antenna tab to enable disable the device to automatically switch to the external GPS antenna when it is affixed on a docking station NOTE If the tab is gree...

Страница 19: ... tab to enable disable the device to automatically adjust the brightness level according to the ambient light Using the Camera Using the Camera application you can use this tablet PC to take photos or videos Opening the Camera App To access the Camera application do one of the following a Tap Camera ...

Страница 20: ...Operating Your Tablet PC EN 20 b In Cortana search box enter camera Then tap Camera ...

Страница 21: ...Operating Your Tablet PC EN 21 Taking Photos Tap to capture a photo NOTE To switch between front and rear cameras tap ...

Страница 22: ...Operating Your Tablet PC EN 22 Recording Videos 1 Tap to switch to Video mode 2 Press to start recording a video The recording time appears on the bottom on the screen 3 To stop recording the video tap ...

Страница 23: ...p to select the desired flash mode Flash is off Flash is on Automatic flash In video recording mode tap to toggle the camera LED flash on or off Setting Photo Timer Tap to toggle the desired time delay Self timer is off 2 second self timer 5 second self timer 10 second self timer ...

Страница 24: ... PC EN 24 Adjusting Focus 1 Tap to switch to Pro mode 2 Tap to display the focus control slider 3 Do the following Tap and drag upwards or downwards if necessary to focus automatically auto manually M or use infinity focus ...

Страница 25: ...EN 25 Adjusting Brightness 1 Tap to switch to Pro mode 2 Tap to display the brightness control slider 3 Do the following Tap and drag upwards to brighten your photo or video Tap and drag downwards to darken your photo or video ...

Страница 26: ...and setting Menu Option Description Press and hold camera button Set the action when you tap and hold the Camera button Video Tap and hold the Camera button to record a video Photo burst Tap and hold the Camera button to take photos continuously Disabled Disable the function Aspect ratio Select the aspect ratio of the photos ...

Страница 27: ... To reduce the flickering that may occur when recording video under fluorescent light Auto To set flicker reduction automatically Digital video stabilization If the setting is set to On digital video stabilization helps you to keep your footage steady Related settings Select the related settings that can only be configured in Settings app Viewing Photos Videos After taking a photo or recording a v...

Страница 28: ...uide you on installing peripheral devices to maximize the use of your tablet PC Installing the MicroSD Memory Card To insert a MicroSD memory card 1 Push down and pull to open the I O port cover 2 Push the memory card into the memory card slot until it clicks into place ...

Страница 29: ...IM card into the SIM card slot until it clicks into place Connecting the Microphone Headset Your tablet PC is equipped with audio combo jack that enables you to use the headset or microphone To connect to a headset open the I O port cover and plug the stereo headphone cable into the audio combo jack To connect to a microphone open the I O port cover and plug the microphone cable into the audio com...

Страница 30: ...camera printer or an external hard disk drive 1 Push down and pull to open the I O port cover 2 Connect one end of the USB cable to the USB port of your device 3 Connect the other end of the cable to the USB device if necessary NOTE The USB cable is not included in the package It is sold separately or it may come with your USB device ...

Страница 31: ...rwise the antenna may be damaged resulting in poor reception Connecting to a Bluetooth Device Your tablet PC can connect and communicate with other Bluetooth enabled devices By default the Bluetooth function is disabled To add a device follow the steps below 1 Tap the arrow icon on the system tray to display hidden icons 2 Tap the Bluetooth icon and select Add a Bluetooth Device ...

Страница 32: ...tions EN 32 3 Tap and select the kind of device you want to add 4 Select the device you want to connect Verify the pairing code on the screen of your device and pairing device match then tap Connect to start pairing ...

Страница 33: ...ction NOTE Most Bluetooth enabled devices need to be paired with your tablet PC The PIN you enter on the tablet PC must be the same PIN to be entered on the other Bluetooth device Once a partnership has been created connecting to that device again will no longer require entering the PIN To disconnect from the Bluetooth enabled device select the device in the Bluetooth menu and tap Remove device ...

Страница 34: ...LAN module A wireless network can be added either when the network is detected or by manually entering the settings information To connect follow the steps below 1 Tap the wireless network icon on the system tray 2 Available wireless network connections are displayed Tap the desired wireless network ...

Страница 35: ...ter the connection is established you can see the wireless icon in the Notification area NOTE Wi Fi access requires service from a wireless service provider Contact your service provider for more information Actual wireless connectivity will depend on system configuration Please contact your dealer for more information To disconnect from the wireless network select the network in the wireless in t...

Страница 36: ... to connect to the Internet using mobile or cellular data networks To connect follow the steps below 1 Insert a valid SIM card into the SIM card slot refer to page Error Bookmark not defined 2 Tap the cellular network icon on the system tray Then tap Cellular to enable the Internet connection via mobile data network ...

Страница 37: ...nections EN 37 3 Select the mobile network carrier and tap Connect to establish the connection TIP Check Let Windows keep me connected box to allow the system to automatically connect to this mobile data network ...

Страница 38: ...lize the hardware so that it can operate correctly Use the BIOS setup utility to change your tablet start up configuration For example you can change the security and power management routines of your system Starting the BIOS Setup Utility You can enter the BIOS setup utility and press Setup button while the tablet PC is booting that is between the time you turn on the tablet PC and before the Win...

Страница 39: ...e including the system date and time Item Description BIOS Information Display the BIOS version detected during boot up System Information Display the CPU type and speed total memory mainboard version Intel PCH SKU name ME FW version and ME Firmware SKU System Date Set the system date System Time Set the system time ...

Страница 40: ...ch screen Front camera Rear camera Barcode scanner Wireless LAN Bluetooth WWAN and GPS Antenna Switching Configurations 1 Enable disable the device to automatically switch to the external GPS antenna when it is affixed on a docking station 2 Enable disable the device to automatically switch to the external WWAN antenna when it is affixed on a docking station Power Configuration Configure the power...

Страница 41: ...ure the boot settings and boot sequence Item Description Boot NumLock State Select the keyboard NumLock state Launch CSM Enable disable the CSM Support Launch Network PXE OpRom Control the execution of UEFI and Legacy PXE Option Rom Option ROM Messages Set the Display mode for Option ROM Boot Option Priorities Set the system boot order ...

Страница 42: ...N 42 Security Menu The Security menu allows you to set or change the Administrator and User passwords Item Description Administrator Password Create or change the Administrator password Secure Boot Customize the Secure Boot settings ...

Страница 43: ... restore the default values for all setup options before leaving the BIOS Setup Menu Item Description Save Changes and Reset Reset the system after saving the changes Discard Changes and Reset Reset the system setup without saving any changes Restore Defaults Restore the default values for all the setup options ...

Страница 44: ...loop the lock cable around a stationary object such as a table Then insert the lock into the Kensington lock hole and turn the key to secure the lock Store the key in a safe place Storing and Handling Your Tablet PC General Storage and Handling Guidelines Use your tablet PC at the recommended temperature between 0 C 32 F and 55 C 131 F to ensure optimal performance Actual operating temperature dep...

Страница 45: ...e touchscreen surface has a special protective coating that prevents dirt from sticking to it Not using a soft cloth may cause damage to the special protective coating on the touchscreen surface Turn off the Tablet PC power when cleaning the display Cleaning the display with the power on may cause improper operation Do not use excessive force on the display Avoid placing objects on top of the disp...

Страница 46: ...an 5 C 41 F or very warm greater than 50 C 122 F environment it is possible that the Battery LED will indicate that the charge has stopped However this does not necessarily mean that your battery is fully charged Read and follow all battery precautions in the Safety section Use only batteries of the same kind as replacements Turn the power off before removing or replacing batteries Do not tamper w...

Страница 47: ...rd drive to a flash drive or other storage device As an added precaution bring an extra copy of your important data Make sure that the battery pack is fully charged Ensure that your tablet PC is turned off Confirm that all the connector covers are closed completely to ensure the device s waterproof integrity Disconnect the AC adapter from your tablet PC and take it with you Use the AC adapter to p...

Страница 48: ...r any beeps Detailed descriptions are useful to the service personnel when you need to consult someone for assistance 7 If any problem persists after you follow the instructions in this chapter contact an authorized dealer for help Solving Common Problems Battery Problems The battery does not charge To prevent possible damage to the battery the device does not allow the battery to charge if the in...

Страница 49: ...need from it To meet ENERGY STAR requirements Wake on LAN is enabled by default If running on battery power this may decrease battery run time To change Wake on LAN settings open the Device Manager Network Adapters and select the LAN device Open the device Properties and select Power Management Disable the Wake on LAN setting by unchecking Allow this device to wake the computer The gas gauge isn t...

Страница 50: ...hange the color and style of your Windows I changed my display resolution but I see no difference on the screen Select Start Power Restart Nothing happens when I try to use the stylus on my touch screen If you cannot select objects accurately with the stylus you may need to calibrate the touch screen The touch screen doesn t respond after a suspend The touch screen needs a few seconds to work afte...

Страница 51: ...ry 2 Connect the AC adapter 3 Turn on the device by pressing the POWER button 4 Reinstall the battery The Battery LED is a steady blue while the battery is charging Hard disk recovery process on Win10 1 Select Start Setting 2 Select Recovery under Update Security 3 Under Reset this PC Click Get started ...

Страница 52: ... 52 4 Select one of the two options depending on your needs Keep my files requires around 3 to 4hr Remove everything requires around 5 to 6hr 5 You are informed of the programs that will be removed Click Next to proceed ...

Страница 53: ... Reset is disabled 7 To enable resetting Windows follow the steps below a Hover mouse over Start menu b Select Command Prompt Admin from the pop up menu c Key in the following command Reagentc enable d Press Enter Wait until you see the Operation Successful status on the screen e Follow steps 1 to 7 to reset your device ...

Страница 54: ...OWER button for at least ten seconds release it and then press the POWER button again The device won t turn off 1 Select Start Power Restart 2 If that does not work press Ctrl Alt Del and then select Task Manager 3 If any programs are open use your arrow keys to highlight each one and select End task Repeat this until all programs are closed 4 If that still does not work press and hold the POWER b...

Страница 55: ...ibility Radiated Susceptibility ANSI ISA 12 12 01 2000 Class I Division 2 4 drop 26 faces IP 65 certified Aluminum magnesium alloy chassis Port covers Optional sunlight readable display Operating System Windows 10 Pro 64 bit Processors Intel Pentium 4417U 2 3GHz processor 2MB cache Graphics Intel HD Graphics 610 Memory 1 slot 4GB 2133MHz DDR4 Storage 128GB SSD Display 11 6 FHD 1920 x1080 Optional ...

Страница 56: ...adapter 100 240V 50Hz 60Hz 65W Main battery Li Ion 11 1V 3950mAh 8 hours3 Optional long life battery Li Ion 11 1V 7800mAh 16 hours3 Environment Temperature Operating 20 C 60 C Storage 40 C 71 C 40 F 160 F Humidity 5 95 Dimension 298 mm L x 192 mm W x 20 mm H Weight 1 2 kg Warranty 3 year limited warranty standard NOTE Specifications are subject to change without any prior notice WWAN and GPS are m...

Страница 57: ...he equipment into an outlet on a circuit different from that to which the receiver is connected Consult the dealer or an experienced radio TV technician for help Shielded interconnect cables and shielded AC power cable must be employed with this equipment to insure compliance with the pertinent RF emission limits governing this device Changes or modifications not expressly approved by the system s...

Страница 58: ...kg The FCC has granted an Equipment Authorization for this device with all reported SAR levels evaluated as in compliance with the FCC RF exposure guidelines SAR information on this device is on file with the FCC and can be found under the Display Grant section of www fcc gov oet ea fccid after searching on FCC ID FKGR1101 Canada Industry Canada IC Notices This Class B digital apparatus complies w...

Страница 59: ... produits hôtes particuliers qui fonctionnent dans des conditions d exposition à des appareils portables Europe Model 9260NGW Software Version 20 80 0 5 Maximum Power Output 2400 2483 5 MHz IEEE802 11 b g n mode 20dBm 1 dB max 2400 2483 5 MHz BLE Bluetooth 10dBm 2 dB max 5150 5725 MHz IEEE802 11 a n ac mode 20dBm 1 dB max 5745 5875 MHz IEEE802 11 a n ac mode 20dBm 1 dB max Europe Model EM7565 Soft...

Страница 60: ...00 3 800 MHz 22 dBm 1 dB Band 48 3500 MHz 3 550 3 700 MHz 22 dBm 1 dB Band 66 1700 MHz Tx 1 710 1 780MHz 23 dBm 1 dB Rx 2 110 2 200 MHz WCDMA frequency band support Band 1 2100 MHz Tx 1 920 1 980MHz 23 dBm 1 dB Rx 2 110 2 170 MHz Band 2 1900 MHz Tx 1 850 1 910MHz 23 dBm 1 dB Rx 1 930 1 990 MHz Band 4 1700 MHz Tx 1 710 1 755MHz 23 dBm 1 dB Rx 2 110 2 155 MHz Band 5 850 MHz Tx 824 849MHz 23 dBm 1 dB...

Страница 61: ...e T4 If apply alternate Ambient Temperature Range as 10 C to 55 C Suitable for use in Class I Division 2 Groups A B C and D hazardous locations or non hazardous locations only WARNING EXPLOSION HAZARD SUBSTITUTION OF COMPONENTS MAY IMPAIR SUITABILITY FOR CLASS I DIVISION 2 And AVERTISSEMENT RISQUE D EXPLOSION LA SUBSTITUTIOND E COMPOSANTSP EUTR ENDRE CE MATERIEL INACCEPTABLE POUR LES EMPLACEMENTS ...

Страница 62: ...ectronic equipment The symbol indicating separate collection for electrical and electronic equipment consists of the crossed out wheeled bin as shown below The symbol must be printed visibly legibly and indelibly CAUTION FOR ADAPTER THE TABLET PC IS FOR USE WITH DEDICATED AC ADAPTER Ensure you connect the power cord to a socket outlet with earthing connection The TABLET PC must be powered by using...

Страница 63: ...Optional The RJ 45 jack is not used for telephone line connection Safety Instructions These safety instructions should always be observed to ensure safe operation when handling the device Do not place this device on an unstable table or surface The device may fall causing serious damage to its housing and components Do not cover the device or block the air ventilation holes of the device with any ...

Страница 64: ...an extended period of time When cleaning the device Be sure to turn off the device properly and unplug the AC adapter before cleaning Wipe the device with a clean dry cloth Do not use abrasive cleaners to clean the device Do not attempt to disassemble or repair this device Doing so will void the warranty ...

Отзывы: