Version 20190806 Page
2
PACKING LIST:
Please check and make sure all parts are in good condition before installation. Any questions, please do NOT return to
dealer, but email us
and contact us on
PayandPack.com
immediately, we will do our best to solve
problems. Thank you.
1. Remote transmitter (1), Remote receiver box w/ 18” wire (1)
2. Wall mount cover plate (1), S
witch box s
crew (2), Slide switch button (1)
3. Installation Instructions (1)
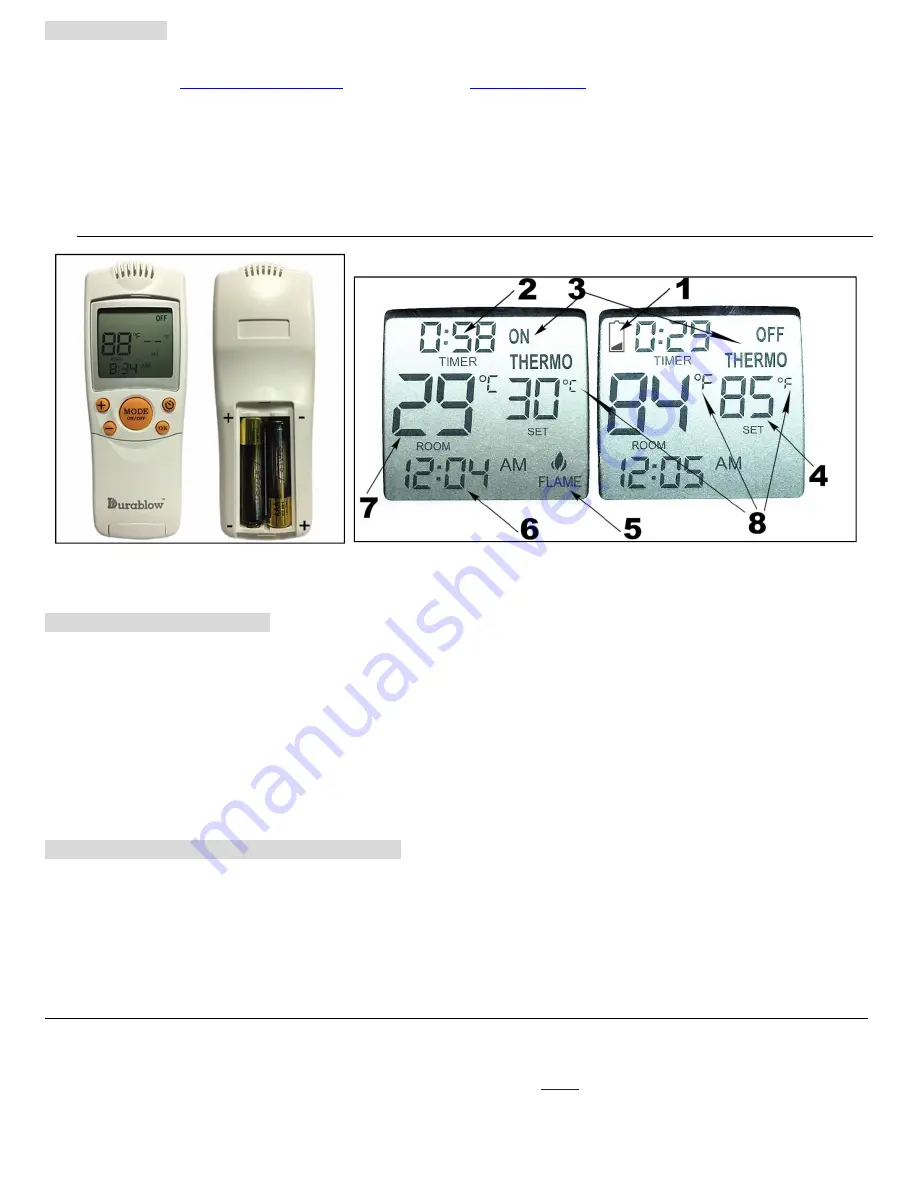
Fig. 1
Transmitter Handset
Fig. 2
LCD display on transmitter
LCD DISPLAY ICONS (Fig. 2)
1.
LOW
BATTERY -
Once it appears which means battery power is low. Replace batteries in 2 weeks.
2. TIMER
– Indicates time remaining before system shuts OFF. Maximum 9-hour setting for timer programming.
3. MODE
– Indicates system operation modes. ON means the system is manually ON. OFF means the entire
system is OFF. THERMO
*2
means the system will automatically cycle ON/OFF, with the desired set temperature.
4.
SET
– Indicates desired set room temperature of THERMO
*2
mode. (works with
ROOM
)
5. FLAME
– Indicates burner / valve is at ON position.
6. CLOCK
– Indicates the current time.
7. ROOM
– Indicates CURRENT room temperature.
8. °F / °C
– Indicates degrees in Fahrenheit or Celsius (convertible).
BASIC TRANSMITTER FUNCTIONS & MODES
IMPORTANT
: The transmitter requires two AAA-size 1.5V batteries (excluded). New (fully charged) batteries are required for
proper functionality of the system. Insert batteries into the transmitter battery compartment on the back, positioning the (+)
and (-) ends of the batteries as indicated on the casing. (Fig. 1) When the batteries are inserted properly, LCD will display
initial numbers.
CAUTION:
Due to the temperature-monitoring components in the transmitter, it is important to allow the transmitter to
detect the room temperature before accurately displaying room temperatures on the screen. Normally it takes 5 to 15
minutes for every first time placing this transmitter in a new location / environment.
To begin the mode cycle (Fig. 3), press and release the MODE button (Fig. 1) until the LCD screen reads OFF (Fig. 4).
Step 1
: Press the MODE button to manually turn
ON
the receiver (Fig. 5). Timer is available in this mode.
The receiver will make sounds of quick BEEP X 2 (♫, ♫).


