Dura-Trel, Inc. ~
PO Box 122, Sheboygan Falls, WI 53085 ~ Toll Free 877-258-6020
TABLE TOP ASSEMBLY
(Refer to Upper Right Portion of Drawing 2)
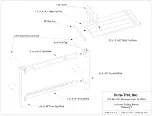
On a flat non-abrasive surface lay four 1 ½ x 5 ½ x 43" table top rails with pilot holes for screws
facing up. Take two 22" table top braces and insert 1¼” screws all the way through the pre-drilled
holes. Fasten table top braces to table top rails, carefully lining up 1¼” screws with the pre-drilled
pilot holes in the table top rails. Apply PVC or household glue to inside edges of
⅞
x 1 ½ x 22"
end cap and
push
(do not slide from end) end cap onto the end of each table top, taking care that
the end cap is flush with the outer edges of table top.
POTTING BENCH ASSEMBLY
(Refer to Drawing 3)
Stand up front and back assemblies from Drawings 1 and 2. Insert four 1½ x 4 x 22” rails into back
assembly. Insert opposite ends of 1½ x 4 x 22” rails into front assembly. Take eleven
⅞
x 3 x
24½” rails and insert one end of each rail into 1½ x 4 x 51½” shelf rail on back assembly. Insert
three
⅞
x 3 x 24½” rails into 1½ x 4 x 51½” table rail on back assembly. Carefully separate the
front and back assemblies just far enough to insert opposite ends of
⅞
x 3 x 24½” rails into
corresponding spots on the front assembly. Make sure all rails are fully inserted, and fasten
together using ¾” kappet screws. Snap screw caps over screw heads.
UPPER SHELF ASSEMBLY
(Refer to Drawing 4)
Full insert 1½ x 5½ x 48” rail into back left post, then insert opposite end into back right post.
Insert ends of 1½ x 5½ x 50½” rail into 1½ x 4 x 10¼” upper shelf left and right supports. Insert
upper shelf supports into back posts. Make sure 1½ x 5 ½ x 48” rail is centered between posts to
allow upper shelf supports to be fully inserted into back posts. Make sure all rails are fully inserted,
and fasten together using ¾” kappet screws. Snap screw caps over screw heads. Apply PVC or
household glue to inside edges of
⅞
x 1 ½ x 4" end cap and
push
(do not slide from end) end cap
onto end of upper shelf supports, taking care that the end cap is flush with the outer edges the
supports.
Set table top assembly in middle of potting bench with braces facing down. The table top is
designed to be removable for easy cleaning with a standard garden hose and any type of household
cleaner without abrasives.
If you encounter missing or defective parts, please contact manufacturer direct at
toll free # below.


