background image

12

Setting up

Connecting with your devices (continued)

(continued on next page)

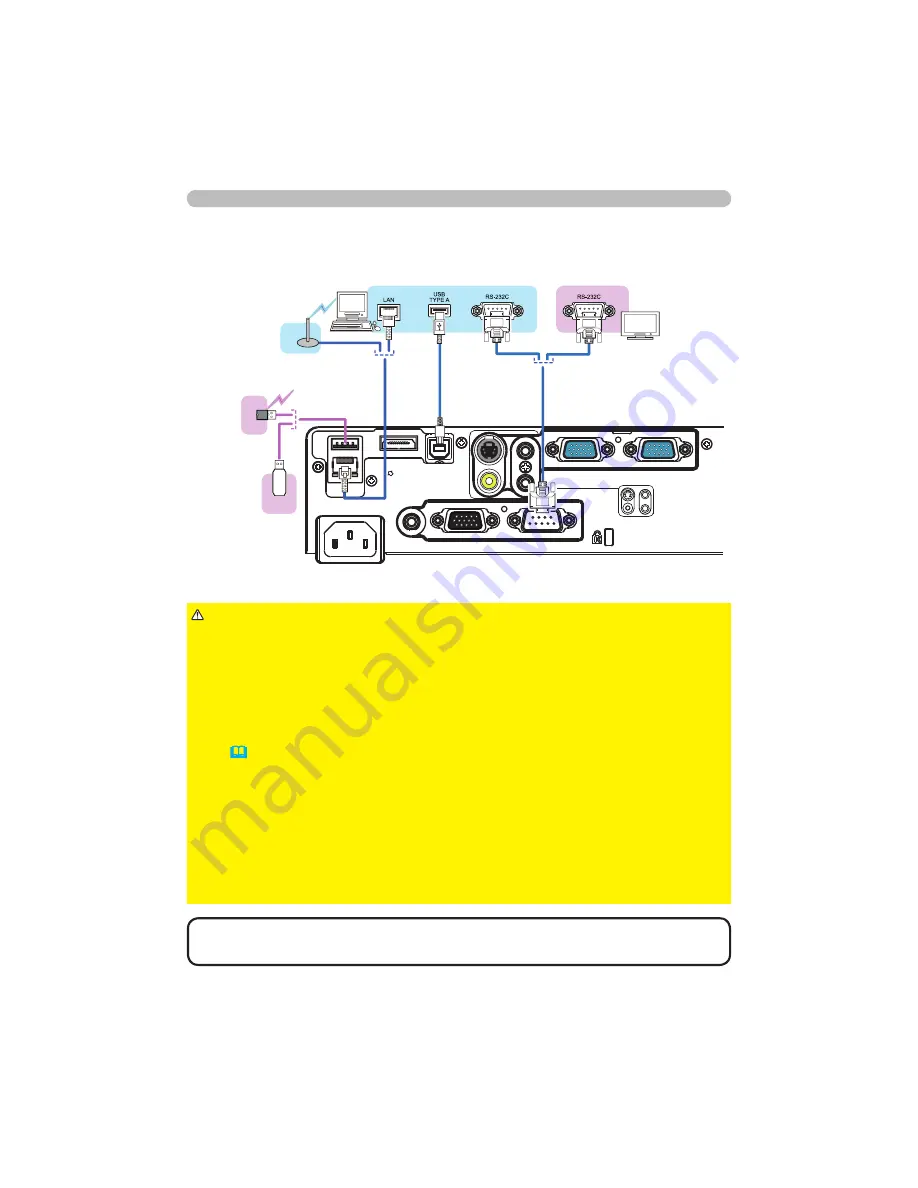
• If an oversized USB storage device blocks the 

LAN

 port, use a USB 

extension cable to connect the USB storage device.

NOTE

► Before connecting the projector to a network system be sure 

to obtain the consent of the administrator of the network.
►Do not connect the 

LAN

 port to any network that might have the excessive 

voltage.
►The designated USB wireless adapter that is sold as an option is required to 
use the wireless network function of this projector.
►Before removing the USB storage device from the port of the projector, be 
sure to use the REMOVE USB function on the thumbnail screen to secure your 
data (

&

83

). 

►Do not use any extension cable or device when connecting the adapter to the 
projector. Before you insert or pull out the USB wireless adapter from the projec-
tor, turn off the power of the projector and pull out the power cord’s plug from the 
outlet. Do not touch the USB wireless adapter while the projector is receiving AC 
power.
►To connect both the LAN cable and USB device to the projector, use a LAN 
cable that is fl at on the side where the plug’s wire is visible. Otherwise, both of 
them cannot be connected correctly, or the wire may break (malfunction).

CAUTION

Computer

External device

CONTROL

MONITOR OUT

AUDIO OUT

AC IN

LAN

HDMI

   USB

DC5V 0.5A

TYPE A

   USB

TYPE B

COMPUTER IN1

COMPUTER IN2

S-VIDEO

VIDEO

AUDIO IN2

AUDIO IN1

Access 

point

USB 

wireless 

adapter

(optional)

USB 

storage 

device

Содержание 8755L-RJ

Страница 1: ...ersonal injury or even death due to incorrect handling This symbol indicates information that if ignored could possibly result in personal injury or physical damage due to incorrect handling Please re...

Страница 2: ...T OVER SCAN V POSITION H POSITION H PHASE H SIZE AUTO ADJUST EXECUTE INPUT menu 39 PROGRESSIVE VIDEO NR COLOR SPACE VIDEO FORMAT HDMI FORMAT HDMI RANGE COMPUTER IN FRAME LOCK RESOLUTION SETUP menu 43...

Страница 3: ...clearer pictures on a screen If you insert a USB storage device such as a USB memory into the USB TYPE A port and select the port as the input source you can view images stored in the device This proj...

Страница 4: ...2 1 2 3 4 7 9 8 10 6 5 11 6 15 13 16 14 5 9 Do not open or remove any portion of the product unless the manuals direct it Do not subject the projector to unstable conditions Do not apply a shock or pr...

Страница 5: ...2 4 7 6 5 Rear panel 11 14 1 LAN port 2 USB TYPE A port 3 HDMI port 4 USB TYPE B port 5 VIDEO port 6 S VIDEO port 7 AUDIO IN1 port 8 AUDIO IN2 port 9 COMPUTER IN1 port 10 COMPUTER IN2 port 11 AUDIO OU...

Страница 6: ...18 14 VOLUME button 21 15 MUTE button 21 16 FREEZE button 28 17 MY BUTTON 1 button 56 57 18 MY BUTTON 2 button 56 57 19 KEYSTONE button 26 20 POSITION button 25 29 21 MENU button 29 22 cursor buttons...

Страница 7: ...les T 1 and T 2 at the back of User s Manual concise as well as the following to determine the screen size and projection distance The values shown in the table are calculated for a full size screen c...

Страница 8: ...pecified in the manual Do not use any mounting accessories except the accessories specified by the manufacturer Read and keep the manuals of the accessories used For special installation such as ceili...

Страница 9: ...so can cause the cooling fans inside the projector to malfunction Avoid placing the projector in smoky humid or dusty place Placing the projector in such places could cause a fire an electric shock a...

Страница 10: ...by EMI regulations CAUTION Plug and Play is a system composed of a computer its operating system and peripheral equipment i e display devices This projector is VESA DDC 2B compatible Plug and Play ca...

Страница 11: ...el are identical If you connect this projector and a notebook computer you need output the display to an external monitor or output simultaneously to the internal display and an external monitor Consu...

Страница 12: ...n on the thumbnail screen to secure your data 83 Do not use any extension cable or device when connecting the adapter to the projector Before you insert or pull out the USB wireless adapter from the p...

Страница 13: ...hat has HDMITM connector but with some equipment the projector may not work properly something like no video Be sure to use an HDMITM cable that has the HDMITM logo Use a Category 2 certified HDMITM c...

Страница 14: ...nnecting with your devices continued Monitor Speakers with an amplifier CONTROL MONITOR OUT AUDIO OUT AC IN LAN HDMI USB DC5V 0 5A TYPE A USB TYPE B COMPUTER IN1 COMPUTER IN2 S VIDEO VIDEO AUDIO IN2 A...

Страница 15: ...Only plug the power cord into an outlet whose voltage is matched to the power cord The power outlet should be close to the projector and easily accessible Remove the power cord for complete separation...

Страница 16: ...ar on the projector Refer to the figure to choose an anti theft chain or wire Also this product has the security slot for the Kensington lock For details see the manual of the security tool Do not use...

Страница 17: ...ERROR rangecheck OFFENDING COMMAND buildshading3 STACK dictionary dictionary...

Отзывы: