background image

Page   

iQ


Series

,


Ultrasonic Hand Held Systems User’s Manual

Dukane Manual Part No. 403-583-00

This page intentionally left blank

Содержание 20ALP060-1E

Страница 1: ...ntelligent Assembly Solutions www dukane com us Dukane Part No 403 583 00 iQ Series ULTRASONIC POWER SUPPLY AL User s Manual Dukane Intelligent Assembly Solutions 2900 Dukane Drive St Charles Illinois 60174 USA TEL 630 797 4900 FAX 630 797 4949 AUTOMATED HAND PROBE PRESS ...

Страница 2: ... mechanical photocopying recording or by any information storage and retrieval system without written permission from the manufacturer Notice of Liability The information contained is this manual is distributed on an As is basis with out warranty While every precaution has been taken in the preparation of this manual the manufacturer shall not have any liability to any person or entity with respec...

Страница 3: ...Page iii Dukane Manual Part No 403 583 00 Revision History Revision Revision Number Summary Date 00 Original release 11 02 2010 ...

Страница 4: ...Page iv iQ Series Ultrasonic Power Supply AL User s Manual Dukane Manual Part No 403 583 00 This page intentionally left blank ...

Страница 5: ...el Overview 23 Start up Sequence 25 LCD Display Overview 26 Section 5 Process Control Settings 27 Selecting the Weld Mode 29 Navigating the Modes 30 Hold 32 Amplitude Adjustment 32 System Information Advanced Settings 33 Setup Maintenance 35 Section 6 Probes and Probe Stacks 37 Section 7 Troubleshooting 49 Section 8 Specifications 55 Section 9 Contacting Dukane 61 Appendices 65 Appendix A E Stop C...

Страница 6: ...Page vi iQ Series Ultrasonic Power Supply AL User s Manual Dukane Manual Part No 403 583 00 This page intentionally left blank ...

Страница 7: ...ion 1 Introduction Dukane Manual Part No 403 583 00 SECTION 1 Introduction General User Information 3 Read the Manual First 3 Notes Cautions and Warnings 3 Drawings and Tables 3 System Overview 4 Key Features 4 ...

Страница 8: ...Page iQ Series Ultrasonic Power Supply AL User s Manual Dukane Manual Part No 403 583 00 This page intentionally left blank ...

Страница 9: ...dentify and avoid hazards and recognize the consequences One of three different symbols also accompany the CAUTION and WARNING blocks to indicate whether the notice pertains to a condition or practice an electrical safety is sue or an operator protection issue Drawings and Tables The figures and tables are identified by the section num ber followed by a sequence number The sequence num ber begins ...

Страница 10: ...ating amplitude smoothly minimizing the start up surges and abnormal stress to the stack and generator Digi Trac Tuning tracks the resonant frequency of the acoustic stack horn booster transducer and ad justs the generator output frequency to match it This is done for every weld cycle and eliminates the need to manually tune the generator Line Voltage Regulation automatically maintains constant am...

Страница 11: ...Page Section 2 Health and Safety Dukane Manual Part No 403 583 00 SECTION 2 Health and Safety General Considerations 7 Plastics Health Notice 7 Electrical Safety 8 Lifting the Equipment 9 ...

Страница 12: ...Page iQ Series Ultrasonic Power Supply AL User s Manual Dukane Manual Part No 403 583 00 This page intentionally left blank ...

Страница 13: ...ot remove any equipment cov er unless specifically directed to do so by the manufactur er The generator produces hazardous electrical voltages which could cause injury Grounded Electrical Power Operate this equipment only with a properly grounded electrical connection See Page 8 for grounding information Comply with Regulations You may be required to add accessories to bring the system into compli...

Страница 14: ...ovided Cable Approved 2 pole 3 wire grounding receptacle HUBBELL No HBL 5662 or equivalent NEMA Configuration 6 15R or 6 20R Figure 2 2 Example of 250 Volt Grounded 3 Prong Receptacle CAUTION If you have a two prong elec trical receptacle we strongly recommend that you replace it with a properly grounded three prong type Have a qualified electrician replace it following the National Elec tric Code...

Страница 15: ...ack Step 5 If you must turn while carrying the load turn using your feet not your torso To place the object below the level of your waist follow the same procedures in re verse order Remember keep your back as vertical as possible and bend at the knees Lifting the Equipment CAUTION Ta k e c a r e i n l i f t ing the equipment We recommend using a me chanical lift device to assist How to Lift Safel...

Страница 16: ...Page 10 iQ Series Ultrasonic Power Supply AL User s Manual Dukane Manual Part No 403 583 00 This page intentionally left blank ...

Страница 17: ... Part No 403 583 00 SECTION 3 Installation Before Installation 13 When to Use Lockout Tagout Devices 13 Unpacking 15 Placement 15 RFI Grounding 15 Connecting Cables 16 Power Cords 17 Automation Controlled System 17 System I O Connector Pinout 18 ...

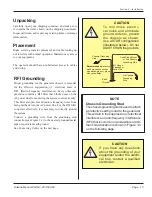
Страница 18: ...Page 12 iQ Series Ultrasonic Power Supply AL User s Manual Dukane Manual Part No 403 583 00 This page intentionally left blank ...

Страница 19: ...vice with lockout capability The LOTO device is placed over the plug end of the generator electrical cord This effectively prevents access to the energy isolation point See the example of one such device in the figure above The figure to the right shows the lockout device in the closed locked position Continued Figure 3 1 Lockout Device In Open Position Unlocked Figure 3 2 Bottom Lockout Device In...

Страница 20: ...re the shell with its lock and lock it 4 Wait a minimum of five minutes for the generator to discharge its electrical energy 5 After taking these steps make the necessary adjustments to the generator Assuming the generator is being put back into service Procedure to use AFTER making any internal adjustments to the generator 1 Authorized personnel remove the lockout tagout device from the plug end ...

Страница 21: ...ively it is necessary to correctly ground the system Connect a grounding wire from the grounding stud connection see Figure 3 1 to the nearest grounded metal pipe or equivalent earth ground See Connecting Cables on the next page CAUTION To minimize electri cal noise and eliminate ground currents ground the chassis as shown Use a STAR configuration illustrated below Do not DAISYCHAINthegrounds Eart...

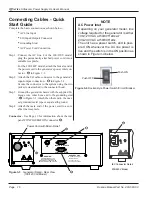
Страница 22: ...tud C in Figure 3 2 Attach the other end to the near est grounded metal pipe or equal earth ground Step 4 Attach the male end of the power cord to a suit able line receptacle Connector See Page 19 for information about the rear panel CONFIGURATION connector E NOTE AC Power Inlet Depending on your generator model line voltage required for the generator is either 100 120 VAC at 50 60 Hertz or 200 24...

Страница 23: ... use in North America or Japan Automation Controlled System Step 1 Ground the generator chassis using the supplied 14 Gauge wire and attach it to the grounding stud C in Figure 3 3 Step 2 Optional Ground the probe support This is a user supplied 14 Gauge wire Step 3 Input Output Cable Attach the automation control cable from the user supplied automa tion equipment to the system HD 15 connector INP...

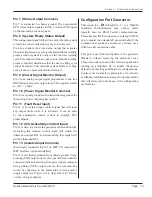
Страница 24: ... Stop circuit is used Otherwise this pin must be jumpered to Pin 1 for ultrasound operation to be enabled See Figure A 1 in Appendix A for E Stop circuit wiring examples Pin 3 System Overload Status Output Pin 3 is a non isolated digital NPN status output that activates when an output overload condition is tripped This output will be an open circuit if an output overload condition is not tripped T...

Страница 25: ...amming Pin 12 U S Activate Cycle Start Input Pin 12 is used to activate the generator ultrasound output Activating this isolated control input will switch the ultrasound output ON and deactivating this signal will switch ultrasound OFF Pin 13 Isolated Input Common Electrically connected to Pin 5 on MPC I O connector if MPC Interface option is installed Pin 13 is electrically isolated from chassis ...

Страница 26: ...Page 20 iQ Series Ultrasonic Hand Held Systems User s Manual Dukane Manual Part No 403 583 00 This page intentionally left blank ...

Страница 27: ...Page 21 Section 4 Controls and Connections Dukane Manual Part No 403 583 00 Front Panel Overview 23 Start up Sequence 25 LCD Display Overview 26 SECTION 4 Controls ...

Страница 28: ...Page 22 iQ Series Ultrasonic Hand Held Systems User s Manual Dukane Manual Part No 403 583 00 This page intentionally left blank ...

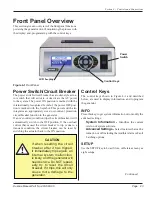
Страница 29: ...Switch Circuit Breaker The power switch circuit breaker has a rocker style actua tor switch that will activate or deactivate the AC power to the system The power ON position is marked with the internationally recognized I symbol the power OFF posi tion is marked with the 0 symbol This power switch also integrates an appropriately sized over current protection circuit breaker function in the genera...

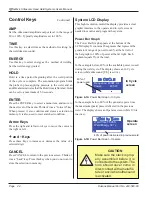
Страница 30: ...e right and left arrow keys to move the cursor to the right or left and Keys Press these keys to increase or decrease the value of a selected digit CANCEL Press CANCEL to return to the previous screen Think of it as a back key Press this key when you do not want to store the selection in memory System LCD Display This high resolution multi line display provides a clear graphic interface to the ope...

Страница 31: ...vated Stopping the Weld Cycle Normal Conditions The cycle stops when the programmed welding cycle ends if the generator is configured to weld by time or energy If it is configured to weld by automation the cycle ends when the Ultrasound Activate Cycle Start Input Pin 12 is deactivated Emergency Conditions Manual System Push the Power Switch to OFF See Figure 4 2 to stop the ultrasound signal This ...

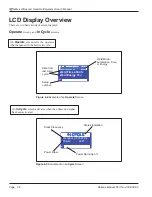
Страница 32: ...cle Screen IN CYCLE Frequency 40087 Hz Power 40 W 2 Status Indication Stack Frequency Power Draw Power Bar Graph Figure 4 4 Example of an Operate Screen Weld Mode Automation Time or Energy Automation Weld Weld Time 0 500 S Weld Energy 18 J 2 Data from last weld cycle Setup number An Operate screen tells the operator what happened in the last weld cycle An In Cycle screen activates when the ultraso...

Страница 33: ...Control Settings Dukane Manual Part No 403 583 00 SECTION 5 Process Control Settings Select the Welding Mode 29 Navigating the Modes 30 Hold 32 Amplitude Adjustment 32 System Information Advanced Settings 33 Setup Maintenance 36 ...

Страница 34: ...Page 28 iQ Series Ultrasonic Hand Held Systems User s Manual Dukane Manual Part No 403 583 00 This page intentionally left blank ...

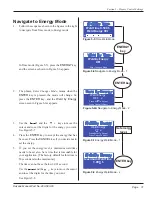
Страница 35: ...eactivated the ultrasonic signal stops and the cycle is complete unless there is a hold time programmed Time In TIME mode the operator sets a maximum time seconds that the ultrasonic signal will be active for each weld cycle The cycle starts when the Ultrasound Activate Cycle Start Input Pin 12 is activated The U S stops when the programmed time is reached Energy In ENERGY mode the operator sets a...

Страница 36: ... 4 Press the ENTER key to accept the time that has been set Figure 5 4 Press the CANCEL key if you decide not to set the time NOTE Navigating to Automation Mode Set Time or Energy depending on mode to OFF and press ENTER This will put you back in Automation mode Alternately Find an empty setup Press SETUP Press ENTER A pop up screen about defaults appears Select YES to load the default operating m...

Страница 37: ...nergy 5 If you set the energy level a maximum weld time needs to be set also Set a time that is reasonable for your application The factory default for this time is 30 seconds also the maximum The time can not be set below 0 001 second Use the and the keys to move the cursor and to set the digits for the time you want See Figure 5 8 Weld by Time Weld Time 0 500 S Weld Energy 00 J 2 Figure 5 5 Time...

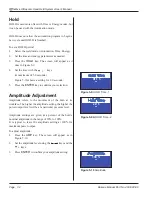
Страница 38: ...a setting for 2 0 seconds 5 Press the ENTER key to confirm your selection Amplitude Adjustment Amplitude refers to the movement of the horn at its workface The higher the amplitude setting the higher the power output level will be at a particular pressure level Amplitude settings are given as a percent of the horn s nominal amplitude in the range of 20 to 100 It is typical to leave the amplitude s...

Страница 39: ...f your unit Before you change a setting please check with Dukane personnel for their recommendations The warning screen is shown for a few seconds then the Advanced Settings screen appears See Figure 5 13 Adjustments can be made to Free Run Frequency Ramp Up Time Frequency Lock and Hold a n d Trigger By Power but note that Trigger by Power is only available when the weld mode is Time or Energy Fre...

Страница 40: ...found on our website at http www dukane com us DL_ApplData asp Follow the on screen prompts to make setting adjustments Trigger by Power For an explanation of Trigger by Power and the three settings that are connected with it please refer to Application Note 506 found on our website at http www dukane com us DL_ApplData asp When Trigger by Power is selected three additional settings screens are pr...

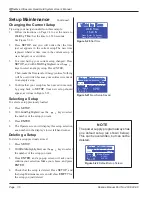
Страница 41: ...gure 5 17A Select NO and the display will change to an Operate screen Select YES and Automation Weld shows at the top of the Operate screen that will display next The setup number appears in the lower left corner of the screen Refer to Figure 4 4 3 After selecting YES press SETUP and the display will look like Figure 5 19 4 Delete To delete the setup select Delete as shown in Figure 5 19 and press...

Страница 42: ...select a setup previously loaded 1 Press SETUP 2 With Load highlighted use the keys to select the number of the setup you want 3 Press ENTER 4 The Operate screen will display this setup selection as a number in the display s lower left hand corner Deleting a Setup To delete a setup previously stored 1 Press SETUP 2 With Delete highlighted use the keys to select the number of the setup you want 3 P...

Страница 43: ...asonic Probe Overview 39 Theory of Operation 40 Probe Configuration 40 Ultrasonic Horn 41 Booster 41 Stack Assembly 42 Attaching Replaceable Tips 42 Attaching Mounting Stud to Horn Booster 43 Attaching Horn to Booster 44 Attaching Booster to Probe 44 Attaching Horn to Probe 44 Stack Disassembly 46 Booster Notes 48 ...

Страница 44: ...Page 38 iQ Series Ultrasonic Hand Held Systems User s Manual Dukane Manual Part No 403 583 00 This page intentionally left blank ...

Страница 45: ...keep the probe cool with compressed air Use the probe s air fitting to connect the air source to the probe See Section 8 Specifications for more detail CAUTION The ultrasonic cable car ries high electrical current when in operation Do not nick or cut this cable If cut there would be a high potential for electric shock NOTE Compressed air supply Make sure the air is clean oil free and dry ...

Страница 46: ...ibrations 2 A horn to transfer the mechanical vibrations from the probe to the parts to be welded Optional components include special replaceable tips which can be threaded on to the tip of the horn and a booster to amplify the mechanical vibrations of the horn A basic probe system is shown in Figure 6 1 Normally a booster is not used with a probe as this increases the length and weight and reduce...

Страница 47: ...ernal stress in the horn increases Higher frequencies are used for delicate parts that cannot handle a lot of amplitude Some factors to keep in mind for high frequency e g 40kHz ultrasonic welding versus low frequency e g 20kHz ultrasonic welding are listed here 1 Stress in the horn is higher at high frequencies 2 Wear on the horn is greater at high frequencies 3 Clean and flat mating surfaces bet...

Страница 48: ...w these instructions may result in the mating surfaces bonding and difficulty removing the tip from the horn 3 Thread the tip into the horn and tighten to the torque specifications below using an open end wrench of the correct size to fit the wrench flats of the tip This is illustrated in Figure 6 3 If necessary use a spanner wrench on horns with spanner wrench holes or an open end wrench on horns...

Страница 49: ...orns with wrench flats to keep the horn or booster from turning in your hand in lb ft lb N m Size 12 18 1 1 5 1 4 2 1 2 x 20 tpi studs 12 18 1 1 5 1 4 2 3 8 X 20 tpi studs 12 18 1 1 5 1 4 2 8 mm studs Always assemble the mounting studs that mate boosters transducers and horns to the input end of the horn or the input end of the booster first This is shown in Figure 6 5 NEVER thread a stud into the...

Страница 50: ...The grease will allow both surfaces to intimately mate and become acoustically transparent which improves the energy transfer We recommend Dow Corning 4 or 111 as an alternate A small packet of Dow Corning 4 is supplied with the system If you cannot use a silicon based grease in your facility a petroleum based grease may be used However it is likely to leave carbonaceous deposits on the surface an...

Страница 51: ...4 for the correct procedure Refer to Table 6 III for torque unit conversions Be careful not to overtighten Table 6 III Horn Booster Torque Unit Conversions NOTE Horn and booster torque specifications are higher than stud torque specs Be sure to tighten the horn or booster joints to the higher torque limits Do not tighten the studs to these higher ratings as it may induce unnecessary stress in the ...

Страница 52: ... mating surfaces after the first 200 400 hours of operation If they require cleaning halve the time between inspections If the surfaces do not require reconditioning then double the time between inspections Each system is different due to the large number of operational parameters and stress factors Figure 6 5 Probe Assembly and Disassembly CAUTION Never hold a probe by the housing when tightening...

Страница 53: ...ter Removing Replaceable Tips from a Horn Use an open end wrench of the correct size to fit the wrench flats of the detachable tip Use a spanner wrench on horns with spanner wrench holes or an open wrench on horns with wrench flats to provide an opposite force to keep the horn from turning in your hand Refer to Figure 6 7 for the correct tip removal procedure Loosen Figure 6 6 Separating the Horn ...

Страница 54: ...toward the input end How to Tell if the Booster Is Amplifying or Reducing Boosters have a die stamped number on their surface that indicates their gain or reduction If the number is greater than 1 0 e g 1 5 it is an amplifying booster If the number is less than 1 0 e g 0 6 it is a reducing or reverse booster A neutral booster has no gain and has 1 0 stamped on it A neutral or coupling booster is u...

Страница 55: ...Section 7 Troubleshooting Page 49 Dukane Manual Part No 403 583 00 SECTION 7 Troubleshooting No Ultrasonic Output 51 System Power Output Level 51 Welding Problems 52 Pop up Fault Status Screens 53 ...

Страница 56: ...Page 50 iQ Series Ultrasonic Hand Held Systems User s Manual Dukane Manual Part No 403 583 00 This page intentionally left blank ...

Страница 57: ...and see if the fault condition has been corrected Overtemperature When the system overheats and the generator s internal temperature exceeds 85 C 185 F an overtemperature fault condition will trip When the system cools the system automatically resets the overtemperature fault Generator Fault Does Not Reset When a system fault condition does not automatically reset the generator needs servicing Sys...

Страница 58: ... lead to inconsistent welds Fillers can be especially troublesome if they are not uniformly distributed the content is too high or it contains too much or poor quality regrind or degraded plastic Try welding by energy This eliminates many inconsistencies There should be no unusual or loud noise from the acoustic stack If there is disassemble the stack and reassemble Exchange the probe with another...

Страница 59: ...is match Fault will reset when next weld cycle starts Resonant frequency not found or lost Check for a defective stack component Check for stack coupling to the fixture Fault will reset when next weld cycle starts System Overtemperature fault detected Fault will reset when system cools down Internal communications error Turn generator power off and back on Call Dukane service if the fault persists...

Страница 60: ...Page 54 iQ Series Ultrasonic Hand Held Systems User s Manual Dukane Manual Part No 403 583 00 This page intentionally left blank ...

Страница 61: ...on 8 Specifications Page 55 Dukane Manual Part No 403 583 00 SECTION 8 Specifications Generator Outline Drawing 57 Weights 58 Operating Environment 58 AC Power Requirements 59 Regulatory Agency Compliance 60 ...

Страница 62: ...Page 56 iQ Series Ultrasonic Hand Held Systems User s Manual Dukane Manual Part No 403 583 00 This page intentionally left blank ...

Страница 63: ...Section 8 Specifications Page 57 Dukane Manual Part No 403 583 00 Figure 8 1 Generator Outline Drawing 12 41 315 2 10 00 254 3 95 100 3 3 51 89 2 ALLOW 5 127 mm BEHIND UNIT FOR CABLE CONNECTIONS IN mm ...

Страница 64: ...e equipment dry Minimize exposure to moisture dust dirt smoke and mold Humidity 5 to 95 non condensing 5 C to 30 C Nonoperating storage guidelines Temperature 4 F to 158 F 20 C to 70 C Air Particulates Keep the equipment dry Minimize exposure to moisture dust dirt smoke and mold Humidity 5 to 95 non condensing 0 C to 30 C Weights Generator 12 pounds 5 44 kg Shipping Add 5 pounds 2 27 kg to unit we...

Страница 65: ...ts Nominal AC Volt North America Japan AC Outlet Rating 20kHz 20ALP060 1E 600 100 120 VAC 50 60 Hz 9 0 Amps 15 0 Amps 20kHz 20ALP060 2E 200 240 VAC 50 60 Hz 4 5 Amps 30kHz 30AL060 1E 100 120 VAC 50 60 Hz 9 0 Amps 30kHz 30AL060 2E 200 240 VAC 50 60 Hz 4 5 Amps 40kHz 40AL060 1E 100 120 VAC 50 60 Hz 9 0 Amps 40kHz 40AL060 2E 200 240 VAC 50 60 Hz 4 5 Amps Table 8 I AC Power Requirements ...

Страница 66: ... The generator complies with the following CE requirements T h e E M C D i r e c t i v e 2 0 0 4 1 0 8 E C for Heavy Industrial EN 61000 6 4 2001 EN 55011 2003 EN 61000 6 2 2001 EN61000 4 2 EN61000 4 3 EN61000 4 4 EN61000 4 5 EN61000 4 6 EN61000 4 8 EN61000 4 11 The Low Voltage Directive 2006 95 EC The Machinery Directive 2006 42 EC EN 60204 2006 Safety of Machinery Electrical Equipment of Machine...

Страница 67: ...Section 9 Contacting Dukane Page 61 Dukane Manual Part No 403 583 00 SECTION 9 Contacting Dukane ...

Страница 68: ...Page 62 iQ Series Ultrasonic Hand Held Systems User s Manual Dukane Manual Part No 403 583 00 This page intentionally left blank ...

Страница 69: ...aken to resolve it Many problems can be solved over the telephone so it is best to call from a telephone located near the equipment Intelligent Assembly Solutions Mailing Address Dukane Ultrasonics 2900 Dukane Drive St Charles IL 60174 USA Phone 630 797 4900 Fax Main 630 797 4949 Service Parts 630 584 0796 Website The website has information about our products processes solutions and technical dat...

Страница 70: ...Page 64 iQ Series Ultrasonic Hand Held Systems User s Manual Dukane Manual Part No 403 583 00 This page intentionally left blank ...

Страница 71: ...Page 65 Appendices Dukane Manual Part No 403 583 00 APPENDICES Appendix A E Stop Circuitry Examples 67 Appendix B List of Figures 68 Appendix C List of Tables 69 ...

Страница 72: ...Page 66 iQ Series Ultrasonic Hand Held Systems User s Manual Dukane Manual Part No 403 583 00 This page intentionally left blank ...

Страница 73: ...able In Dedicated E Stop Switch Wiring Diagram System I O Connector Pin 1 Pin 2 User supplied E stop switch iQ Auto Enable Out Enable In Automation System Safety Circuit Wiring Diagram System I O Connector Pin 1 Pin 2 User automation control hardware Master control relay Relay contact block Appendix A ...

Страница 74: ... Cycle 24 4 1B Power Bar Graph Operate 24 4 2 Power Switch 25 4 3 Power up Screen 1 25 4 3A Power up Screen 2 25 4 3B Operate Screen Appears After Power up 25 4 4 Example of an Operate Screen 26 4 5 Example of an In Cycle Screen 26 5 1 Manual Weld Mode 30 5 2 Navigate to Time Mode 30 5 3 Time Weld Mode 1 30 5 4 Time Weld Mode 2 30 5 5 Time Weld Mode 31 5 6 Navigate to Energy Mode 1 31 5 6A Navigat...

Страница 75: ...of Tables Appendix B Continued 5 15 Trigger Watts 34 5 16 Trigger Timeout 34 5 17 Setup Maintenance 1 35 5 17A Pop up Load Defaults 35 5 18 Setup Maintenance 2 35 5 19 Setup Maintenance 3 35 5 20 Set Time 36 5 21 New Setup Saved 36 5 22 Default Setup Screen 36 6 1 Probe Horn and Tip 40 6 2 Probe Booster and Horn 41 6 3 Replaceable Tip Installation 42 6 4 Stack Assembly Procedure 44 6 5 Probe Assem...

Страница 76: ...Page 70 iQ Series Ultrasonic Hand Held Systems User s Manual Dukane Manual Part No 403 583 00 This page intentionally left blank ...

Страница 77: ... Infrastructure The ISO 9001 2008 standard establishes a minimum requirement for these requirements and starts transitioning the company from a traditional inspection oriented quality system to one based on partnership for continuous improvement This concept is key in that Du kane no longer focuses on inspection but on individual processes Dukane s quality management system is based on the followi...

Страница 78: ...St Charles Illinois 60174 USA TEL 630 797 4900 FAX 630 797 4949 iQ Series Ultrasonic Power Supply AL User s Manual Printed in the United States of America www dukane com us Please refer to our website at www dukane com us sales intsales htm to locate your local representative ...

Отзывы: