background image

user manual

V 07.07.2018

BASIC risers

Содержание Universal 1.1 23

Страница 1: ...user manual V 07 07 2018 BASIC risers ...

Страница 2: ...g 18 powered flights launch 19 powered flights climbing 23 powered flights flight 25 activating the trimmer 27 steering influence on airfoil 28 speed modes 29 powered flights 31 golden rules 32 quick descent methods 33 extreme manoeuvres 35 paraglider care 37 warranty and aerocasco 40 page enviromental care 42 what have you bought 43 technical data 44 rigging scheme 45 summary 47 ...

Страница 3: ... so or when undergoing training at an accredited school Pilots are personally responsible for their own safety and their paraglider s airworthiness The use of this paraglider is solely at the user s own risk Neither the manufacturer nor dealer do accept any liabilities involved This paraglider on delivery meets all the requirements of the EN 926 1 and 926 2 regulations or has an airworthiness cert...

Страница 4: ... flying recreational paraglide Beginning pilots will surely appreciate exceptional comfort in uneasy thermals resulting from considerable amount of reflex traits present in the design On activating the trimmers Universal 1 1 becomes a full reflex paramotor wing good for both leisure and cruise flying thermalling last but not least for initial paramotor training Universal 1 1 is refreshed version o...

Страница 5: ...l stages of the production process take place as our Polish plant under close supervision of the designer himself thus ensuring highest European quality Careful selection of modern fabrics and design solutions brings about great strength and durability of the canopy All materials used come from marked production batches and each production step can be verified down to identification of individual ...

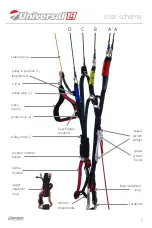
Страница 6: ...pulleys brake handle pulley loop 2 pulley loop 3 speed system hooks upper carabiner loop lower carabiner loop steering line riser scheme 6 pulley in position 1 lengthened taśma trymera carabiner D B C A A sviwel trimmer strap handle Easy Keeper magnets ...

Страница 7: ...opriate scale designed for easy and fast replacement in case of deterioration three levels of the pulleys to be used depending on the hangpoint level For quick and easy recognition in emergency some of the risers are distinguished with coloured covers as follows A red used for launching A red used for big ears B yellow used for B stall D blue needed to keep the glider down in strong wind aborted l...

Страница 8: ...dymium magnets It keeps the handles firmly at the risers while both attaching and releasing goes smoothly and easily The system allows for easy placing the brake handles on risers during flight when they are not used thus minimalizing the danger of getting into running propeller riser scheme 8 ...

Страница 9: ...ve your brake handles in rigid half rigid or soft configuration without need to purchase additional handles swivel against twisting of the steering line Neodymium magnet of the Easy Keeper exchangeable insert slit for the inserts semi soft PVC insert rigid insert The soft handle is obtained when no insert is used toggle ...

Страница 10: ...lot should perfectly understand that The biggest danger induced by overloading the canopy is its hyperreactivity Caution Check your real take off weight Some pilots calculate their take off weight by just summing up catalogue numbers e g paramotor 29 kg canopy 6 kg pilot 87 kg ca 120 kg In fact your actual take off weight can be umpteen kilograms bigger Most often we forget the clothing electronic...

Страница 11: ...teering lines while the lower hangpoints shorter lines Before you will take on powered flight it is recommended to try the setup out Hang up the entire PPG unit with ropes sit in the harness and ask someone to pull the risers up You must make sure that in flight you will always be able to reach the brake handles even if the airflow blows them away Being suspended in this way you have a perfect opp...

Страница 12: ...How to match the pulley level and steering line mark with the suspension height before first use 12 ...

Страница 13: ...K magnet mounted over second pulley position Pulley in first position EK magnet mounted over buckle of the trimmer Pulley in second position middle EK magnet mounted over buckle of the trimmer 4 Pulley in third position lower EK magnet mounted over buckle of the trimmer ...

Страница 14: ...ed Make sure they are not tangled and checked against catching anything It is equally important to check the brake lines They must be firmly attached to the brake handles and run freely through the pulleys to the trailing edge make sure the risers are not twisted it is very important to check that no lines are looped around the canopy The so called line over may have disastrous consequences during...

Страница 15: ... above you Let the A risers loose and check the wing Pump out possible faults and keep an eye on position of the paraglider Side drift is corrected best by moving yourself always under center of the canopy In order to keep wing in the air the suspension lines must stay taut all the time so in light winds you will have to run forward With stronger winds you can control the wing while standing still...

Страница 16: ...d system particularly hard Be careful not to confuse the risers Caution During start especially winched or with a motor always remember to bring the wing directly over your head The aerofoil and its angle of attack were arranged so as to give maximum lift coefficient with relatively high safety level As a result it can stay behind a pilot if he neglects bringing it directly over head during launch...

Страница 17: ...n with a small amount of brake applied This improves overall stability by increasing the angle of attack of the canopy The canopy should neither rock back nor surge forwards but always stay above the pilot In order to achieve it the pilot should accelerate the canopy by letting off the brakes when entering a thermal according to its strength and brake it on exiting This is part of basic active fly...

Страница 18: ...sult in a dangerous pendulum effect near the ground WINCHING Our paraglider has been successfully tested for foot launching by winch During winching trimmers should be set in closed position 0 First phase of the winch take off is analogous to classic launch After rising the canopy you will be taken off the ground as the winch line gets loaded Avoid large heading corrections in first stage of fligh...

Страница 19: ...flying with the trimmers closed since in this configuration the Universal 1 1 behaves as a classic wing Once you feel confident with your wing you can start experimenting with faster trim settings and speed system Use all additional speed and vigor of the Universal 1 1 Caution Before each launch it is necessary to have a thorough check of the paraglider harness and power unit see page 14 Classic l...

Страница 20: ...he propeller On the other hand possible fall on your back and damaging the propeller is dangerous and costly so it should be avoided at any price even that of some damaged lines During take off when you feel that the strain on both risers to be equal open up full power and lean back to counter the engine thrust so that it can push you forward rather than towards the ground The best option is not t...

Страница 21: ...s and one brake with throttle and the second brake in the other hand With a decent wind it is by far the best way to launch In weaker wind it is better to prepare a classic launch as running backwards with a paramotor on your back is not the easiest thing to do It is reasonable not to pull the wing up until you are really determined to launch especially when it s already clipped in Lay down the ro...

Страница 22: ... case too you have to find such combination of trimmers brakes and throttle settings that will give you the best speed and rate of climb Remember You are launching with your hands crossed You have to really master this technique before trying it with a running engine on your back Any brake operation or steering inputs in general should be smooth and gentle Do not try to take off until you have you...

Страница 23: ...alfunction so it s better not to take unnecessary chances and always fly with a safe margin of speed Depending on the power unit geometry it is possible that after take off you will notice a propeller torque turning moment It will try to turn you around so counteract with a brake or harness cross bracing The risers of the Universal 1 1 feature double main carabiner loops upper and lower Asymmetric...

Страница 24: ...afe height after take off and wish to go for a route you can turn on the right direction fully open the trimmers and let off the brakes If the conditions are turbulent it can look foolhardy but this is the essential feature of the reflex profile the faster you fly the safer your Universal 1 1 That s why it s actually possible to release the brakes and enjoy your flight Caution Some pilots with pre...

Страница 25: ...ettings necessary for course adjustments When you intend to release the trimmers follow this procedure grab the trimmer buckles press the locks of both buckles with your thumbs once you feel both locks to let go allow the trimmer tapes to slowly slip out In this way you will be able to release the trimmers as muchas you intended to in a controlled action Closing the trimmers should be symmetrical ...

Страница 26: ...wing will be constantly turning Caution Do not engage speed system with closed trimmers Such action can cause dangerous deflations f you intend to use speed system release at least 6 cm of the trimmer Speed system Directly affects the angle of attack and unlike the trimmer does not alter the airfoil geometry Using full speedbar in case of the Universal 1 1 increases speed by ca 30 Contrary to most...

Страница 27: ...27 activating the trimmer 29 In order to fully activate the trimmer act as follows move the plastic buckle to the end of the trimmer strap take the trimmer strap out of the neoprene cover ...

Страница 28: ...feature will not work Closed trimmers Using the brakes is a typical steering mode in this configuration and does not cause any danger This setting is used during launch landing and thermalling The canopy behaves much as classic profile paraglider with slightly increased tuck resistance centre of pressures lifg speed sink pitching moment Influence of brake operation on the reflex profile Pilots use...

Страница 29: ...sers length in the middle position maximum speed Lengths of the risers incl quicklinks length tolerance 5mm speed modes 29 Trimmer settings influence on the airfoil A 490 mm A 490 mm B 490 mm C 490 mm D 490 mm A 490 mm A 490 mm B 535 mm C 605 mm D 665 mm A 490 mm A 490 mm B 475 mm C 450 mm D 425 mm C D C D B D A C A B A A B A A ...

Страница 30: ...lity classic speed system operation low angles of attack and maximum speed high stability and hard steering speed modes A 410 mm A 410 mm B 415 mm C 420 mm D 425 mm A 410 mm A 410 mm B 460 mm C 540 mm D 665 mm Lengths of the risers incl quicklinks length tolerance 5mm Trimmer settings influence on speed system action C D B D A C A B A A 30 ...

Страница 31: ... with your brakes If the landing field is not big enough and you have to land on the spot we advise you to set the trimmers in slower settings It will increase lift coefficient of the wing effectively decreasing its sink rate and speed Such an action is especially important when flying with high surface loading Powered landing Make a flat approach with the engine idling then level out and lose the...

Страница 32: ...ver water between trees or power lines etc where engine failure will leave you helpless Mind the turbulence caused by other gliders or even by yourself especially when flying low It is not reasonable to let go of the brakes below 100 meters because a possible power unit malfunction may require immediate attention In general never trust your engine as it can stop at any moment Always fly as if it s...

Страница 33: ...ring powered climb as the increased drag of the ears can cause excessive angle of attack and a parachutal stall Besides pulling the ears while climbing is pointless anyway B Stall B stal can be executed only with completely closed trimmers i e pos 0 To enter a B stall simultaneously pull down both B risers yellow cover by ca 10 15 cm The canopy will collapse across the entire span along its B row ...

Страница 34: ...orward toward leading edge This rule affects all paragliders but the more reflex is present in the airfoil the more aggressive is that effect A typical reflex paraglider on released trimmers shows following load distribution according to line rows A 60 B 30 C 5 D 5 Taking over as much of the load by the A and B rows of the reflex canopies 90 in total brings about their praised stability However in...

Страница 35: ...iour Extreme flying manoeuvres should only be carried out during safety training courses instability training under proper guidance One sided collapse When the trimmers are fully opened or the speed system is engaged collapses practically do not occur and can be induced only by a very strong turbulence Still if it happens a little counter steering is enough to keep the Universal 1 1 on course or a...

Страница 36: ...gnificant loss of speed Nevertheless if such a parachutal stall happens simply apply some pressure on speed bar and or push the A risers forward Line over and cravatte Universal 1 1 is a modern wing which in order to decrease drag has fewer suspension lines and greater distances between them Therefore it s always possible that after a tuck one of the stabilisers may tangle in the lines Usually a c...

Страница 37: ...gainst moisture and UV rays Never pack or store the glider when wet as it significantly shortens life of the fabric Remember that the wing becomes damp even while lying on green grass in direct sunlight as the grass transpires Caution Locking a wet paraglider in a car exposed to sun is absolutely unacceptable Hot car interior acts like an oven and tests have shown that color bleeding transfer can ...

Страница 38: ... careful to keep snow sand or stones from entering the cell openings their weight can slow or even stall the glider while sharp edges can damage the cloth Prevent lines from catching anything as they can overstretch or tear Never step on the lines Knots can chafe suspension and or brake lines Check the length of your lines after tree or water landing as they can stretch or shrink The lines can be ...

Страница 39: ...ry 24 months or every 150 hours whatever comes first if not advised otherwise by the inspecting person due to paraglider s condition In case of paragliders used commercially e g in schools or tandem flying a Full Inspection is recommended every 12 months after first 24 months from purchase date or every 100 hours airtime whatever comes first A paraglider can be officially inspected only by the man...

Страница 40: ...00 flight hours whatever comes first For the mountain wings MPG speedflying schools or professional users warranty covers 18 months 1 5 year or 150 flight hours whatever comes first Warranty does not cover any of the following canopy colour fading as well as bleeding caused by improper storage transport damage caused by chemicals or salt water damage caused by improper use damage caused in emergen...

Страница 41: ...l paragliders check before purchase It can be purchased only for privately used paragliders AeroCasco covers only damages occuring while taking off flying or landing Obviously all faults in the material and manufacturing flaws are covered by normal warranty When handing the paraglider for the repair you have to present a card confirming its AeroCasco status After the repair you will have to cover ...

Страница 42: ... where we can fly Keep to marked paths do not make excessive noise do not leave any garbage and respect fragile balance of the nature Recycling of used gear A paraglider is made out of synthetic materials which need to be properly disposed of when worn out If you are not able to dispose of the paraglider properly DUDEK Paragliders will do that for you Just send your paraglider to the address given...

Страница 43: ...ve fabric 10 cm x 37 5 cm for small repairs Note that even small tears located in the vicinity of stitches are to be repaired by an authorised service only ź looped and stitched suspension line the longest of all lines in the paraglider to be used as a temporary replacement Do not cut it if you have to temporarily replace a shorter one just tie it at the length needed ź paraglider passport with en...

Страница 44: ...6 00 46 00 45 60 5 60 5 95 6 40 6 85 7 35 PASAMON Bydgoszcz Polska Certification EN Approval ULM identification yes yes yes yes yes Number of cells Surface area flat m2 Surface area projected m2 Span flat m Span projected m Aspect Ratio flat Aspect Ratio projected Sink rate m s Speed km h min 23 trim 37 52 max 57 3 Max cord mm Min cord mm Distance pilot to wing m Total line lenght m Total take off...

Страница 45: ...per end with at least 150 mm margin for fastening brake handle this means for this line extra 25 cm than in the table is needed i The rigging scheme itself is published on the next page while tables of line lengths you will find in attachments to this manual Lengths are measured with a specialised computer operated device All the lines before measurement are stretched with a steady 5 kg load Thank...

Страница 46: ...46 rigging scheme ...

Страница 47: ...of possible dangers and face them wisely You must accept the fact that all air sports are potentially dangerous and your actual safety depends solely on you We insist that you fly safely and this concerns both the weather choicesafety margin during all manoeuvres Caution FLYING THE PARAGLIDER IS ALWAYS YOUR OWN RESPONSIBILITY summary 47 SEE YOU IN THE AIR ...

Страница 48: ...Dudek Paragliders ul Centralna 2U 86 031 Osielsko Poland tel 48 52 324 17 40 www dudek eu info dudek eu ...

Отзывы: