background image

6.

O P E R A T I N G   T H E   T O O L

Read Safety Instruction section of this manual.

Loading the tool:

WARNING:


Always connect air before loading the tool. 

Always wear safety goggles when operating the tool.

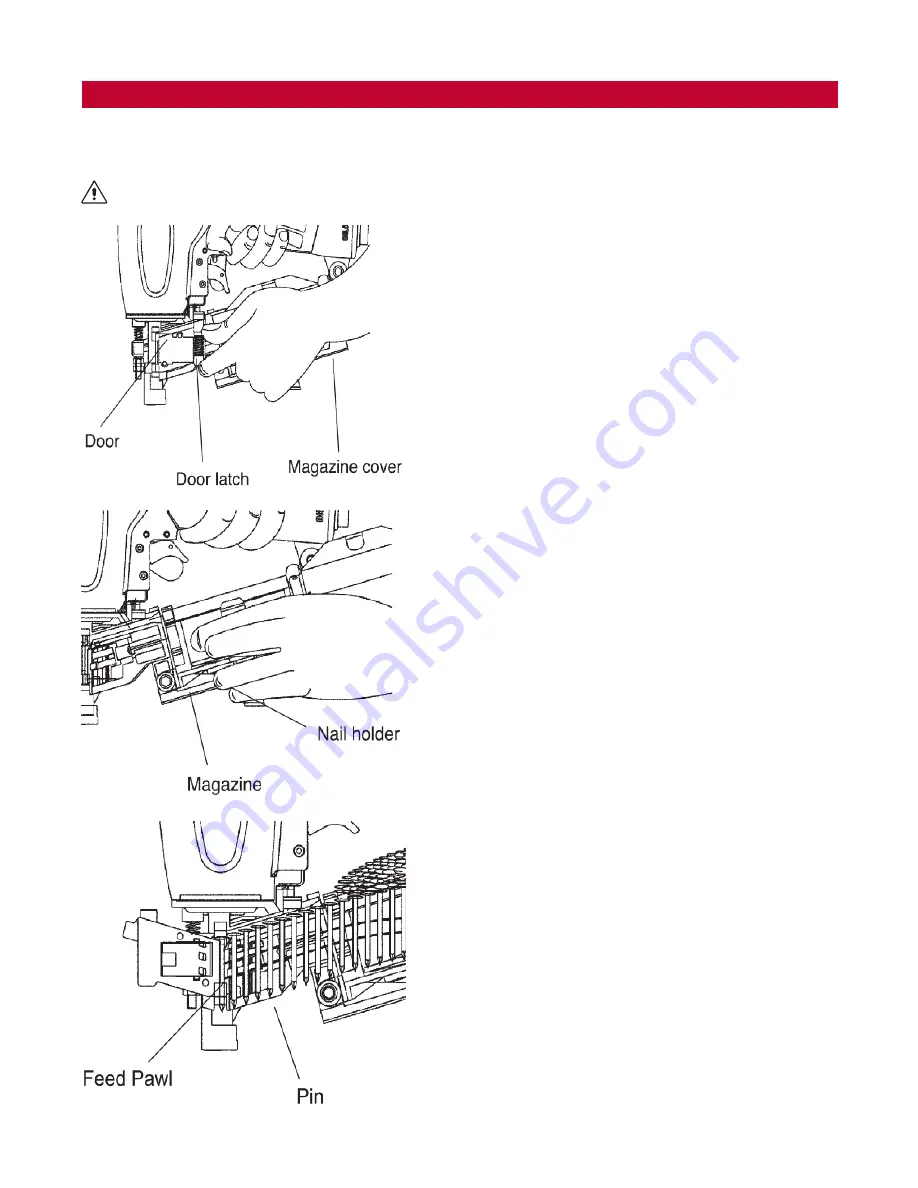
1. 

Open the magazine.


Pull down door latch and swing the door, then swing 

magazine cover open.

2. 

Check adjustment.


The pin support can be adjusted up and down for 

three settings.  Set the position of the pin support 

according to the pin length.  The pins will not feed 

smoothly unless the magazine is not adjusted 

correctly.  To change setting pull up on the post and 

twist to the correct step.

3. 

Load the coil fasteners.


Place a coil of fasteners over the post in the 

magazine.  Uncoil enough of the pins to reach the 

feed pawl, place the first pin in front of the feed pawl 

into the driver channel and place the second pin 

between the teeth of the feed pawl.  The heads of the 

pins must be in the slot in the nose.

4. 

Close the magazine.


Close the magazine cover and swing the door closed. 

Be sure that the door is fully latched when released.  

The tool is now ready to operate.

TEST OPERATION

1. 

Adjust the air pressure at 80 p.s.i. (5.5 bar) and 

connect the air supply.

2. 

Without touching the trigger, depress the safety nose 

against the work-piece.  Pull the trigger. (The tool must 

fire the fastener.)

3. 

With the tool off the work-piece, pull the trigger.  Then 

depress the safety nose against the work-piece.  (The 

tool should NOT fire the fastener.)

4. 

Adjust the air pressure as much as the lowest possible 

according tot he diameters and length of fastener and 

the hardness of work-piece.

Содержание REPEATER 4200

Страница 1: ...com Operation And Maintenance Manual BEFORE OPERATING THIS TOOL ALL OPERATORS SHOULD STUDY THIS MANUAL TO UNDERSTAND AND FOLLOW THE SAFETY WARNINGS AND INSTRUCTIONS IF YOU HAVE ANY QUESTIONS CONTACT WITH OUR REPRESENTATIVES OR DISTRIBUTOR WARNING 4200 ...

Страница 2: ...anual Contents Tool Specifications 3 Nail Specifications 3 External Tool Parts 3 Safety Instructions 4 Lubrication and Maintenance 5 Actuating Tool 5 Operating the Tool 6 8 Troubleshooting Guide 8 Part Lists 9 12 Warranty 12 4200 ...

Страница 3: ...rator s position A weighted single event sound power level A weighted single event surface sound pressure level LpA 1s 91 dBA LwA 1s 102 dBA LpA 1s 89 dBA Vibration Characteristics Values in Accordance with ISO 8862 1 Weighted root mean square acceleration 2 7 m s2 F A S T E N E R S P E C I F I C AT I O N S Smooth Wire collated Coil Nails Nail Lengths Shank Diameters Shank Type 1 19 05 24 5 mm 001...

Страница 4: ...tool that is leaking air or has damaged or missing parts Inspect screw tightness loose or improperly installed screws or bolts cause accidents and tool damage when the tool is put into operation Inspect to confirm that all screws and bolts are tight and properly installed prior to operating the tool Never use the tool if any portion of the tool controls trigger contact arm is inoperable disconnect...

Страница 5: ... and fasteners should be kept tight and undamaged Loose screws results in unsafe operation and parts breakage A C T U AT I O N T O O L Sequential Fire Trigger Gray Color To be used in applications where precise fastener placement is preferred This trigger reduces the chances of double firing and unintentional firing 1 With your finger off the trigger press the safety nose all the way down on the s...

Страница 6: ...ugh of the pins to reach the feed pawl place the first pin in front of the feed pawl into the driver channel and place the second pin between the teeth of the feed pawl The heads of the pins must be in the slot in the nose 4 Close the magazine Close the magazine cover and swing the door closed Be sure that the door is fully latched when released The tool is now ready to operate TEST OPERATION 1 Ad...

Страница 7: ... 3 Make sure that the trigger and safety move freely up and down without binding or sticking after each adjustment Clearing a Jammed Fastener Should a pin jam occur disconnect air supply from tool keep the tool pointed away from you and follow these instructions to clear If the tool jambs do not continue to fire the tool This cause the driver blade to break 1 Press down the door latch and swing th...

Страница 8: ...ce o ring Loose now screw Tighten screws and recheck Damaged o rings or gasket Replace o ring or gasket Bumper cracked worn Replace bumper Loose cap screws Tighten screws and recheck Damaged seal or gasket Replace seal or gasket Skipping fasteners Intermittent feed Worn bumper Replace bumper Dirt in nose Clean Dirty dry magazine Clean lubricate use pneumatic tool oil Damaged magazine Replace magaz...

Страница 9: ...9 P A R T L I S T R E P E AT E R 4 2 0 0 ...

Страница 10: ...6 DST4200 46 O Ring 1 47 DST4200 47 Ball Steel 2 Item Part Description Qty 48 DST4200 48 Adjusting Spring 1 49 DST4200 49 Adjusting Post 1 50 DST4200 50 Gasket 1 51 DST4200 51 Nose 1 52A DST4200 52A Magnet Bushing Assembly 1 Set 53 DST4200 53 Hex Soc Hd Bolt Lower 2 54 DST4200 54 Spring 1 55 DST4200 55 Feed Pawl 1 56 DST4200 56 O Ring 6 57 DST4200 57 Roll Pin 2 58 DST4200 58 Feed Piston 1 59 DST42...

Страница 11: ...11 P A R T L I S T R E P E AT E R 4 2 0 0 F R A M E ...

Страница 12: ...warranty shall run for a period of one year from the date of manufacture Warranty Limitation The warranty stated above is in lieu of all other warranties express or implied including but not limited to the implied warranties of MERCHANTABILITY AND FITNESS FOR A PARTICULAR PURPOSE Although Ductmate may have suggested the product or provided written or oral advice to the Purchaser it is the Purchase...

Отзывы: