background image

Mounting

5

TS SERIES

 INSTALLATION

1.   Determine where the speakers will 

be mounted. Make sure the area 
is large enough for the speaker 
to mount evenly. Also ensure the 
mounting location is deep enough for 
the speaker to fit.

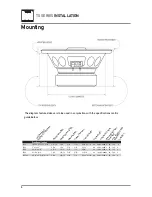
2.   Refer to the specification chart to 

determine the proper diameter hole 
to cut for your speaker model.

3.   If supplied, use the plastic mounting 

ring as a template to mark the 
locations for the mounting screws. 
Drill the holes with a 3/32" bit.

4.   Be sure to observe proper polarity 

when connecting the wires. The 
speaker's positive terminal is 
indicated with a "+" symbol.

5.  Fit the speaker to the hole cut-out.
  Mount the speaker using the  


  supplied screws. If the speaker grill  
  is to be used, insert 4 screws into 
  the grill holes and then mount the   
  speaker.

Standard Rear Deck Installation

Mounting hole

Cut-out

Grille

Speaker

Standard Door Installation

Grille

Speaker

Mounting hole

Cut-out

Содержание ILLUMINITE TS55

Страница 1: ...INSTALLATION OWNER S MANUAL TS SERIES Car Audio Speakers TS69 TS65 TS55 TS45 TS5768 ...

Страница 2: ... this system yourself have it installed by a qualified audio technician Before installation disconnect the battery negative terminal to prevent damage to the unit fire and or possible injury Do not connect Amplifier or any audio source to illuminite inputs Inputs are designed for 12 volt power source only Thank you for purchasing the TS Series car speakers Although Dual has attempted to make sure ...

Страница 3: ...nting your speaker in place 4 Use the highest quality connectors for a reliable installation and to minimize signal or power loss 5 Use caution before you drill or cut Be careful not to cut or drill into gas tanks fuel lines brake or hydraulic lines vacuum lines or electrical wiring when working on any vehicle 6 Never run speaker wires underneath your vehicle Running speaker wires inside the vehic...

Страница 4: ...nal housing The polarity and indicators for each set of inputs also appear on these labels 1 Do not connect amplifier or any audio source to illuminite lighting inputs Inputs are designed for switched 12 volt DC power source only 2 See fig 1a illustrated wiring diagram be sure to maintain polarity Be sure to connect to a switched 12 volt DC source Correct connection would be the positive 12 volt w...

Страница 5: ...lastic mounting ring as a template to mark the locations for the mounting screws Drill the holes with a 3 32 bit 4 Be sure to observe proper polarity when connecting the wires The speaker s positive terminal is indicated with a symbol 5 Fit the speaker to the hole cut out Mount the speaker using the supplied screws If the speaker grill is to be used insert 4 screws into the grill holes and then mo...

Страница 6: ...50 135 4 TS45 5 1 4 x 5 16 1 3 4 1 15 16 7 16 5 16 3 11 16 89 100Hz 20kHz 40 120 4 TS5768 9 5 16 x 6 11 16 x 1 2 2 3 4 2 15 16 7 16 1 4 5 3 16 x 7 1 2 89 63Hz 20kHz 50 150 4 G r i l l D i m e n s i o n s H x W x D o r H x D i a m e t e r T o p M o u n t i n g D e p t h T w e e t e r P r o t r u s i o n B o t t o m M o u n t i n g D e p t h C u t o u t D i a m e t e r S e n s i t i v i t y d B F r ...

Страница 7: ...e product What to do 1 Before you call for service check the troubleshooting guide in your owner s manual A slight adjustment of any custom controls or connections discussed in your instruction booklet may save you a service call 2 If you require service during the warranty period you must carefully pack the product preferably in the original package and ship it by prepaid transportation with a co...

Страница 8: ...Dual Electronics Corporation Toll Free 1 866 382 5476 www dualav com 2009 Dual Electronics Corp All rights reserved NSA0209 V1 1 ...

Отзывы: