DTVS Smart1 Скачать руководство пользователя страница 7

7

Names and Functions of Parts
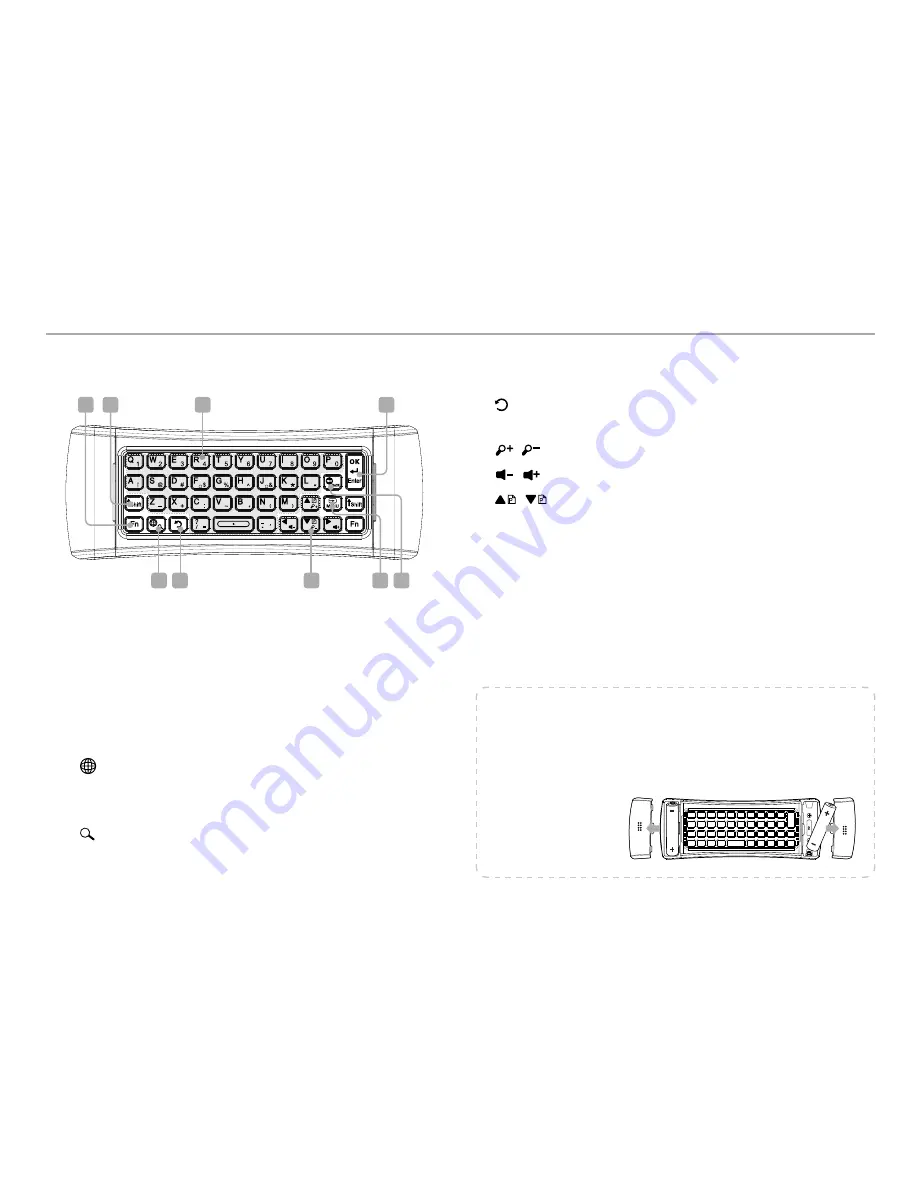
 RF RCU - Qwerty


1.  Character, number, and functions  


 Enter characters or numbers.

  2. Shift


 If you want to input capital letters or  upper letters, 
press 

Shift

 button together.

  3. Fn


 If you wan to input numbers, special characters 
and functions with blue, press Fn button together.


4. 

 (Multi Language)  


You can enter the language you selected in the  


System menu of Setup.


 (Search) 

 (Press and Hold) 

Displays search screen.

 5.   (Back)  

Returns to the previous screen.

 6. 

/

/

/

►  Moves the focus up/down/left/right.


 /   

Use Zoom in/out function with 

Fn 

button.

    /   

Use Volume up/down with the 

Fn 

button.


Use Page up/down function with the 

Shift

 button.

  7. MENU


Displays the menu screen.

  8. BACK


Removes the previous character.

  9. ENTER


 Finishes the current text input or executes a 
command.


OK  

OK or select function with Fn button.

Inserting the batteries

Use the 2 AA batteries for RF RCU.

1.

 Push and slide in the direction of the arrow in the figure to open the battery cover.

2.

  Insert the new batteries into the battery slot.


y

Make sure you match the plus (“+”) ends with the plus markings on the  
battery case.

3.

  Close the battery covers.

1

9

4

5

6

7

8

2

3

Содержание Smart1

Страница 1: ...Please read this installation manual carefully before use...

Страница 2: ...t place this product under direct sunlight near heaters or in places where there is heat It may result in a fire Whenthereisheatorsmokefromtheproduct immediatelyremovethe poweradapter Itmaycauseafireo...

Страница 3: ...onfiguring the Home Screen 14 Viewing program information 15 Using the status information menu 15 Using multi mode 15 Configuring the Main Menu 16 CHANNEL 17 CHANNEL configuration 17 Using the sort me...

Страница 4: ...SATA slot 3 S PDIF OPTICAL Connect S PDIF to the digital audio unit 4 AVOUT Connect AV cable to the display 5 HDMI Connect HDMI cable to the display 6 USB Connect external USB devices to USB slot 5V...

Страница 5: ...the previous channel 7 MENU Displays application menu items if available 8 Back Returns to the previous screen Home Long press Displays current channel 9 Plays pauses media OK Selects highlighted men...

Страница 6: ...menu Zoom In Zoom in function is available on images and web browsers 14 APP Green Moves to APP menu Zoom Out Zoom out function is available on images and web browsers 15 FAVORITE Yellow Moves to FAV...

Страница 7: ...creen 6 Moves the focus up down left right Use Zoom in out function with Fn button UseVolume up down with the Fn button Use Page up down function with the Shift button 7 MENU Displays the menu screen...

Страница 8: ...8 Connections Connecting HDMI AV cables Connecting S PDIF Connecting Ethernet cable Connecting a satellite antenna cable HDMIcable AVcable stereotype Digitalaudiocable Optical Satelliteantennacable...

Страница 9: ...ting external storage devices Connecting the power adaptor Connecting USB storage devices Connecting peripherals e SATAcable USBStorage Device USBStorage Device Poweradaptor Wirelessdongle SD MMC Wire...

Страница 10: ...n to the radio you must first perform the installation procedures The First time installation gives you the convenience of selecting various languages displays setting network setting weather setting...

Страница 11: ...ss Back button 13 Select ALL FTA or Scramble and then press the OK button 6 Press the OK button to select Network Settings 7 Select Ethernet DHCP Ethernet Manual or Wireless Ethernet DHCP Automatic se...

Страница 12: ...e Antenna type popup menu 3 Use the OK buttons to select the DiSEqc 1 0 DiSEqc 1 1 Motor or USALS options The Channel Search screen will be shown Note If you want to change the Antenna type press the...

Страница 13: ...ect a satellite using the buttons Edit Name You can change the satellite name To save the name press the OK button LNB Frequency Press the OK button to display popup menu Use the OK buttons to select...

Страница 14: ...to display the Transponder Edit popup menu 4 Set up the menu Deleting a channel 1 Use the OK buttons to select a satellite or transponder list The blue indicator light should turn on 2 To delete a ch...

Страница 15: ...While the program information is displayed press the button to display detailed program information Note Program information will disappear after five seconds of inactivity Current area Date time 4 Da...

Страница 16: ...lays the Application list Yellow button Displays the CHANNEL APP or INTERNET favorites Blue button Displays the bookmarks list White button Displays the 7 day Electronic Programme Guide EPG None Selec...

Страница 17: ...A HD SD Scrambled or FTA Find sort To Find channels enter the first letters of the channel name Note To Find sort select the Default of Group sort Sorted channels on Find sort will not be saved If you...

Страница 18: ...s by Satellite Sorting by Favorite group Press the GREEN button to sort channels by Favorite Group To select F1 F12 press OK button Sorting by Channel name Press the YELLOW button to sort channels by...

Страница 19: ...ite TV or Radio Default A Z Z A CAS FTA HD SD Next press the OK button to save changes Channel edit Press the GREEN button to edit channels Select lock unlock delete rename or Add Removefavorite Press...

Страница 20: ...h channel select the ALL satellite of Sort RED button Displays the channel lists of sorted satellite Displays selected favorite group Add remove commands Help menu for edit Multi select for move Move...

Страница 21: ...n to run the assigned application Note Only applications can be assigned to Hotlink Channel sort Press the RED button to sort channels Select satellite TV or Radio Default A Z Z A CAS FTA HD SD Next p...

Страница 22: ...and view pictures Video Note Unicode subtitle is supported Screen capture function is supported Playback position Total length Use the buttons to move the current media playback position on the seek b...

Страница 23: ...e OK button Repeats the current song Repeats all songs Do not repeat Displays the play list settings Add Delete Select All APP Using iMedia player Picture Select the photo file Previous file Rotate ri...

Страница 24: ...he OK button Repeats the program Do not repeat Repeat Play mode Edit mode Using PVR player Start recording While watching a program press the Record button to begin recording While recording the recor...

Страница 25: ...d Each time the button is pressed the forward speed is increased as and Each time the button is pressed the rewind speed is increased as and UsingTimeShift If the Time Shift is set while watching sate...

Страница 26: ...ite select Search To input text press Keyboard button to display the virtual keyboard Select the search box if you want to search and press and hold the Keyboard button to display the virtual keyboard...

Страница 27: ...the IPTV application to the browser on PC as below and click ADD After the OK button is pressed the channel will be displayed on the PC browser and IPTV application APP Using IPTV Advanced Application...

Страница 28: ...for advanced users for experimental purposes The software is offered without any warranties or right of claim for any damage caused to the product or any source or body external The product manufactu...

Страница 29: ...on to select Remove from Favorite 1 Press the MENU button to displays the Options menu 2 Press the OK button to select Add to Favorite EPG Configuring the EPG or Select EPG menu 1 Use the buttons to s...

Страница 30: ...sort menu Add Reservation Recording Find sort To Find channels enter the first letters of the channel name Note To Find sort select the Default of Group sort Sorted channels on Find sort will not be...

Страница 31: ...hould turn on Press the RED button to delete the selected item Displays the PVR storage and available space Using the SETUP Select System WIRELESS NETWORKS Wireless On Off Ethernet DHCP Static IP Blue...

Страница 32: ...cess to any functions with PIN Code DO NOT FORGET IT Note Master PIN code 7962 Using the SETUP PVR Storage path Time shift Channel Location Select location for channel More Pairing for RF remote contr...

Страница 33: ...all running applications select the Running section Running applications can be stopped by selecting the respective option in the application detailed information 5 To display detailed application inf...

Страница 34: ...nect the power adapter for a long time However the product has no other problems Poor picture quality Check the signal level If it is low please try to adjust the alignment of your satellite dish No s...

Страница 35: ...with HDMI 1 3a RS 232 D SUB 9Pin USB 4 x USB 2 0 e SATA Up to 3 Gbps S PDIF OPTICAL Digital Audio output SD MMC 1 x SD memory card slot Ethernet 10 100BASE T RJ 45 Ethernet Wireless 802 11 b g n 2 4G...

Страница 36: ...C350 0003...

Отзывы: