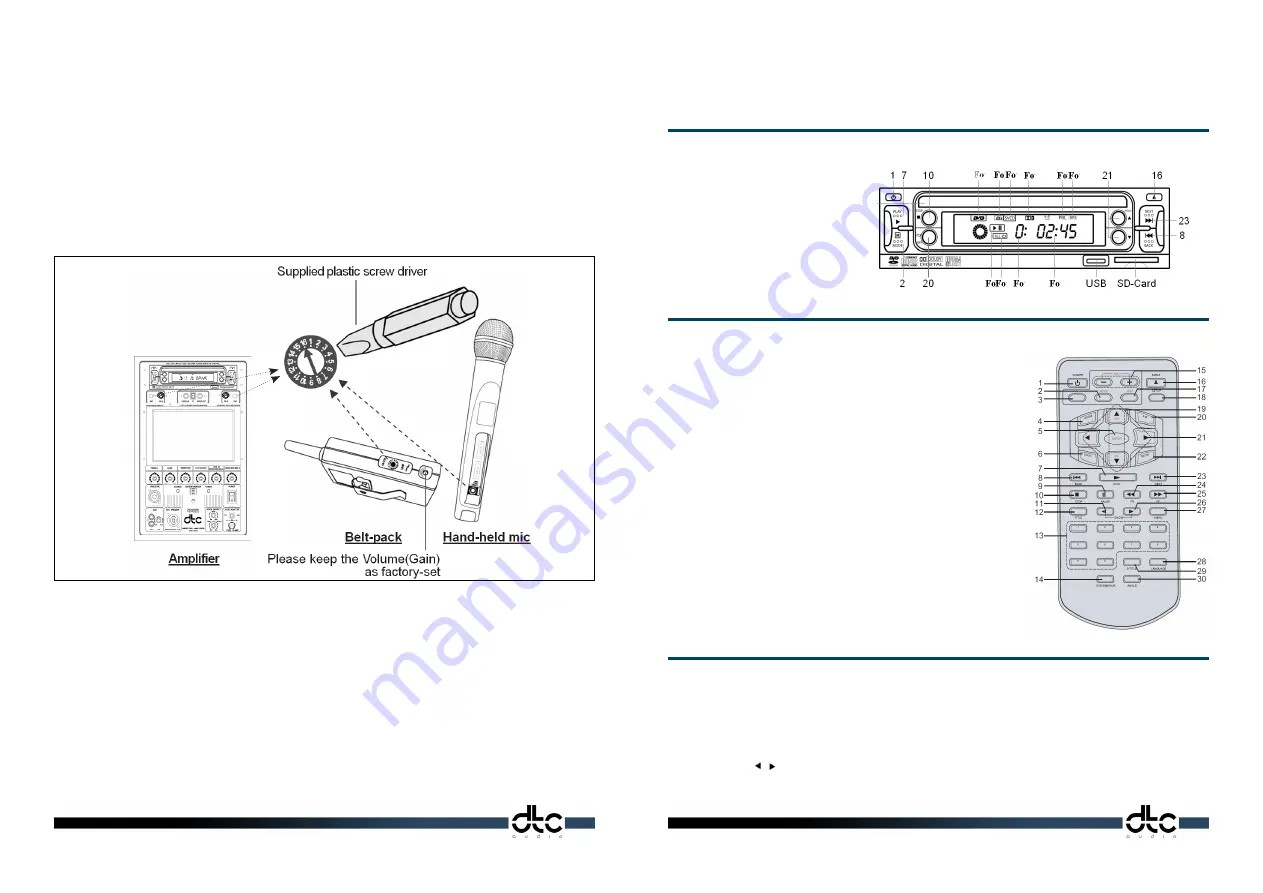
2. Operating Instructions
Using the UHF Wireless Microphone
1.
Open the battery compartment of wireless hand-held mic or belt-pack transmitter mic
and insert supplied 2 x AA type batteries in their c/- polarity.
2.
Set Ch-number of amplifier and microphone both to same number by Ch-selector
switch using supplied plastic “I” screw driver. ( Please see the schematic below )
3.
Clockwise insert the supplied BNC wireless antenna into it’s socket on the operating panel.
4.
Plug your wired microphone into the combination jack on the operating panel.
5.
Turn on the main power on/off switch. Power-on LED will be illuminated.
6.
Adjust the volume level of wired mic and try while setting treble/bass to proper level.
7.
Adjust the volume level of wireless mic on the amplifier. Turn on the switch of wireless
mic and try. The on-air LED next to the Ch-selector switch will be illuminated.
8.
In the case of frequency interference occurring, try to set Ch to another Ch-number.
9.
Use the aux in/out RCA jack to feed out or feed in audio signals to and from another source.
Using the Wired Microphone
1.
Turn on the main power on/off switch, the power-on LED will be illuminated
2.
Plug 1/4” plug into the wired mic socket and adjust the volume using the wired mic volume knob.
(see number 6 and 9) on the operating panel.
NOTE:
Wired microphones are also as sensitive to feedback as wireless microphones, therefore it is advisable to follow the same advice as in the
above information for optimum performance
Using Auxiliary Equipment
1.
Use the Aux in/out jack connection to feed in or out audio signals from another source
2.
Typical sources to feed into the amplifier are MP3 players, DVD players, laptops and palm devices
etc. where you want to amplify the sound to larger audiences.
3.
The feed out socket can be used to connect to amplifiers and mixers.
Play
1. With your TV remote control, change connected TV to proper video input mode (VIDEO-IN)
2. Press the remote control of [POWER] or [ ] on the DVD front panel. (Standby to disc open mode)
3. Load a disc in the disc slot with label side up. Place a single disc in the slot. The disc will be inserted
automatically. Then the DVD player begins to read it so as to identify different disc formats, then display on the screen.
4. When directory or menu picture displays on the screen, press the direction
buttons [▲][▼][ ][ ] on the remote control to move lighting band to desired track.
You can also directly press number buttons to select a specific track.
Using the DVD Player
Front Panel
Safety Precautions
There are dangerous voltages inside this product. To prevent electric shock do not open the cabinet yourself. For service
please contact our regional representative office or direct to us as per the instructions of Limited Warranty
1. Power on-off switch
2. Mode select
7. Play button
8. Back
10. Stop button
16. Eject
20. A-B repeat
21. Pitch control faster/slower
23. Next
A
u
d
i
o
1 POWER
Turns power on/off
2 MODE
Select play of DVD/USB/SD-card.
3 SCAN-Not in use
(Only for DMB operation: Option)
4 ZOOM
Zooms in/out the screen
5 ENTER
Selects a menu item
6 GOTO
Jumps to a DVD title/track/chapter
7 PLAY
Return to normal pitch of Play disc
8 BACK
Moves to previous Chapter/Track
9 PAUSE
Pauses disc play
10 STOP
Stops disc play
11 SLOW
Rewinds disc at 1/2 or 1/4 speed
12 TITLE
Displays the track number of disc
13 NUMBER
Jumps to a song of a CD or MP3
14 DVD/AUX MODE CHANGE
Change mode of DVD/DMB/AUX
15. VOLUME
Increase or decrease volume
16. EJECT
Ejects disc
17. DISPLAY
Moves to the title/track/chapter
18. SET-UP
Sets up various functions
19. CH+/CHSelect
tracks of CD/USB/SD-card
20 A-B REPEAT
Repeat play of selection
21 PITCH UP-DOWN or MOVE
Adjust pitch Up/Down or
Move to an item in the menu
22 MUTE
Mutes sound
23 NEXT
Turns to the next capter/tack
24 FAST REWIND
Fast rewind disc at 2 ~ 8 times
25 FAST FORWARD
Fast forward disc at 2 ~ 8 times
26 SLOW
Forwards disc at 1/2 ~ 1/4 times
27 MENU
Display menu of a disc in play
28 LANGUAGE
Select language (When disc support)
29 S-TITLE
Select sub-title language (-ditto-)
30 ANGLE
Shows various angled display(-ditto-)
Remote Control


