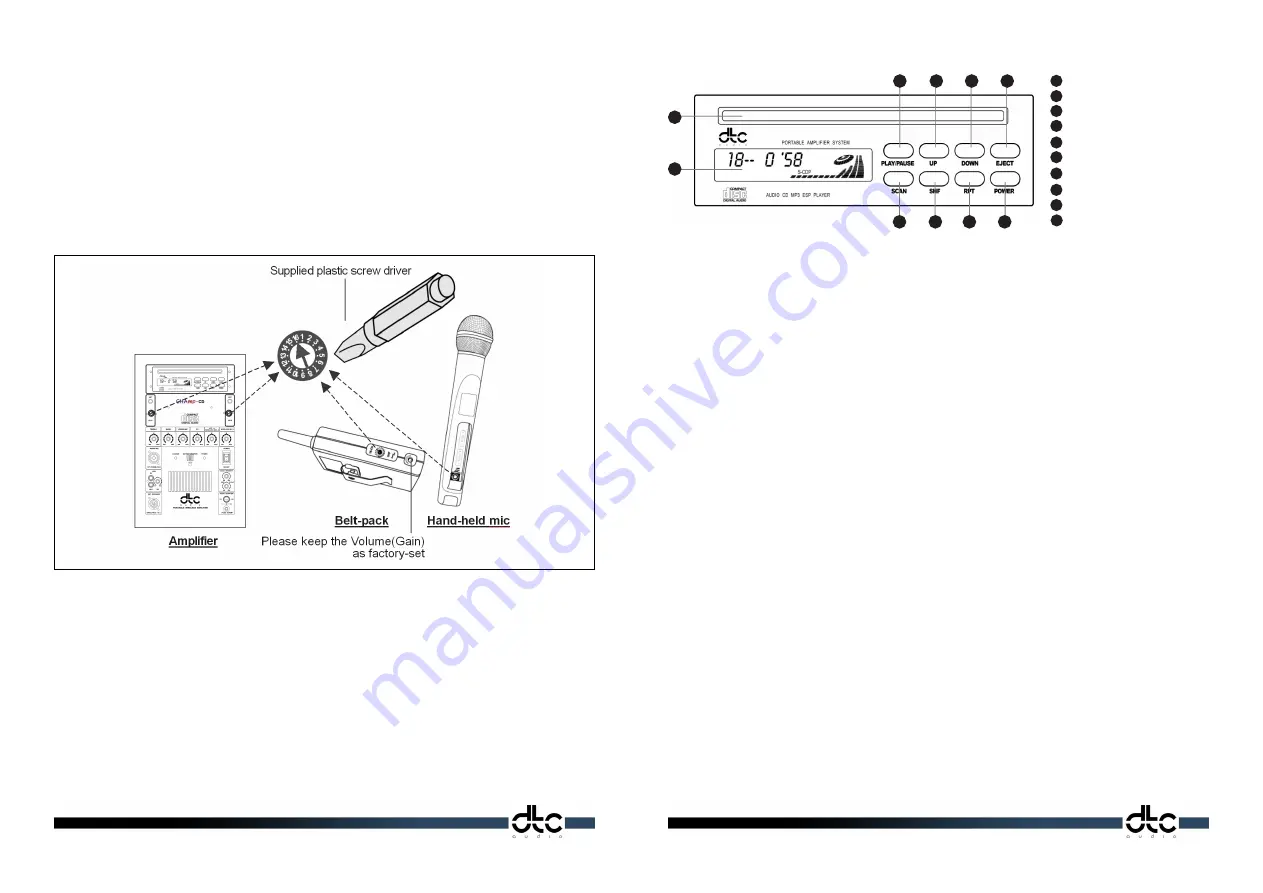
2. Operating Instructions
How to operate the MP3-CD Player
1
5
6
9
8
7
10
2
3
4
1. To Switch On
Press POWER button(10) to turn the unit ON and press again to turn it OFF.
2. To Insert a CD
Put a disc into slot(5) with label side up. The disc will automatically start to play.
The display(6) will indicate S-CDP mode, show the Track number, it’s played time,
a moving disc and audio frequency bar-graph symbols.
3. To Eject a CD
Press the EJECT button(4) to eject the disc from the slot. If the disc is not removed within 10 seconds it will automatically load
again.
4. To Play/Pause a CD
When the disc has loaded, press the PLAY/PAUSE button(1) to start play.
press PLAY/PAUSE button(1) The display(6) will show the CD is in Pause mode. Press the button to resume play.
5. To Forward Track
IPress the UP button(2) to advance the disc to the next track. The track number will
be shown on the LCD display(6) To fast forward through the tracks hold down the UP button(2). While this is
happening the display(6) will show track number and play time advancing. The disc will resume play when the button is
released.
6. To Back Track
Press the DOWN button(3) to back track to the previous track. The track number will be shown on the LCD display(6).
To fast back track through the tracks hold down the DOWN button(3). While this is happening the display(6) will show track
number and the play time decreasing. The disc will resume play when the button is released.
7. To Repeat a Track
Press RPT button(9) to repeat the same track of the disc. Repeat play will continue until the RPT button(9) is pressed again.
During play the display(6) will show that CD is in RPT mode.
8. To Play Tracks in Random Order
Press SHF button(8) to play tracks in random order. The LCD display(6) will show that CD is in S-SHF mode Press the button
again to resume normal order play.
9. To Scan and Sample the Tracks.
Press SCAN button(7) to set the CD in S-SCN mode whereby each track will play in sequence for 10 seconds. The LCD
display(6) will show track number. Press the button to resume normal play.
10. When Playing MP3 Format Discs
The LCD display(6) will indicate S-CDP mode MP3, the Track number, and can also scroll the Song Title and Artist’s Name.
11. Remote Control Unit
Point the Remote Control Unit infra red beam at the CD desk and press desired
function button on the CD/MP3 Player Section to control. The buttons allow you to Switch On/Off (Power), Select Track (Up/
Down), Play/Pause, Random Play (SHF), Repeat Track (RPT), Scan.
Note: This unit does not control the volume, which needs to be adjusted manually.
PLAY/PAUSE
UP (Forward Track)
DOWN (Backward Track)
EJECT
CD SLOT
LCD Display
CD TRACK SCAN KEY
TRACK RANDOM PLAY
TRACK REPEAT PLAY
POWER ON/OFF
1
5
6
9
8
7
10
2
3
4
Using the UHF Wireless Microphone
1.
Open the battery compartment of wireless hand-held mic or belt-pack transmitter mic
and insert supplied 2 x AA type batteries in their c/- polarity.
2.
Set Ch-number of amplifier and microphone both to same number by Ch-selector
switch using supplied plastic “I” screw driver. ( Please see the schematic below )
3.
Clockwise insert the supplied BNC wireless antenna into it’s socket on the operating panel.
4.
Plug your wired microphone into the combination jack on the operating panel.
5.
Turn on the main power on/off switch. Power-on LED will be illuminated.
6.
Adjust the volume level of wired mic and try while setting treble/bass to proper level.
7.
Adjust the volume level of wireless mic on the amplifier. Turn on the switch of wireless
mic and try. The on-air LED next to the Ch-selector switch will be illuminated.
8.
In the case of frequency interference occurring, try to set Ch to another Ch-number.
9.
Use the aux in/out RCA jack to feed out or feed in audio signals to and from another source.
Using the Wired Microphone
1.
Turn on the main power on/off switch, the power-on LED will be illuminated
2.
Plug 1/4” plug into the wired mic socket and adjust the volume using the wired mic volume knob.
(see number 6 and 9) on the operating panel.
NOTE:
Wired microphones are also as sensitive to feedback as wireless microphones, therefore it is advisable to follow the same advice as in the
above information for optimum performance
Using Auxiliary Equipment
1.
Use the Aux in/out jack connection to feed in or out audio signals from another source
2.
Typical sources to feed into the amplifier are MP3 players, DVD players, laptops and palm devices
etc. where you want to amplify the sound to larger audiences.
3.
The feed out socket can be used to connect to amplifiers and mixers.


