background image

*

*

Conference Host

13

chairman units which are given the priority to make
speeches, and they can operate simultaneously. The
setup procedures are as follows:

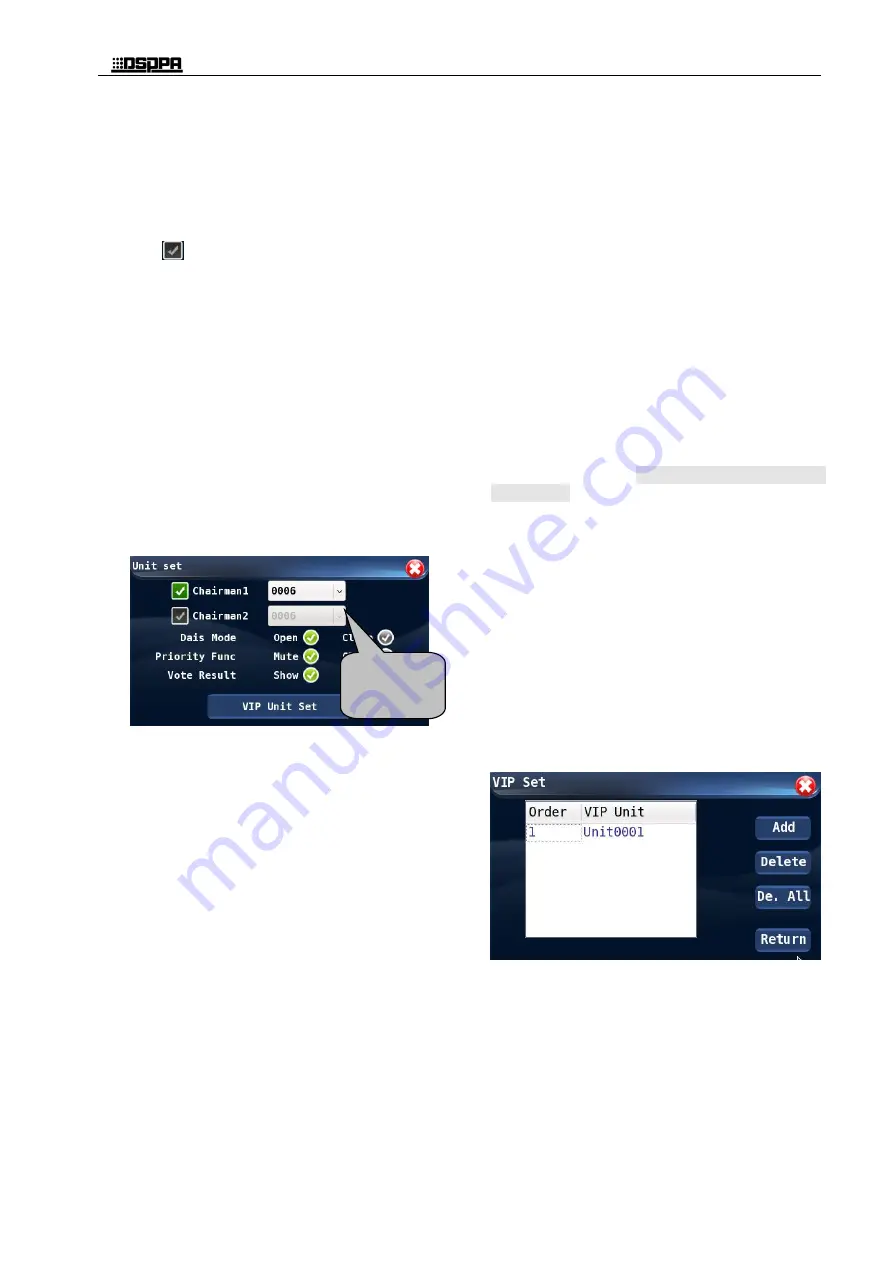
On the "Unit Setup" interface, touch and select
the "Chairman Unit" (for example, Chairman
Unit 1 is selected). When an option is selected,
the

icon before such option will be

displayed in green color.

Touch the black arrow after the ID box of
conference unit to unfold the drop-down list,
and select the ID from the menu for "Chairman
Unit 1" or "Chairman Unit 2".

After all conference units are numbered and
the conference system is restarted, the
Chairman Units will be automatically
identified and its ID will be displayed in the
list on the operation interface.

The ID of conference unit set as a Chairman
unit will be displayed on the following
interface.

If ten chairman units are connected to the system,

then after all conference units are renumbered, all

the ten chairman units will be identified by the

conference controller and will be displayed on the

list as shown above.

2) Platform mode

To set up the platform on/off status of

Chairman Unit 1 and Chairman Unit 2, the

user may simply touch the desired option to

complete the setup operation.

If the Platform mode is "ON", then both the

two chairman units will be always on and the

ON/OFF button the chairmen unit will be

ineffective; if the platform is "OFF", the

chairman unit will be operated by the On/Off

button on such units.

3) Priority

The user may set the priority of Chairman Unit

1 and Chairman Unit 2 as "Mute" or "Off".

The user may touch the options after "Priority"

on this interface to complete the setup.

If "Mute" is selected, then in the conference,

when the chairman presses the priority button,

then all activated conventioner unit will be

turned to mute status. After the activated

conventioner unit is mute, the On/Off LED

light on the microphone will blink, and a

sound off message will be displayed on LCD

screens of the Chairman unit and the

conventioner units. Please refer to the

description of conference unit setup section for

detailed information as the content displayed

and the operation instructions. If it is no longer

necessary to turn off the microphones of

conventioner units, they chairman may press

the priority button and cancel the sound off

status by following the instructions on the

LCD screen, the conventioner unit will be able

to deliver speeches.

If "Off" is selected, then in the conference,

when the chairman presses the priority button,

then all activated conventioner unit will be

turned off.

4) Vote result display (

Only effective on units with

LCD screen

)

With this option, the user may decide if the

vote result will be displayed on all conference

units including the Chairman Unit 1 and

Chairman Unit 2. The user may touch the

options after "Vote Result Display" button to

complete the setup.

If "YES" is selected, then the vote result will

be displayed on all conference units; of "NO"

is selected, then the vote results will not be

displayed on LCD screens of any conference

unit other than the chairman unit 1 and 2.

5) Setting of VIP units

The user may touch the "VIP Unit Setup" button on

the "Unit Setup" interface to enter the VIP unit

setup interface which is as shown below:

D62 series smart digital conference system allows a

maximum number of 30 VIP units. The VIP unit

may be a conference unit of whatever type. When

the total activated conference unit is less than 20

under FREE mode and 10 under any other mode,

the VIP unit is free from limitation of conference

mode and may be turned on/off freely.

On the interface shown above, the user may

add new VIP units by touching the "ADD"

button. The conference system allows a

Touch here to

show the list of

all

Chairman

units.

Содержание D6201

Страница 1: ...6201 PROFESSIONAL DIGITAL CONFERENCE SYSTEM D6201 USB User s Manual Welcome to use DSPPA public address system For the better use of this product please read this instruction carefully prior to use Guangzhou DSPPA Audio Co Ltd http www dsppatech com ...

Страница 2: ...此页留空供用户记事 ...

Страница 3: ...ence control host D6201 Users should carefully read this manual before connecting and installing and using it and follow the instructions in the manual Instructions marked with this mark on the rear panel of the machine are all matters that must be taken care of Please be sure to use or operate them in accordance with these instructions Please keep this manual in a safe place for future use D V0 6...

Страница 4: ...old or hot Please do NOT place any heavy article on this equipment Please operate switches buttons or external audio source carefully Please prevent foreign matters such as paper metal etc entering the equipment through the gaps or opening in such cases please cut off the power supply immediat ely Do NOT attempt to remove any internal component from the equipment or to modify the equipment in what...

Страница 5: ... 1 5 CAMERA SELECT 6 4 1 6 MEETING MODE 6 4 1 7 SOUND EFFECT CONTROL 7 4 1 8 RECORD CONTROL 8 4 2 SYSTEM CONFIGURATION 8 4 2 1NETWORK SETTING 9 4 2 2 CAMERA TRACKING POSITION SETTING 9 4 2 3 MICROPHONE UNIT DETECTION 10 4 2 4 CONFERENCE MICROPHONE ID SETTING 11 4 2 5 CONFERENCE MICROPHONE SETTING 12 4 2 6 SET SPEAK TIME 14 4 2 7 CHIME SET 14 4 2 8 SYSTEM TIME SETTING 14 4 2 9 DISPLAY SETTING 15 4 ...

Страница 6: ...hical interface easy to use Support Chinese English system languages other languages can be customized Support VIP Mic setting up to 30 VIP Mic can speak freely in all the 5 conference modes Built in DSP sound processor support low cut frequency shift and equalizer control Support conference recording manually or automatically With Mic detection function manually or automatically Support speech ti...

Страница 7: ... port USB For connection of USB flash disks during the recording process A mouse with USB port may be connected to operate the system 4 LCD touch screen display For display of function icons and menus in the operation process touch screen is used in configuration 5 Screw holes for installation in cabinet 2 2 Rear panel 广州市迪士普音响科技有限公司 Guangzhou DSPPA Audio Co Ltd 请勿打开 以免触电 RISK OF ELECTRIC SHOCK DO...

Страница 8: ...phones of all conference units will be deactivated When the 5V voltage on this port is off the system will automatically return to the working status before such alarm 10 Ethernet port PC The conference can realize remote control via TCP IP network When the system is connected to a WIFI network it allows wireless conference control via a tablet PC 11 Fuse in power supply of the system F2AL250V fus...

Страница 9: ...PPA Audio Co Ltd 请勿打开 以免触电 RISK OF ELECTRIC SHOCK DO NOT OPEN 警告 CAUTION AC220V 50Hz 320W F2AL250V ALARM IN LINE IN 1 2 3 4 5 6 商标 型号 D6201 品名 会议主机 9 1 2 3 4 5 7 8 6 9 1 2 3 4 5 7 8 6 9 1 2 3 4 5 7 8 6 9 1 2 3 4 5 7 8 6 9 1 2 3 4 5 7 8 6 2000m PROFESSIONAL DIGITAL CONFERENCE SYSTEM D6237 PROFESSIONAL DIGITALCONFERENCE SYSTEM D6233B PRIORITY TALK PROFESSIONAL DIGITALCONFERENCE SYSTEM D623 4B TALK D...

Страница 10: ...e first identification of U disk needs 30s 2min depending on the U disk memory size please wait patiently Before the song is played you must insert the USB disk that has been recorded into the song as the sound source Song playback and recording cannot be performed at the same time The interface is as shown below 4 1 3 Number of speech The limit of the number of speech set in this item is valid in...

Страница 11: ... for operation In this operation one of the cameras is selected for example camera 1 is selected and other cameras are mainly configured with the camera If the camera is changed for example camera 2 is selected the camera needs to be reselected The camera is set up including the camera tracking switch setting and the camera tracking positioning setting When selecting a camera touch the icon in fro...

Страница 12: ...nference system 1 Touch the desired conference mode to select for example touch NORMAL to select the NORMAL mode the conference is selected when the icon before such conference mode is in green color 2 If VOICE mode is selected as the conference mode then the user needs to set up the sensitivity of the microphones on conference units The procedures for setting up the sensitivity as follows When th...

Страница 13: ... and Manual recording modes On the recording interface as shown above the user may touch the desired recording mode to select it Automatic recording If the automatic recording function is selected the recording will start when any speech is delivered via any conference unit and it will automatically stop when the last speaking unit is off The recording may stop if there is not enough space on the ...

Страница 14: ...ically pop up a message saying requiring system restart to take effect Then restart the system 4 2 2 Camera Tracking and Positioning The user may touch the Camera Positioning icon on the System Setup interface to enter the camera tracking and positioning setup interface which is as shown below On this interface the user may select the desired communication protocol of cameras and can set up the sw...

Страница 15: ...oard on the interface shown below and then the user may use the button to adjust the position and focal length when the camera is pointed to such conference unit Finally the user should save the position information of cameras He she can touch the Modify button after the Save as preset point to enter the modification interface Then he she can touch the preset points for example 1 and then touch th...

Страница 16: ...e inspection and the LED lights on the conference unit inspected will be off Or otherwise the user may touch the Previous Unit or Next Unit to inspect other conference units connected to the conference controller and stop the inspection after all conference units are inspected 2 Inspection to LCD screen Touch the Inspection to LCD Screen button and the button is selected if it is highlighted Touch...

Страница 17: ...ring interface the user can touch the Add new ID button to enter the operation interface which is as shown below The user should set up the IDs on newly added conference units and after the setup operation he she should touch the END button on the interface shown above to exit the interface After all new conference units are numbered the newly added unit IDs will take effect after the conference c...

Страница 18: ...ned to mute status After the activated conventioner unit is mute the On Off LED light on the microphone will blink and a sound off message will be displayed on LCD screens of the Chairman unit and the conventioner units Please refer to the description of conference unit setup section for detailed information as the content displayed and the operation instructions If it is no longer necessary to tu...

Страница 19: ... warning function and the user can set up the countdown time in this interface which should be with the range between 1 and 60 seconds The countdown will also be displayed on the speech unit If the speech timing function is not needed in the conference then it can be set as OFF The user can adjust the values of time limit and countdown function to the desired value by touching the small gray arrow...

Страница 20: ...ime the user needs to calibrate the touch screen by following the following procedures Touch the Screen Calibration button on the Display Setup interface to enter the screen calibration interface After the touch screen is in the calibration status the system will automatically restart and enter the screen calibration interface after a while On the calibration interface the user should touch the ce...

Страница 21: ...USB flash disk found please check Touch the Import configuration file to the system and then touch the OK button in the dialog box to copy the configuration file to the system After the configuration file is copied to the system the system will be restarted automatically in order to load the system parameters restored 4 Modify the password on the equipment The user can touch the Modify the passwor...

Страница 22: ...ple the ID code of the first extension controller is set as 0000 0000 then all such DIP are switched to the lower position the ID code of the second controller is 0000 0001 then the last DIP is at the high level while all others are at the lower position The setting on the rear panel of extension controller is as shown below Please refer to the List of Extension Controller IDs for information with...

Страница 23: ...0 19 0001 0010 4 0000 0011 20 0001 0011 5 0000 0100 21 0001 0100 6 0000 0101 22 0001 0101 7 0000 0110 23 0001 0110 8 0000 0111 24 0001 0111 9 0000 1000 25 0001 1000 10 0000 1001 26 0001 1001 11 0000 1010 27 0001 1010 12 0000 1011 28 0001 1011 13 0000 1100 29 0001 1100 14 0000 1101 30 0001 1101 15 0000 1110 31 0001 1110 16 0000 1111 32 0001 1111 ...

Страница 24: ...开 以免触电 RISK OF ELECTRIC SHOCK DO NOT OPEN 警告 CAUTION AC220V 50Hz 320W F2AL250V ALARM IN LINE IN 1 2 3 4 5 6 商标 型号 D6201 品名 会议主机 9 1 2 3 4 5 7 8 6 9 1 2 3 4 5 7 8 6 9 1 2 3 4 5 7 8 6 9 1 2 3 4 5 7 8 6 9 1 2 3 4 5 7 8 6 2000m Procedures for replacement of fuses 1 Before the fuse is replaced please cut off the power supply and unplug the equipment from the socket 2 As shown by Fig a straight screwdri...

Страница 25: ...e do NOT open the case and repair without permission from a professional personnel to avoid accident or additional damages to the device Please do NOT place any corrosive chemicals near or on the device 2 Matters needing attention Our company provides a three year free warranty service including free replacement parts over quality issues as from the date of purchase provided that the device is ins...

Страница 26: ...performance specifications are subject to changes without further notification Item D6201 LINE input voltage 250 30 mV ALARM input voltage 250 30 mV LINE output voltage 1 0 1 V BALANCE output voltage 1 0 1 V Frequency response 40Hz 20kHz 3dB Maximum input voltage 4 0 2 V SNR 80 dB Harmonic distortion 0 3 Output power 110W 3 way 24V Max power 320W Static power consumption 15W Quantity of maximum un...

Страница 27: ...emove the cover of the equipment otherwise you may get an electric shock Where necessary repair to the equipment should be conducted by qualified professionals All terminals on the device marked with are live and dangerous and should be connected by trained personnel This is connected to power source via the plug and any failure or danger occurs the user can disconnect the device from power source...

Страница 28: ... Conference Host 4 注意 此页不打印 广州市迪士普音响科技有限公司 型号名称 D6201会议控制主机说明书 3C认证 内容修改 修改说明书中的 非热带气候条件下安 全使用 标志 版本 V0 6 审核 编制 王小胜 批准 日期 2018 5 23 ...

Отзывы: