Drytac DES-1 Скачать руководство пользователя страница 19


19 

2.   Ensure that your plaque is fully against the black in-feed guide. 


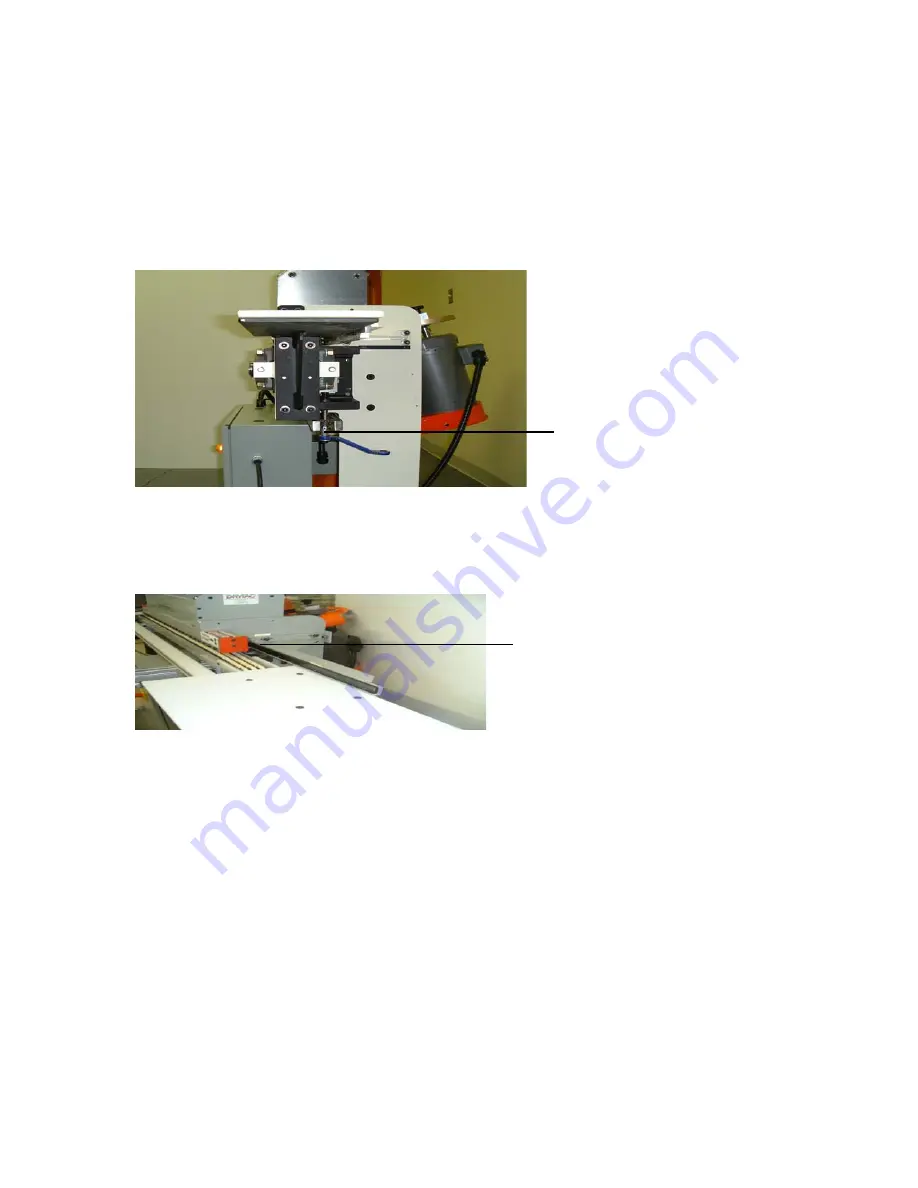
3.   Using the ratchet to adjust the conveyor system height, bring the conveyor up to 

put pressure on the plaque. 


       (ratchet ) 


4.   The top of the plaque must be flat and even with the top edge of the adjustable 

plate of the in-feed guide. 


      (Top edge of black guide) 


5.   Turn your vacuum (Dust Collector) system on. 
6.   Turn the “Feed” knob to “JOG” mode. 
7.   Press the green “Shaper On” switch. 
8.   Press the blue “Feed” button, until plaque is pulled in.  
9.   Allow the plaque to travel, through shaper, for approximately 3”  (8 cm.).  Re-

lease the “Feed” Button. 

10. Turn Shaper off. 
11. Wait until shaper stops completely.  
12. Lower the conveyer and remove plaque. 
13. Measure how much the plaque is being shaved and make adjustments accord-

ingly. 


Содержание DES-1

Страница 1: ...1 DES 1 DES 1E MANUAL www drytac com ...

Страница 2: ...____________________________________ ___________________________________________ ____________________________________________ MODEL NUMBER ____________________________ SERIAL NUMBER ____________________________ DATE ______________________________________ ...

Страница 3: ...3 IMPORTANT SAFETY NOTICES 1 READ THIS ENTIRE MANUAL PRIOR TO PROCESSING ANY WORK THROUGH THIS MACHINE 2 TO PREVENT ANY INJURY ONLY ONE OPERATOR SHOULD MAKE THE NECESSARY SETTING ADJUSTMENTS ...

Страница 4: ...AC the professional edge finishing system Before starting to work with your new edge finishing system please take the time to read this manual DES 1 DES 1E MANUAL you will find it invaluable in simplifying the setup and operation of your machine ...

Страница 5: ...25 Mathis Suite 400 12207 D Los Nietos Road Concord ON Richmond VA USA Farmers Branch TX USA Santa Fe Springs CA USA Canada L4K 3X5 23231 75234 90670 Tel 905 660 1748 Tel 804 222 3094 Tel 972 910 8811 Tel 562 941 9630 Fax 905 660 1752 Fax 804 226 2330 Fax 972 910 8839 Fax 562 941 2927 Toll Free Tel Toll Free Tel CANADA 1 800 353 2883 USA 1 888 622 3236 Toll Free Fax Toll Free Fax CANADA 1 877 437 ...

Страница 6: ...The conveyor transports these boards past the shaping cleaning and oven foil applicator stations Polyurethane rubber holddown rollers apply pressure on the plaqued artwork to secure it in place on the feed conveyor while it is being processed The shaper cleaning station cuts and cleans the 45 and 90 profile onto the plaqued artwork as it is being transported past the spinning shaper head and clean...

Страница 7: ... plaque with the selected colored foil As the plaqued artwork exits the oven applicator station a torque rewind take up system collects the spent donor foil onto a throw away core The plaqued artwork can now be retrieved from the DES 1 and the next edge can be processed When all edges on the same plaque are run through the machine a perfect miter is automatically performed at each corner ...

Страница 8: ...n screw bolts holding skids onto the base of machine 11 Using a pallet mover pump truck move DES 1 to desired location 12 Remove components from boxes 13 Locate and identify tables and guides 14 Remove bolts from either side of equipment you will require these bolts to attach the tables to your DES 1 15 Secure the in feed table marked In feed table with 4 bolts screwed on Equipment 16 Tables have ...

Страница 9: ...EC approved plug and wire Plug Type HUBBEL HBL2621CN 250V 30A Power Required AC 220 Volts Single Phase 60 Hz 30 Amps EUROPE DES 1E No plug and external electrical connection wires are included with DES 1E Electrical hook up on European model DES 1E should be performed according to local codes Power Required AC 220 Volts Single Phase 50 Hz 30 Amps ...

Страница 10: ...activate power switch This switch must be turned on first in order to provide power to the rest of the machine Inside the cabinet you will find the fuses breakers relays and transformer required for the proper operation of the unit 2 CONTROL PANEL Ergonomically positioned at a 45 degree angle at the upper front of the machine designed for easy access to all the controls and operator safety ...

Страница 11: ...R METER FILM ADVANCE FEED JOG CONTINUOUS FEED SHAPER ON SHAPER OFF MASTER STOP POWER ON PUSH IN to activate all panel controls EMERGENCY STOP PUSH IN to stop all machine functions To reactivate all controls PULL OUT then push in POWER ON TORQUE ROTATE to provide torque load to rewind motor ...

Страница 12: ... scheduled maintenance and work throughput Activates only when FEED is pressed and conveyor is in motion FILM ADVANCE Used to advance a small amount of foil onto the the rewind station Foil left in front of the heated wheel during preheat or setup will not transfer properly due to the adhesive burning FEED This switch allows you to choose between JOG CONTINUOUS two settings JOG mode used when sett...

Страница 13: ...Aligns and guides plaqued artwork at infeed INFEED GUIDE Allows you to control the depth of cut on ADJUSTMENT the edge of your plaque INFEED TABLE Helps support plaqued artwork as it enters the conveyor infeed CONVEYOR Carries plaqued artwork through to all processing stations ...

Страница 14: ...transport of the ASSEMBLY laminated plaqued to each station OUTFEED TABLE Helps support the laminated plaque as it exits SUPPORT TABLE Helps support oversized laminated plaques while being processed SUPPORT ARMS Attached to the conveyor assure proper parallelism between the conveyor and the support table ...

Страница 15: ...t the height of the SUPPORT ASSEMBLY infeed table with the height of the conveyor Please note A similar support assembly is used on the outfeed table CONVEYOR RAISING AND Allows you to control the nip LOWERING ASSEMBLY between the conveyor and the holddown wheels RATCHET Ratchet handle device used to set the proper conveyor nip point ...

Страница 16: ...125 28 5 mm SHROUD Engineered for easy evacuation of dust and encloses the shaper unit Complete with a 3 76 2 mm O D manifold used for attaching an evacuation tube to your dust collector CLEANING BRUSHES Built right onto the shroud these brushes assure that the laminated plaque is dust free prior to the application of the thermal transfer foil ...

Страница 17: ...il on a standard 3 76 2 mm I D core Equipped with a CLUTCH BRAKE device to ensure a smooth unwind The FOIL HEIGHT ADJUSTMENT UNIT and the IDLER ROLLERS keep the foil in the proper path FOIL REWIND ASSEMBLY Accepts a standard 3 76 2 mm I D core and rewinds the donor spent thermal transfer foil All driven by a torque motor controlled by a selection knob on the front panel Proper foil separation is c...

Страница 18: ...ure below In feed Guide Adjustment plate This section will describe step by step how to setup the DES 1 to fulfill your needs Your in feed guide has also been set according to specification However the adjustable plate on in feed guide may need adjustment again due to transportation vibration i CONVEYOR NIP 1 Using an identical thickness plaque as your artwork that requires edging as a leader Plac...

Страница 19: ...the in feed guide Top edge of black guide 5 Turn your vacuum Dust Collector system on 6 Turn the Feed knob to JOG mode 7 Press the green Shaper On switch 8 Press the blue Feed button until plaque is pulled in 9 Allow the plaque to travel through shaper for approximately 3 8 cm Re lease the Feed Button 10 Turn Shaper off 11 Wait until shaper stops completely 12 Lower the conveyer and remove plaque ...

Страница 20: ...move more counter clockwise to remove less wing nut 4 bolts 3 Tighten the 4 bolts If you require more or less bevel iii DEPTH OF BEVEL 1 Loosen the center bolt on the height adjustment mechanism of the shaper head Do not remove center bolt ratchet 2 Using the ratchet turn counter clockwise to have smaller bevel clockwise to have a stronger bevel 3 Tighten the center bolt ...

Страница 21: ...he mirror Provided with your equipment check the distance be tween the plaque and the applicator wheel If adjustment needs to be done Note applicator wheel must be at room temperature for this procedure 7 Loosen six 6 bolts on the applicator wheel adjustment mechanism 8 Using the wing nut turn clockwise to pull applicator wheel back away from plaque or counter clockwise to push applicator wheel in...

Страница 22: ...on Unwind Assembly on the left hand side 2 Pull your foil through as per diagram Remember adhesive side should be facing the plaque and the protective foil carrier facing the applicator wheel 3 Make sure the foil is in the proper path webbing around idlers in front of Infra Red sensor in front of applicator wheel around Stripper idler and onto rewind mechanism core micro switch plug oven Heater On...

Страница 23: ...at the time of shipping to 310 F Recommended operating temperature is between 290 F and 330 F 7 Allow the controller to reach the operating temperature 8 Turn your Vacuum Dust Collector system on 9 Turn the Shaper on 10 Allow the Shaper to reach its peak speed 11 Turn the Feed function key to Continuous position 12 Press the blue Feed button 13 Push plaque against the In feed guide and onto the co...

Страница 24: ... This temperature is a good starting point however there are some foils that activate at a higher temperature and some that will activate a lower set point Please test and adjust your temperature set point accordingly Experimenting within your environment i e room temperature and relative humidity will be your best guide Recording your results will help you with future diagnosis Temperature contro...

Страница 25: ...1 Turn DES 1 off by pressing the emergency button and turning the main power switch to off position 2 Allow the DES 1 to stop completely 3 Remove the Shroud 4 Use Allen key supplied with your DES 1 at time of shipping and remove the bolt 5 Remove flat spacer and beveled split washer 6 Remove the top section of Shaper head assembly 7 On a flat surface turn the upper part of the shaper head upside d...

Страница 26: ...n the bolts Notice that the lower part has two bolts per blade 6 Rotate Replace the blade 7 Ensure that blade is properly seated in place 8 Tighten the bolts 9 Install the lower part of the Shaper head first 10 Install the upper part 11 Install the beveled spacer 12 Install the round spacer 13 Tighten the center bolt 14 Place the shroud in position 15 Remember to turn the power on and pull any eme...

Страница 27: ...ain Panel 2 DES 1 shuts down and there is no power after edging a few plaques Check if your main fuse breaker has triggered If so reset and resume work If problem persists have a qualified Electrician inspect and or install a 30A 220V breaker Press to reset blue button inside the lower front Main Panel identified with Conveyor Belt and Shaper Head Readjust your conveyor s nip pressure set point Ex...

Страница 28: ...ading edge of plaque is missing foil or has wrinkled foil You may have too much pressure on the applicator wheel Re adjust applicator wheel assembly You may not have enough pull torque on the rewind torque mechanism Increase tension on the rewind torque station while balancing tension with the clutch brake adjustment knob on the unwind station 6 Larger plaques have a wave on the beveled edge If wa...

Страница 29: ... when pinched by the moving plaque against the spinning applicator wheel 9 Foil keeps melting and breaking If your temperature is within operating range then you may have too much torque on the rewind assembly Readjust torque rewind tension and balance until stationary with clutch brake unwind mechanism ex Suggested torque rewind set point for 3 4 19 mm foil is 45 to 60 10 There is a fine line on ...

Страница 30: ...ur hold down wheel and axel assembly requires cleaning Hold down wheels require relocation into a different slot Same as rotating the tires on a car 12 There are black dust marks on the back and front of plaques Black dust is an indication of cleaning overdue on the conveyor chain pads assembly Turn off DES 1 and use pressurized air to clean the conveyor belt assembly Refer to Scheduled Maintenanc...

Страница 31: ...on in feed guide Place a plaque against the in feed guide Turn feed to Jog mode Raise conveyer belt until plaque is squeezed Try and pull the plaques by hand Press JOG and bring plaque to the center of conveyor belt and try pulling out again Press JOG and bring plaque to the end of Conveyor but not out and try pulling plaque out again Plaque should not be pulled out by hand Run the plaque through ...

Страница 32: ...n applicator motor support screws by a turn if problem persists replace directional clutch bearing 16 After a full blade replacement or blade rotation DES 1 doesn t sound same as usual Warning Shut down machine Wait until Shaper head has come to a full stop Remove protective shroud then proceed Verify blades on the shaper head make sure each blade is seated properly into the matched directional sl...

Страница 33: ...urface area remove five wheels clean and set aside Remove the next five wheels clean and place where the first five wheels were originally installed Remove the next five wheels clean and place where the second set of five were removed You will have room for five wheels at the end of the aluminum bar Place the first set of wheels that was kept aside in this area Wheels require rotation to maintain ...

Страница 34: ... you are standing in front of DES 1 this assembly is on the right hand side Loosen other four nuts on the other side of Conveyor assembly If you are standing at the back of DES 1 this assembly is on the left hand side Use 9 16 wrench to tighten bolts on either side of Conveyor assembly while checking for tension periodically Do not over tighten Chain may snap Note Keep DES 1 clear and clean from a...

Страница 35: ...nel you will find all the controls you need to operate the machine For safety reasons all switches have been turned to OFF posi tion prior to shipping 5 On the right hand side of the control panel pull the red button marked Master Stop 6 On the left hand side of the control panel pull the red button marked Emergency Stop 7 Next to Emergency Stop is a green button marked Power Pressing this button ...

Страница 36: ...wer Height Adjustment housing DES 7020 004 Center Screw Brass Bushing DES 7020 005 Set Screw with Hex Nut Height Guide DES 7020 006 Knurled Height Adjustment Hand Wheel DES 7020 007 3 Aluminum Core Holder Block DES 7020 008 Tension Spring and Spacer DES 7020 009 Plastic Tension Knob DES 7020 010 Core Holder Block Brass Bushing DES 7020 011 Foil Support Plate DES 7020 012R Tension Roller Bearing DE...

Страница 37: ...embly Aluminum Bracket DES 7010 001 Holddown Wheels Pkg of 48 DES 7010 001A Holddown Wheels Individual DES 7010 002 Holddown Wheel Axel Pkg of 48 DES 7010 002A Holddown Wheel Axel Individual DES 7013 002 Infeed Guard Plate DES 7013 003 Outfeed Guard Plate DES 7013 004 Neoprene Outfeed Protector ...

Страница 38: ...5 005 Height Adjustment Screw Bushing DES 7015 006 Guide Brass Bushing DES 7015 007 Height Adjustment Block DES 7015 008 Attachment Collet DES 7015 009 Height Adjustment Extension DES 7015 010 Sprocket DES 7015 011 Offset Ratcheting Ratchet DES 7015 012 Threaded Brass Nut DES 7015 013 Height Adjustment Screw Gear Unit Side DES 7015 014 Height Adjustment Screw In feed Side ...

Страница 39: ...02 Rewind Motor Sprocket DES 7019 003 Drive Shaft Support Block DES 7019 004 Rewind Shaft DES 7019 005 Drive Sprocket DES 7019 006 Chain Guard DES 7019 007 Chain DES 7019 008 Motor Support Plate DES 7019 009 Foil Support Plate DES 7019 010 3 Aluminum Core holder Block DES 7019 011 Bearings ...

Страница 40: ...k DES 7022 002 Clutch Bearing DES 7022 003 Applicator Wheel Motor Support Plate DES 7022 004 Applicator Wheel Shaft DES 7022 005 Support Collet DES 7022 006 High Temperature Bushings DES 7022 007 Spring Spacer DES 7022 008 Applicator Wheel Shaft Housing DES 7007 Applicator Wheel Motor DES 7005 Applicator Wheel ...

Страница 41: ...e Sprocket DES 7023 003 Shaft Sprocket DES 7023 004 Motor Shaft Support Plate DES 7023 005 Motor Shaft Guard Plate DES 7023 006 High Speed Bearings DES 7023 007 Drive Shaft DES 7023 008 Dust Collector Manifold DES 7023 009 Motor DES 7023 010 Manifold Guide Plate DES 7006 Shaper Head DES 7010 Drive Belt ...

Отзывы: