Drummond submersible Скачать руководство пользователя страница 4

Page 4

For technical questions, please call 1-888-866-5797.

Item 63477 


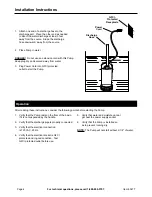
Installation Instructions

1.  Attach one end of a discharge hose to the 

discharge port.  Place the other end as needed 
to direct the water discharge at least 3 feet 
away from the source.  Slope the discharge 
hose downward, away from the source. 

2.  Place Pump in water.

DANGER!

  Do not use an extension cord with this Pump.  

Keep plug dry and secured away from water.

3.  Plug Power Cord into GFCI protected 

outlet to start the Pump. 

Operation

After reading these instructions, consider the following points before starting the Pump:

1.  Verify that the Pump rests on the floor of the basin, 

if it is not suspended by the handle.

2.  Verify that the discharge pipe is properly connected.

3.  Verify that the electrical connection 

is 120 VAC, 60 Hz.

4.  Verify that the electrical socket is GFCI 

protected and in good condition.  Test 
GFCI protected outlet before use.

5.  Verify that water and moisture cannot 

get near the power supply socket.

6.  Verify that the Pump is installed so 

as to prevent running dry.

NOTE:

 The Pump will not start without 2-1/4" of water.

GFCI-

Protected 

Receptacle

Discharge 

Hose

Power 

Cord

Содержание submersible

Страница 1: ...ence 17d When unpacking make sure that the product is intact and undamaged If any parts are missing or broken please call 1 888 866 5797 as soon as possible Copyright 2017 by Harbor Freight Tools All...

Страница 2: ...d at all costs 6 The Pump must be protected from frost 7 The Pump must be protected from running dry 8 Access by children should also be prevented with appropriate measures 9 To prevent death from ele...

Страница 3: ...rt as required check the Pump regularly with start up tests Power Supply 1 The Pump is equipped with a shock proof plug according to regulations The Pump is designed to be connected to a 120VAC 60Hz G...

Страница 4: ...art the Pump Operation After reading these instructions consider the following points before starting the Pump 1 Verify that the Pump rests on the floor of the basin if it is not suspended by the hand...

Страница 5: ...ne voltage 4 Check valve sold separately stuck or installed backwards 1 Clean out dirt and debris from impeller 2 There must be at least 2 1 4 deep water for the Pump to operate properly 3 Consult an...

Страница 6: ...1 Power Cable 1 3 Self Tapping Screw 5 4 Main Body Subassembly 1 5 Screw 4 6 O Ring 2 7 Base Cover 1 8 Cable Sheath 1 9 Cable Guide 1 10 Cable Fastener 2 11 Capacitor 35Uf 1 12 Cable Connector 1 13 S...

Страница 7: ...Page 7 For technical questions please call 1 888 866 5797 Item 63477 Assembly Diagram...

Страница 8: ...o the above limitation of exclusion may not apply to you THIS WARRANTY IS EXPRESSLY IN LIEU OF ALL OTHER WARRANTIES EXPRESS OR IMPLIED INCLUDING THE WARRANTIES OF MERCHANTABILITY AND FITNESS To take a...

Отзывы: