

Unscrew one screw on either side of the wheelchair that holds the
seat in place.
Attach seat belt to the chair by lining up the grommet holes with
the screw holes. Re-insert screws through both the seat belt and
the chair securing the seat belt in place.
Adjust the seat belt to the desired length by
routing the strap through the buckle as shown
in Figs A-C.
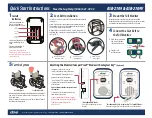
Quick Start Instructions
ASB-2109 & ASB-2109V
Need Set-up Help? (866) 621-4933
Seat Belt Installation
2
4
Mount the Fall Monitor
5
Test the System
now active. The monitor will sound the alert whenever the Seat
Belt is unfastened.
When the monitor is activated press the “Reset” button. This will
shut down the alerting mode.
3
Mount the monitor out of reach of the resident. Suitable
mounting location is the back of wheelchair, so that the resident
cannot tamper with monitor or reach the “Reset” button.
Connect the Seat Belt to
the Fall Monitor
A.
B.
A.
Route the strap through
the buckle as shown
C.
Pull the end of the
strap to tighten
B.
Strap routed correctly
before tightening
Seat Belt Closed
Seat Belt Opened
Bottom of
monitor
Pinch the cord together
and route it through
the strain relief recess.
Plug the cord
into the monitor.
For more information about the
Caregiver Key™, and how it can be used
in your facility’s Fall Assessment Program
call 866-621-4933
Resetting the Monitor/ Tamper Proof
™
Mode with Caregiver Key
™
(Optional)
“Reset Button ON” Mode
Press the Reset button to reset the
monitor.
“
Reset Button OFF, Use
Caregiver Key™ To Turn OFF
”
Mode.
Place the Caregiver Key™ over the red dot to reset the monitor.
Safety Auto Reset™
Pad
Lost
Low
Battery
Monitor Status
Active When Blinking
Pad and Monitor
Reset
S
S
a
a
f
f
e
e
f
f
f
f
t
t
y Au
y Au
t
t
t
t
t
t
o
o
t
t
t
t
R
R
e
e
s
s
e
e
e
e
et™
et™
P
P
ad
ad
L
L
ost
ost
L
L
o
o
w
w
B
B
a
a
t
t
t
t
e
e
r
r
y
y
Moni
Moni
t
t
or St
or St
a
a
tus
tus
A
A
c
c
ti
ti
v
v
e
e
W
W
hen Blin
hen Blin
k
k
ing
ing
P
P
ad and Moni
ad and Moni
t
t
or
or
Refer t
o User Instruc
tions
befor
e changing this setting
.
Reset Butt
on-
ON
Reset Butt
on OFF
U
se C
ar
eg
iv
er Key
To
Tur
n OFF
6V DC
300mA M
AX
-
Install
Batteries
1
The battery compartment
door is secured with the
included Phillips-head screw
Alert Volume
Adjustment
Tone
Adjustment
Alert Delay
Adjustment
W
arning:
Failur
e t
o c
omply with w
arning ma
y r
esult in injur
y
or dea
th.
This devic
e is not suitable f
or all individuals
. O
ther
devic
es ma
y be r
equir
ed
. This devic
e is not a substitut
e for
visual monit
oring b
y c
ar
egiv
er. S
ensor pad fall monit
ors ar
e
user
. The manufac
tur
er does not claim tha
t this devic
e will
stop elopemen
t and/or st
op falls
. This devic
e is designed t
o
agumen
t c
ar
egiv
ers c
ompr
ehensiv
e r
esiden
t mobilit
y
managemen
t pr
ogr
am.
Test this devic
e bef
or
e each use
.
Read the instruc
tions and legal disclaimer
.
Read Instruc
tions B
ef
or
e U
se:
Batt
er
y not included
. U
se 3 x AA alk
aline B
att
eries
.
Set Up: Plug sensor pad i
nto the fall monit
or. A
pply pr
essur
e t
o
the sensor pad t
o t
est the syst
em.
The moni
tor will emit t
wo
beeps
, indic
ating tha
t the syst
em is w
ork
ing
. The
Monit
or
Sta
tus
LED will blink e
ver
y 3 sec
onds when the syst
em is
ac
tiv
ated and oper
ating pr
operly
.
Delay
2sec 1sec 0sec
3 2 1
Dcrease/Increase
Volume
Tone
Close battery door and secure
it with small Philips-head
screw.
Place monitor back into its
plastic protective boot.
Drive
Medical Design
& Manuf acturing
el: 866-371-2266
T
| www.drivemedical.com
Caregivers can choose to reset the
CordLess® Monitor in either of two ways:
“Reset Switch ON”: Pressing the Reset
button on the front of the monitor.
“Reset Switch OFF”: Placing the optional
Caregiver Key over the red dot on the front
of the monitor.
Option 2 allows only the caregiver to reset
the monitor.
See switch on side of the monitor to select
the monitor of your choice.
For more information about the Caregiver
Key™ and how it can be used in your facility’s
Fall Risk Assessment Program call
866-621-4933


