background image

SKU 95065 

        For technical questions, please call 1-800-444-3353


Page 8  

CHARGInG THE BATTERy

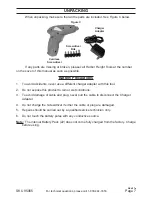
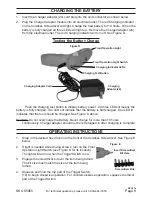
Insert the Charger Adapter (24) cord plug into the unit connector as shown below.

1. 

Plug the Charger Adapter module into an electrical outlet. The red Charging Indicator 

2. 

on the Cordless Screwdriver will light. Charge the new battery for 10 hours.  When the 
battery is fully charged all three LEDs will light up.  Remove the Charger Adapter (24) 
from the electrical outlet. The red Charging indicator will turn off. See Figure D.

Testing the Battery Charge

Charging 

Adapter (24)

Charging Adapter Cord

 Charging Indicator LEDs

Front Operation Light Switch

Front Operation Light

Charging Test Button

Figure D

Push the charging test button to display battery power.  All three LEDs lit means the 

battery is fully charged. Two LEDs lit indicate that the battery is half charged. One LED lit 
indicates that the tool should be charged. See Figure D above.

Caution:

 Do not overcharge the Battery. Never charge for more than 10 hours 

continuously. Charger Adapter should not be left plugged in after charging is complete.

OpERATInG InSTRuCTIOnS

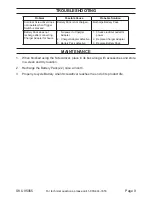
1.  Snap in the desired hex driver into the front of the Cordless Screwdriver. See Figure E 

below.

If light is needed while driving screws, turn on the Front 

2. 

Operation Light Switch (see Figure D for its location). 
The light will turn on when the Trigger Switch is on.

Engage the screwdriver bit over the item being turned. 

3. 

The bit size must match the size of the item being 
turned.

Squeeze and hold the top part of the Trigger Switch 

4. 

(14) to begin clockwise operation. For counterclockwise operation, squeeze the lower 
part of the Trigger Switch.

Figure E

Screwdriver Bits

Insert Screwdriver 

Bit Here

REV 07a

Содержание 95065

Страница 1: ...ll rights reserved No portion of this manual or any artwork contained herein may be reproduced in any shape or form without the express written consent of Harbor Freight Tools Diagrams within this manual may not be drawn proportionally Due to continuing improvements actual product may differ slightly from the product described herein Tools required for assembly and service may not be included For ...

Страница 2: ...n the work area from debris such as chips and sparks Provide barriers or shields as needed Electrical Safety Avoid body contact with grounded 1 surfaces such as pipes radiators ranges and refrigerators There is an increased risk of electric shock if your body is grounded Do not expose power tools to rain 2 or wet conditions Water entering a power tool will increase the risk of electric shock Groun...

Страница 3: ...g protection must be used for appropriate conditions Tool Use and Care Use clamps not included or other 1 practical ways to secure and support the workpiece to a stable platform Holding the work by hand or against your body is unstable and may lead to loss of control Do not force the tool 2 Use the correct tool for your application The correct tool will do the job better and safer at the rate for ...

Страница 4: ...vibration related injury Wear suitable gloves to reduce the 3 vibration effects on the user Use tools with the lowest vibration when 4 there is a choice between different processes Include vibration free periods each day 5 of work Grip tool as lightly as possible while 6 still keeping safe control of it Let the tool do the work To reduce vibration maintain the tool 7 as explained in this manual If...

Страница 5: ...d by a service facility before use If the plug will not fit the outlet have a proper outlet installed by a qualified electrician Grounded Tools Tools with Three Prong Plugs Tools marked with Grounding 1 Required have a three wire cord and three prong grounding plug The plug must be connected to a properly grounded outlet If the tool should electrically malfunction or break down grounding provides ...

Страница 6: ...Table A If you are using one extension cord for 5 more than one tool add the nameplate amperes and use the sum to determine the required minimum cord size See Table A If you are using an extension cord 6 outdoors make sure it is marked with the suffix W A W in Canada to indicate it is acceptable for outdoor use Make sure the extension cord is 7 properly wired and in good electrical condition Alway...

Страница 7: ...Battery Precautions To avoid accidents never use a different charger adapter with this tool 1 Do not expose this product to rain or wet conditions 2 To avoid damage of cable and plug never pull the cable to disconnect the Charger 3 Adapter Do not charge the Screwdriver if either the cable or plug are damaged 4 Repairs should be carried out by a qualified service technician only 5 Do not touch the ...

Страница 8: ...s lit means the battery is fully charged Two LEDs lit indicate that the battery is half charged One LED lit indicates that the tool should be charged See Figure D above Caution Do not overcharge the Battery Never charge for more than 10 hours continuously Charger Adapter should not be left plugged in after charging is complete Operating instructions 1 Snap in the desired hex driver into the front ...

Страница 9: ...charge after connecting Charger Adapter for hours No power to Charger 1 Adapter Charger Adapter defective 2 Battery Pack defective 3 Check electrical outlet for 1 power Replace Charger Adapter 2 Replace Battery Pack 3 Maintenance When finished using the Screwdriver place in its box along with accessories and store 1 in a clean and dry location Recharge the Battery Pack 22 once a month 2 Properly r...

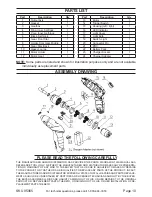
Страница 10: ... and are not available individually as replacement parts Assembly Drawing PLEASE READ THE FOLLOWING CAREFULLY THE MANUFACTURER AND OR DISTRIBUTOR HAS PROVIDED THE PARTS DIAGRAM IN THIS MANUAL AS A REFERENCE TOOL ONLY NEITHER THE MANUFACTURER NOR DISTRIBUTOR MAKES ANY REPRESENTA TION OR WARRANTY OF ANY KIND TO THE BUYER THAT HE OR SHE IS QUALIFIED TO MAKE ANY REPAIRS TO THE PRODUCT OR THAT HE OR SH...

Страница 11: ...ncidental or consequential damages so the above limitation of exclusion may not apply to you This warranty is expressly in lieu of all other warranties express or implied including the warranties of merchantability and fitness To take advantage of this warranty the product or part must be returned to us with transportation charges prepaid Proof of purchase date and an explanation of the complaint ...

Отзывы: