background image

SKU 94371

        For technical questions, please call 1-800-444-3353

Page 5

Unpacking

When unpacking, check to make sure the following parts are included:

Impact Driver, Battery, Charger Base, and Charger Adapter.

If any parts are missing or broken, please call Harbor Freight Tools at the number
on the cover of this manual.

Operation

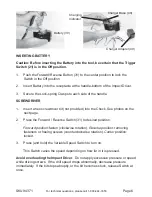
CHARGING BATTERY

The Battery (30) does not come charged from the factory.  Charge before using.
Refer to photos on the next page.

1.

Push the two side buttons in on the Battery, then slide the Battery off the

Impact Driver handle.

2.

Slide the Battery into the Charger Base (48).  The battery can only insert one

way using the guide tabs.

3.

Plug the Charger Adapter (49) output cord into the Charger Base connector.

4.

Plug the Charger Adapter line cord into an electrical outlet.

Verify on the Charger Base that the red charging indicator light come on.  If it

does not come on, check the power connection or try a different wall outlet.
Charge the new Battery for 5 hours. Subsequent charges will take 4 to 5
hours.

5.

Unplug the Charger Base from the electrical outlet when the Battery is fully

charged. The Charging Indicator will flash red.

Note: The operation time of a new battery will ramp up as it is properly used (drained)
and recharged. It will take about 5 recharging cycles before the Battery is at maxi-
mum efficiency.

Caution: If two or more batteries are to be charged, avoid damaging the Charger
by allowing it to cool down between charges. Wait for the Battery to cool down
before placing in the Impact Driver.

Содержание 94371

Страница 1: ...or Freight Tools All rights reserved No portion of this manual or any artwork contained herein may be reproduced in any shape or form without the express written consent of Harbor Freight Tools For technical questions and replacement parts please call 1 800 444 3353 94371 Due to continuing improvements actual product may differ slightly from the product described herein ...

Страница 2: ...ork area conditions Do not use machines or power tools in damp or wet locations Don t expose to rain Keep work area well lighted Do not use electrically powered tools in the presence of flammable gases or liquids 3 Keep children away Children must never be allowed in the work area Do not let them handle machines tools or extension cords 4 Store idle equipment When not in use tools must be stored i...

Страница 3: ... mounting fixtures and any other condition that may affect proper operation Any part that is damaged should be properly repaired or replaced by a qualified technician Do not use the tool if any switch does not turn On and Off properly 14 Replacement parts and accessories When servicing use only identical replacement parts Use of any other parts will void the warranty Only use accessories intended ...

Страница 4: ...e begins to diminish Severe heat is most destructive to a battery the more heat generated the faster the battery loses power A battery that gets too hot can be permanently damaged Never over discharge a battery by using the tool even after tool performance is decreasing Never attempt to discharge a tool s battery by continuing to pull the tool trigger When tool performance begins to diminish stop ...

Страница 5: ...Charger Adapter 49 output cord into the Charger Base connector 4 Plug the Charger Adapter line cord into an electrical outlet Verify on the Charger Base that the red charging indicator light come on If it does not come on check the power connection or try a different wall outlet Charge the new Battery for 5 hours Subsequent charges will take 4 to 5 hours 5 Unplug the Charger Base from the electric...

Страница 6: ...t provided into the Chuck See photos on the next page 2 Press the Forward Reverse Switch 31 to desired position Forward position fasten clockwise rotation Reverse position removing fasteners or freeing screws counterclockwise rotation Center position locked 3 Press and hold the Variable Speed Switch to turn on This Switch varies the speed depending on how far in it is pressed Avoid overloading the...

Страница 7: ...ols clean by wiping with a damp cloth 2 Store tools in carrying case when not using avoid storing in high temperature areas 3 When the battery becomes weak and the tool loses power keep the tool turned On until the battery is completely drained before recharging This will ensure a full recharge 4 Recharge battery monthly when not in use to maintain battery life When the battery is spent it will ne...

Страница 8: ...or Housing 1 13 Washer M4 4 14 Motor 1 16 Planet Gear 2 17 Planet Shaft 2 18 Shaft 1 19 Block 1 20 Spring 1 21 Switch 1 23 Top Case 1 24 Motor Gear 1 25 Bolt M3 15 5 26 Bolt M4 15 2 27 Bolt M3 10 5 28 Bolt M4 35 4 29 Terminal 2 30 Battery 1 31 Button Forward Reverse 1 32 Spring 1 33 Steel Ball 1 34 Chuck 1 35 Rotation Shaft 1 36 Bottom Plate 1 37 Radiator 1 38 Wire Red 1 39 Wire Black 1 Part No De...

Страница 9: ...HE OR SHE IS QUALIFIED TO MAKE ANY REPAIRS TO THE PRODUCT OR THAT HE OR SHE IS QUALIFIED TO REPLACE ANY PARTS OF THE PRODUCT IN FACT THE MANUFACTURER AND OR DISTRIBUTOR EXPRESSLY STATES THat ALL REPAIRS AND PARTS REPLACEMENTS SHOULD BE UNDERTAKEN BY CERTIFIED AND LICENSED TECHNICIANS AND NOT BY THE BUYER THE BUYER ASSUMES ALL RISK AND LIABILITY ARISING OUT OF HIS OR HER REPAIRS TO THE ORIGINAL PRO...

Отзывы: