Drill Master 40070 Скачать руководство пользователя страница 6

Page 6

SKU 40070

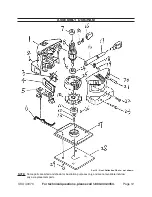
For technical questions, please call 1-800-444-3353.

and work with approved safety equipment, such as those dust masks that are specially
designed to filter out microscopic particles.
(California Health & Safety Code § 25249.5, 

et seq.)

8.

Take caution as some woods contain preservatives such as copper chromium
arsenate (CCA) which can be toxic

. When cutting these materials extra care should

be taken to avoid inhalation and minimize skin contact.

9.

WARNING!

  Exposure to aluminum oxide (a dust generated from material removing

processes) can result in eye, skin, and respiratory irritation.  Always use a NIOSH
(National Institute for Occupational Safety and Health) approved respirator and ANSI
approved safety goggles.  Avoid skin exposure.  Proper ventilation in the work area
is required.

10.

WARNING!

 The warnings, cautions, and instructions discussed in this instruction

manual cannot cover all possible conditions and situations that may occur. It must
be understood by the operator that common sense and caution are factors which
cannot be built into this product, but must be supplied by the operator.

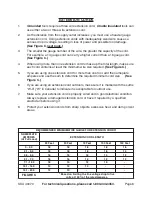
Note: Performance of this tool (if powered by line voltage) may vary depending on
variations in local line voltage. Extension cord usage may also affect tool performance.

GROUNDING

WARNING!

Improperly connecting the grounding wire can result in the risk of electric
shock.  Check with a qualified electrician if you are in doubt as to whether the
outlet is properly grounded.  Do not modify the power cord plug provided with
the tool.  Never remove the grounding prong from the plug.  Do not use the
tool if the power cord or plug is damaged.  If damaged, have it repaired by a
service facility before use.  If the plug will not fit the outlet, have a proper outlet
installed by a qualified electrician.

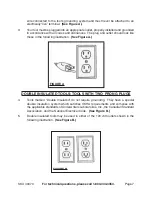
GROUNDED TOOLS: TOOLS WITH THREE  PRONG  PLUGS

1.

Tools marked with “Grounding Required” have a three wire cord and three prong
grounding plug.  The plug must be connected to a properly grounded outlet.  If the
tool should electrically malfunction or break down, grounding provides a low
resistance path to carry electricity away from the user, reducing the risk of electric
shock.  

(See Figure A.)

2.

The grounding prong in the plug is connected through the green wire inside the
cord to the grounding system in the tool.  The green wire in the cord must be the only

Содержание 40070

Страница 1: ...or Freight Tools All rights reserved No portion of this manual or any artwork contained herein may be reproduced in any shape or form without the express written consent of Harbor FreightTools For technical questions and replacement parts please call 1 800 444 3353 TO PREVENT SERIOUS INJURY READ AND UNDERSTAND ALL WARNINGS AND INSTRUCTIONS BEFORE USE Manual Revised 10 05 40070 ...

Страница 2: ...dark areas invite accidents Make sure there is adequate surrounding workspace 2 Do not operate power tools in explosive atmospheres such as in the presence of flammable liquids gases or dust Power tools create sparks which may ignite the dust or fumes 3 Keep bystanders children and visitors away while operating a power tool Distractions can cause you to lose control Protect others in the work area...

Страница 3: ...wet conditions Water entering a power tool will increase the risk of electric shock 8 Do not abuse the Power Cord Never use the Power Cord to carry the tools or pull the Plug from an outlet Keep the Power Cord away from heat oil sharp edges or moving parts Replace damaged Power Cords immediately Damaged Power Cords increase the risk of electric shock 9 When operating a power tool outside use an ou...

Страница 4: ...oes not turn it on or off Any tool that cannot be controlled with the Power Switch is dangerous and must be replaced 19 Disconnect the Power Cord Plug from the power source before making any adjustments changing accessories or storing the tool Such preventive safety measures reduce the risk of starting the tool accidentally Always unplug the tool from its electrical outlet before performing any in...

Страница 5: ...ck 5 Never lay the tool down until it has come to a complete stop Moving parts can grab the surface and pull the tool out of your control 6 Never leave the Sander unattended when it is plugged into an electrical outlet Turn off the tool and unplug it from its electrical outlet before leaving 7 WARNING Some dust created by power sanding sawing grinding drilling and other construction activities con...

Страница 6: ...ust be supplied by the operator Note Performance of this tool if powered by line voltage may vary depending on variations in local line voltage Extension cord usage may also affect tool performance GROUNDING WARNING Improperly connecting the grounding wire can result in the risk of electric shock Check with a qualified electrician if you are in doubt as to whether the outlet is properly grounded D...

Страница 7: ...uld look like those in the following illustration See Figure A DOUBLE INSULATED TOOLS TOOLS WITH TWO PRONG PLUGS 4 Tools marked Double Insulated do not require grounding They have a special double insulation system which satisfies OSHA requirements and complies with the applicable standards of Underwriters Laboratories Inc the Canadian Standard Association and the National Electrical Code See Figu...

Страница 8: ...mperes and use the sum to determine the required minimum cord size See Figure C 6 If you are using an extension cord outdoors make sure it is marked with the suffix W A W in Canada to indicate it is acceptable for outdoor use 7 Make sure your extension cord is properly wired and in good electrical condition Always replace a damaged extension cord or have it repaired by a qualified electrician befo...

Страница 9: ...ION Always make sure the Power Cord 17 of the Sander is unplugged from its electrical outlet prior to making any adjustments or assembling to the tool ATTACHING THE DUST COLLECTION CHUTE 0 1 Turn the Chute 0 so that the tab on top of the rectangular end faces up Snap it in place into the rectangular shaft at the back of the Sander 2 Connect a 1 1 4 dust collection hose from the Chute to your dust ...

Страница 10: ...ed from its electrical outlet prior to making any adjustments to the tool 2 Clamp your workpiece down or insert it in a vise Make sure the wood you are sanding does not have any nails or metal of any kind in it or you will ruin the sandpaper and damage the Pad 28 3 After donning the appropriate safety gear covered on page 2 of this manual plug in the Sander 4 Turn on the Sander by turning on the S...

Страница 11: ...TO MAKE ANY REPAIRS TO THE PRODUCT OR THAT HE OR SHE IS QUALIFIED TO REPLACE ANY PARTS OF THE PRODUCT IN FACT THE MANUFACTURER AND OR DISTRIBUTOR EXPRESSLY STATESTHAT ALL REPAIRS AND PARTS REPLACEMENTS SHOULD BE UNDERTAKEN BY CERTIFIED AND LICENSED TECHNICIANS AND NOT BY THE BUYER THE BUYER ASSUMES ALL RISK AND LIABILITY ARISING OUT OF HIS OR HER REPAIRSTOTHE ORIGINAL PRODUCT OR REPLACEMENT PARTS ...

Страница 12: ...chnical questions please call 1 800 444 3353 ASSEMBLY DIAGRAM NOTE Some parts are listed and shown for illustration purposes only and are not available individu ally as replacement parts Part 0 Dust Collection Chute not shown ...

Отзывы: