background image


4

INSTALLATION & DEVICE ACTIVATION 


1.  Click this link to go to the DrewTech downloads page: 


DrewTech.com/downloads 


2.  Locate and click on the 

"CarDAQ-PLUS 2

®

Set-up"

 link 


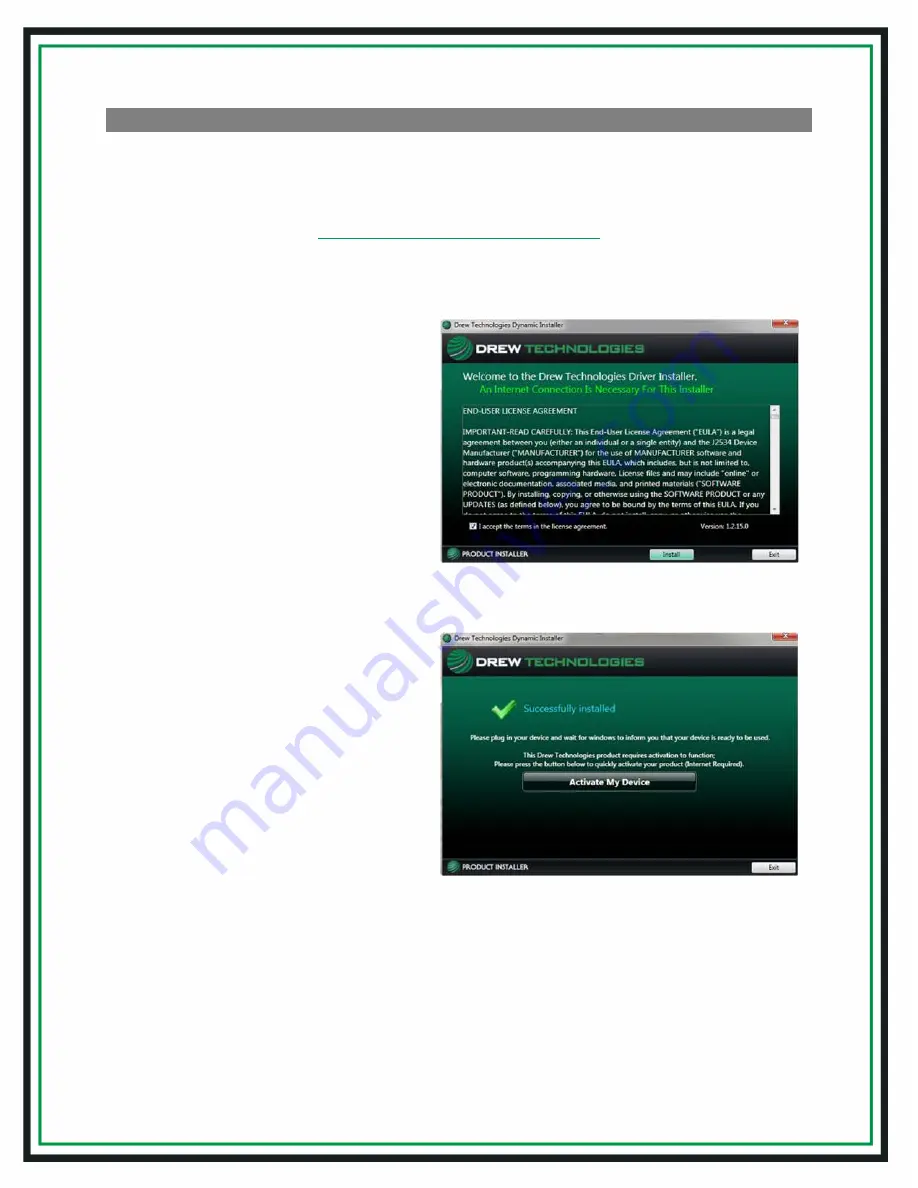
3.  Run the installation once the 

software has downloaded to your 
PC. Upon encountering this screen, 
read the end-user license 
agreement, and check the box next 
to 

“I accept...”

then click 

"Install"


4.  Once the setup application has 

finished, connect the USB cable to 
your CarDAQ-Plus 2

®

device and to 

the PC. Look for the message 
window in the lower, right-hand 
corner of the screen that indicates 
that the drivers are being installed 
and listen for the familiar Windows 
driver installation chime. Upon 
successful driver installation, 
click

“Activate My Device”


Содержание CarDAQ-Plus 2

Страница 1: ......

Страница 2: ...Toolbox 3 7 DREWTECH Tech2Win DRIVER 9 Troubleshooting 9 PRODUCT SPECIFICATIONS 10 Protocols Supported 10 Operating Systems Supported 10 Product Specifications Tolerances 10 IMPORTANT NOTES 12 LIMITE...

Страница 3: ...CarDAQ Plus 2 device and is available at DrewTech com GETTING TO KNOW THE CarDAQ Plus 2 LED Status lights Blinking Red Solid Red Blinking Green Solid Green Power Firmware error Call DrewTech Support D...

Страница 4: ...screen read the end user license agreement and check the box next to I accept then click Install 4 Once the setup application has finished connect the USB cable to your CarDAQ Plus 2 device and to th...

Страница 5: ...5 5 The Device Activator application will refresh Click Activate My Device 6 Select the device you want to activate and click Continue 7 Fill in all applicable information and click Continue...

Страница 6: ...he interface unplug the USB cable for the CarDAQ Plus 2 device from your PC and click Ok b Then plug the USB cable for the CarDAQ Plus 2 device back into your PC and click Ok 10 Once product activatio...

Страница 7: ...documents OEM documentation web links quick links videos basic diagnostic functions connection verification and more J2534 Toolbox 3 should be referred to regularly as information is updated continual...

Страница 8: ...n pertaining to OEM J2534 flashing including links information walkthroughs and some helper functions 7 Support tab contains functions to check driver installation vehicle communication updating the d...

Страница 9: ...onfiguration application 2 Confirm that the driver is installed which is indicated by a green check mark Note If there is a red X click Install Troubleshooting If the Install does not work click on Ex...

Страница 10: ...10 skip to step 10 Windows 7 Once the driver installation reports complete Right click the BlueTooth icon in your system tray in the lower right corner 6 Click Add a device 7 Click CarDAQ Plus2 where...

Страница 11: ...t Versions Windows 10 32 bit and 64 bit Versions Physical Specifications Tolerances Name Value Dimensions approximate InputVoltageRange 6 5 x 6 x 1 5 7VDC to 27VDC Supply Current 220mA 7VDC 175mA 12VD...

Страница 12: ...rials or workmanship for one year from the date of purchase Within this period Drew Technologies will at its sole option repair or replace any components that fail in normal use Such repairs or replac...

Страница 13: ...evice COPYRIGHT INFORMATION Copyright All material herein is Copyrighted 1996 2017 Drew Technologies Inc CarDAQ Plus 2 software hardware and firmware are also copyrighted Users are given permission to...

Страница 14: ...nologies Support by emailat support drewtech com or call toll free 877 888 2534 option 3 Support hours are 8 30am 5 30pm EST Monday Friday excluding holidays Drew Technologies Inc 3915 Research Park D...

Отзывы: