background image

-7-

Operating Instructions

ON/OFF AND VARIABLE 

SPEED SWITCHES

Your Sander is equipped with a variable
speed switch and a separate on/off switch.
The speed can be controlled from minimum
to maximum speed by moving the switch
lever to desired setting.

TO TURN TOOL “ON”: Slide switch to the
“ON”position (I) on symbol.

TO TURN TOOL “OFF” Slide switch to the
“OFF” position (0) off symbol.

TO INCREASE SPEED: Move variable speed
control lever toward the + sign.

TO DECREASE SPEED: Move variable speed
control lever toward the – sign.

Setting

Material/Application

Low

Delicate surfaces, veneers, 
or light surface finishing &
polishing

Low

Plastics or other soft surfaces 

Medium

Solid wood, fast stock
removal, paint removal

High

General use, metal sanding &
finishing, chipboard, coarse
sanding on rough surfaces, 
& polishing

SELECTING A CONTOUR SHAPE

Individual contour shapes are available in three
basic styles. A variety of radiuses are available
in each style:

Convex shapes: 1/8", 3/16", 1/4", 3/8", 1/2",
5/8"

Concave shapes: 1/8", 3/16", 1/4", 3/8", 1/2",
5/8"

Angled shapes: Flat, 30°, 60°, 45°, 90°, -90°

The contour shapes are available in a variety of
different radiuses to match common
configurations. Additionally, each contour can
be modified or customized by trimming or
shaping the material to the desired form. 

INSTALLING AND REMOVING DETAIL

PAD & OPTIONAL SHUTTER PAD

Your sander is equipped with a quick change
clamping mechanism that allows you to easily
change accessories without additional tools.

To attach detail pad or optional shutter pad to
the sander:

1. Disconnect sander from power source. 

2. Rotate red release lever to lower the
accessory clamp holder. 

3. Apply hook and loop backed sandpaper to
pad. 

4. Insert pad completely into the top and
back of the holder until it reaches the rear
"stop".

HINT: Make sure the small grip dimples have
firmly secured the rubber grip ring (Fig. 1).

5. Press holder firmly back up into place
until  the pad "snaps" into position.

To remove pad, rotate lever to release and
lower the clamp holder. Remove the pad
from the holder. You are now ready to install
another pad or contour shape. 

When using detail sanding pads, regularly
rotate the pad 180 degrees to maximize all
surfaces for longer, more efficient use. 

INSTALLING AND REMOVING

CONTOURS

To attach a contour shape to the sander:

1. Disconnect sander from power source.

2. Rotate red release lever to lower the
accessory clamp holder. 

3. Apply either a sanding tube or pressure
sensitive adhesive directly to contour shape.

4. Insert contour completely into the top and
back of the holder until it reaches the rear
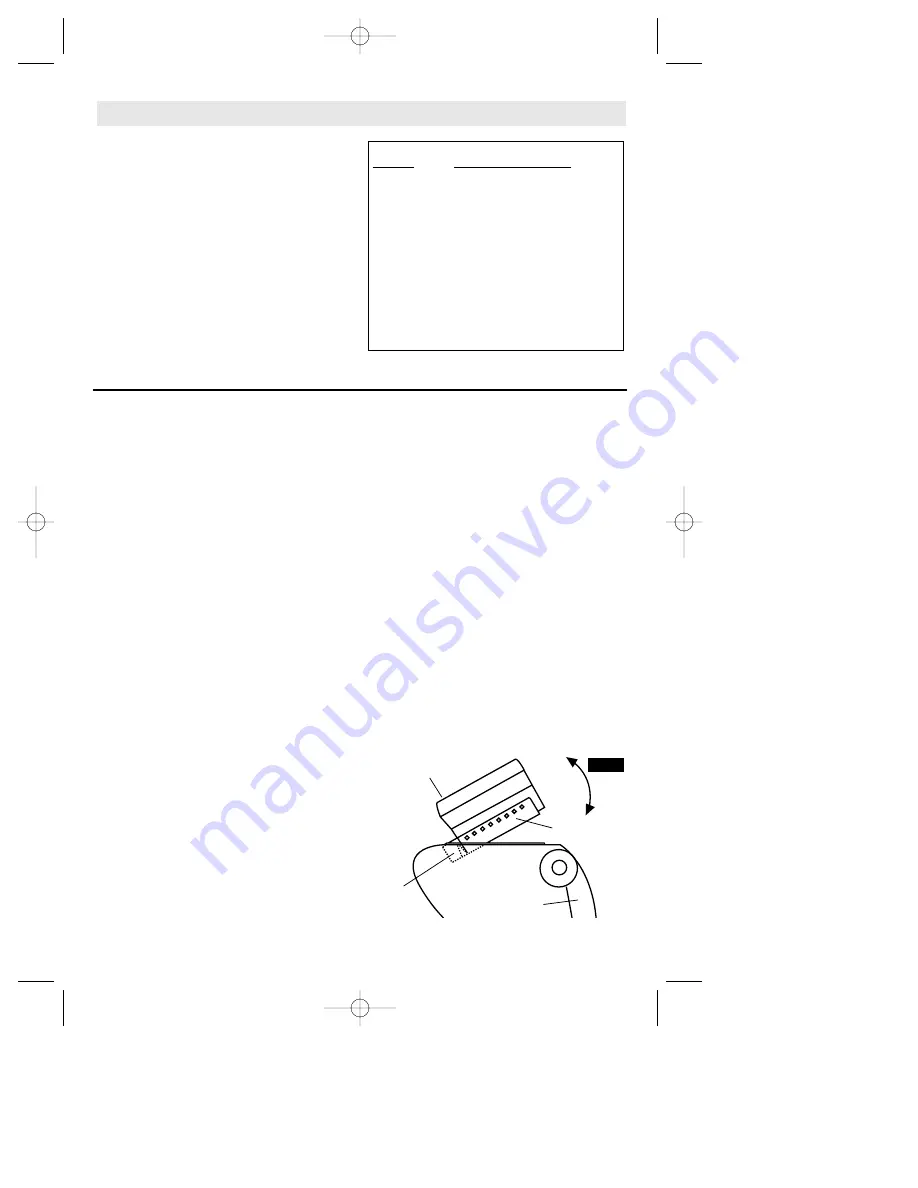
"stop" (Fig. 2).

CONTOUR 

REAR
STOP

RELEASE LEVER

CLAMP
HOLDER

FIG. 2

DM 2610919361 9/03  9/5/03  8:33 AM  Page 7

Содержание SOLUTION 6000

Страница 1: ... reserved P O Box 1468 Racine Wisconsin 53401 1 800 437 3635 http www dremel com Safety Assembly Operation Maintenance Accessory Information Warranty Service Parts Parlez vous français Voir page 12 Habla español Vea página 23 Dremel brand products are manufactured and sold by the Dremel Division of Robert Bosch Tool Corporation DM 2610919361 9 03 9 5 03 8 33 AM Page 1 ...

Страница 2: ...the risk of electric shock Do not abuse the cord Never use the cord to carry the tools or pull the plug from an outlet Keep cord away from heat oil sharp edges or moving parts Replace damaged cords immediately Damaged cords increase the risk of electric shock When operating a power tool outside use an outdoor extension cord marked W A or W These cords are rated for outdoor use and reduce the risk ...

Страница 3: ...llow instructions in the Maintenance section of this manual Use of unauthorized parts or failure to follow Maintenance Instructions may create a risk of electric shock or injury Certain cleaning agents such as gasoline carbon tetrachloride ammonia etc may damage plastic parts Unplug the sander before changing accessories Accidental start ups may occur if sander is plugged in while changing an acce...

Страница 4: ... silica from bricks and cement and other masonry products and Arsenic and chromium from chemically treated lumber Your risk from these exposures varies depending on how often you do this type of work To reduce your exposure to these chemicals work in a well ventilated area and work with approved safety equipment such as those dust masks that are specially designed to filter out microscopic particl...

Страница 5: ...sing from 0 setting Arrow Action in the direction of arrow Alternating current Type or a characteristic of current Direct current Type or a characteristic of current Alternating or direct current Type or a characteristic of current Class II construction Designates Double Insulated Construction tools Earthing terminal Grounding terminal Warning symbol Alerts user to warning messages Ni Cad RBRC sea...

Страница 6: ...o the nameplate on your tool SANDING TUBE RELEASE LEVER CLAMP HOLDER CONTOUR VENTILATION OPENINGS VARIABLE SPEED SWITCH ON OFF SWITCH DETAIL PAD HOOK LOOP PAPER POWER CORD MOTOR BRUSHES RUBBER GRIP RING GRIP DIMPLES FIG 1 See diagram for proper way to hold tool The head of sander will get warm as it is being used Please use care to make sure ventilation openings are not covered during use VENTILAT...

Страница 7: ...g the material to the desired form INSTALLING AND REMOVING DETAIL PAD OPTIONAL SHUTTER PAD Your sander is equipped with a quick change clamping mechanism that allows you to easily change accessories without additional tools To attach detail pad or optional shutter pad to the sander 1 Disconnect sander from power source 2 Rotate red release lever to lower the accessory clamp holder 3 Apply hook and...

Страница 8: ...es they are not reusable HINT When using 1 8 and 3 16 concave contours with sanding tubes it will be easier to conform the abrasive to the workpiece if a finer grit paper is used NOTE The contour shapes have been extruded to the dimension indicated on the shape When doing exacting work it will be necessary to provide an allowance for the sandpaper being used Heavier coarser grit papers require a g...

Страница 9: ... the OFF position To ensure longer life and even wear lightly brush any residue or clogged materials from sandpaper surface prior to each use Do not wet sand with this sander WARNING Maintenance Service Preventive maintenance performed by unauthorized personnel may result in misplacing of internal wires and components which could cause serious hazard We recommend that all tool service be performed...

Страница 10: ... the wand be sure to align the sanding sheet holes with the holes in the sanding pad to allow the dust wand to function properly The detail pad and optional shutter pad can be used with hook loop sandpaper with or without holes for dust collection If you ve purchased sandpaper without holes holes can be punched manually for use with the dust wand Using sandpaper with holes while not using the dust...

Страница 11: ...other person is authorized to give any warranties on behalf of Dremel If Dremel inspection shows that the problem was caused by problems with material or workmanship within the limitations of the warranty Dremel will repair or replace the product free of charge and return product prepaid Repairs made necessary by normal wear or abuse or repair for product outside the warranty period if they can be...

Страница 12: ...servés P O Box 1468 Racine Wisconsin 53401 1 800 437 3635 http www dremel com Sécurité Assemblage Fonctionnement Maintenance Informations sur les accessoires Garantie Pièces de service Les produits de marque Dremel sont fabriqués et commercialisés par la Division Dremel de Robert Bosch Tool Corporation DM 2610919361 9 03 9 5 03 8 33 AM Page 12 ...

Страница 13: ...ez pas la fiche en tirant sur le cordon N exposez pas le cordon à la chaleur à des huiles à des arêtes vives ou à des pièces en mouvement Remplacez immédiatement un cordon endommagé Un cordon endommagé augmente le risque de choc électrique Lorsque vous utilisez un outil électrique à l extérieur employez un prolongateur pour l extérieur marqué W A ou W Ces cordons sont faits pour être utilisés à l ...

Страница 14: ...es deux mains libres pour contrôler l outil Tenez le cordon à l écart de l accessoire Le cordon peut s emmêler avec le patin ou le contour N utilisez pas un outil si son interrupteur est bloqué Un outil que vous ne pouvez pas commander par son interrupteur est dangereux et doit être réparé Débranchez la fiche de l outil avant d effectuer un réglage de changer d accessoire oude ranger l outil De te...

Страница 15: ...Les cristaux de silices provenant des briques et du ciment et d autres produits de maçonnerie et L arsenic et le chrome provenant des bois traités chimiquement Le niveau de risque dû à cette exposition varie avec la fréquence de ces types de travaux Pour réduire l exposition à ces produits chimiques il faut travailler dans un lieu bien ventilé et porter un équipement de sécurité approprié tel que ...

Страница 16: ... vitesse augmente depuis le réglage 0 Flèche Action dans la direction de la flèche Courant alternatif Type ou caractéristique du courant Courant continu Type ou caractéristique du courant Courant alternatif Type ou caractéristique du courant ou continu Construction classe II Désigne des outils construits avec double isolation Borne de terre borne de mise à la terre Symbole d avertissement Alerte l...

Страница 17: ...tre outil AVERTISSEMENT TUBE DE PONÇAGE LEVIER DE RELÂCHEMENT SUPPORT DE SERRAGE CONTOUR PRISES D AIR COMMANDE À VITESSE INTERRUPTEUR MARCHE ARRÊT PATIN POUR TRAVAIL DE PRÉCISION PAPIER À CROCHETS ET BOUCLES CORDON BALAIS DU MOTEUR BAGUE DE SERRAGE EN CAOUTCHOUC DÉPRESSIONS DE PRISE FIG 1 Il faut tenir l outil comme illustré sur le schéma La tête de la ponceuse chauffe pendant l utilisation Faites...

Страница 18: ...t le matériau à la forme désirée POSE ET DÉPOSE DU PATIN POUR TRAVAIL DE PRÉCISION ET DU PATIN FACULTATIF POUR VOLETS Votre ponceuse est pourvue d un mécanisme de serrage à changement rapide qui vous permet de changer facilement les accessoires sans outils supplémentaires Pour fixer le patin pour travail de précision ou le patin facultatif pour volets à la ponceuse 1 Débranchez la ponceuse de la p...

Страница 19: ...etez les abrasifs usés ils ne sont pas réutilisables CONSEIL Lorsque vous utilisez les contours concaves de 1 8 po et de 3 16 po avec les tubes de ponçage il est plus facile d adapter l abrasif à l ouvrage en utilisant un papier à grain plus fin REMARQUE Les formes de contour ont été extrudées à la dimension indiquée sur la forme En exécutant un travail exigeant il faudra prévoir une tolérance en ...

Страница 20: ...e et répartir l usure uniformément brossez délicatement pour enlever tout résidu ou matériau bloqué sur la surface du papier de verre avant chaque usage N utilisez pas cette ponceuse pour le ponçage par voie humide Maintenance Entretien L entretien préventif effectué par des employés non autorisés peut entraîner un positionnement erroné des composants et des fils internes et ainsi causer des dange...

Страница 21: ...les trous du patin de ponçage afin de permettre un fonctionnement approprié du tube de poussière Le patin pour travail de précision et le patin pour volets offert en option peuvent être utilisés avec du papier de verre à crochets et boucles avec ou sans trous pour collecte de poussière Si vous avez acheté du papier de verre sans trous vous pouvez percer des trous manuellement pour utilisation avec...

Страница 22: ...orisé à accorder des garanties au nom de Dremel Si l inspection effectuée par Dremel révèle que le problème a été causé par une défaillance des matériaux ou de l exécution dans les limites de la garantie Dremel réparera ou remplacera le produit gratuitement et renverra le produit port payé Si elles peuvent être effectuées les réparations rendues nécessaires par l usure normale ou un usage abusif o...

Страница 23: ...erechos reservados P O Box 1468 Racine Wisconsin 53401 1 800 437 3635 http www dremel com Seguridad Ensamblaje Funcionamiento Maintenance Información sobre accesorios Garantía Piezas de repuesto Los productos de la marca Dremel son fabricados y vendidos por la División Dremel de Robert Bosch Tool Corporation DM 2610919361 9 03 9 5 03 8 33 AM Page 23 ...

Страница 24: ...ta mecánica aumentará el riesgo de que se produzcan sacudidas eléctricas No abuse del cordón Nunca use el cordón para llevar las herramientas ni para sacar el enchufe de un tomacorriente Mantenga el cordón alejado del calor el aceite los bordes afilados o las piezas móviles Cambie los cordones dañados inmediatamente Los cordones dañados aumentan el riesgo de que se produzcan sacudidas eléctricas A...

Страница 25: ...ara la que está diseñada No utilice la herramienta si el interruptor no la enciende o apaga Toda herramienta que no se pueda controlar con el interruptor es peligrosa y debe ser reparada Desconecte el enchufe de la fuente de energía antes de hacer cualquier ajuste cambiar accesorios o guardar la herramienta Estas medidas de seguridad preventivas reducen el riesgo de arrancar la herramienta acciden...

Страница 26: ...illos y cemento y otros productos de mampostería y Arsénico y cromo de madera tratada químicamente Su riesgo por causa de estas exposiciones varía dependiendo de con cuánta frecuencia realice este tipo de trabajo Para reducir su exposición a estos agentes químicos trabaje en un área bien ventilada y trabaje con equipo de seguridad aprobado como por ejemplo máscaras antipolvo que estén diseñadas es...

Страница 27: ...gado graduación de 0 Flecha Acción en la dirección de la flecha Corriente alterna Tipo o una característica de corriente Corriente continua Tipo o una característica de corriente Corriente alterna o continua Tipo o una característica de corriente Construcción de clase II Designa las herramientas de construcción con aislamiento doble Terminal de toma de tierra Terminal de conexión a tierra Símbolo ...

Страница 28: ...ON SOPORTE ABRAZADERA CONTORNO ABERTURAS DE VENTILACION INTERRUPTOR DE VELOCIDAD VARIABLE INTERRUPTOR DE ENCENDIDO Y APAGADO ZAPATA PARA TRABAJO DE DETALLE PAPEL DE ENGANCHE Y CIERRE CORDON DE ENERGIA ESCOBILLAS DEL MOTOR ANILLA DE AGARRE DE GOMA HOYUELOS DE AGARRE FIG 1 Ver el diagrama para aprender el modo correcto de sostener la herramienta El cabezal de la lijadora se calentará a medida que se...

Страница 29: ... la forma deseada INSTALACION Y REMOCION DE LA ZAPATA PARA TRABAJO DE DETALLE Y DE LA ZAPATA OPCIONAL TIPO PERSIANA La lijadora está equipada con un mecanismo de sujeción de cambio rápido que le permite cambiar fácilmente los accesorios sin tener que usar herramientas adicionales Para colocar en la lijadora la zapata para trabajo de detalle o la zapata opcional tipo persiana 1 Desconecte la lijado...

Страница 30: ...uina de la hoja de papel usando una uña y despéguela Tire los abrasivos usados No son reutilizables SUGERENCIA Al utilizar contornos cóncavos de 1 8 y de 3 16 con tubos de lijar será más fácil adaptar el abrasivo a la forma de la pieza de trabajo si se utiliza un papel de grano más fino NOTA Las formas de los contornos se han extruido a la dimensión indicada en la forma Al hacer trabajo de precisi...

Страница 31: ...na mayor duración y un desgaste uniforme quite todos los residuos o materiales atrapados en la superficie del papel de lija pasando suavemente un cepillo antes de cada uso No lije en mojado con esta lijadora Servicio El mantenimiento preventivo realizado por personal no autorizado pude dar lugar a la colocación incorrecta de cables y componentes internos que podría constituir un peligro serio Reco...

Страница 32: ... 31 Al utilizar la varilla asegúrese de alinear los agujeros de la hoja de lijar con los agujeros de la zapata de lijar para permitir que la varilla para polvo funcione adecuadamente La zapata para detalles y la zapata opcional para persianas puede utilizarse con papel de lija de enganche y cierre con o sin agujeros para la recolección de polvo Si ha comprado papel de lija sin agujeros puede hacer...

Страница 33: ...antía en nombre de Dremel Si la inspección de Dremel demuestra que el problema fue causado por problemas con el material o la fabricación dentro de los límites de la garantía Dremel reparará o reemplazará el producto gratuitamente y devolverá el producto con el porte pagado Las reparaciones necesarias debido al desgaste normal o al abuso o las reparaciones de productos que se encuentren fuera del ...

Страница 34: ... 8 11 16 14 13 15 10 12 9 9 2 21 20 22 23 OPTIONAL ACCESSORY ACCESSOIRE EN OPTION ACCESORIO OPCIONAL MODEL MODÈLE MODELO 6000 FO13600003 CONTOUR SANDER PONCEUSE À CONTOURS LIJADORA DE CONTORNEA DM 2610919361 9 03 9 5 03 8 33 AM Page 34 ...

Страница 35: ... Actuator Actionneur à interrupteur Accionador del interruptor 13 2610919369 Brush Cap Pair Chapeau de balai paire Tapa para escobillas par 14 2615090930 Brush Spring Pair Ressort de balai paire Muelle para escobillas par 15 2610919363 VS Switch Assembly Ensemble de commande à Ensamblaje del interruptor de VV vitesse variable 16 2615302158 Cord Assembly Ensemble de cordon Ensamblaje del cordón 17 ...

Отзывы: