background image

Page  3  of  8

In


the


unlikely


event


of


missing


or


damaged


parts,


please 

contact the customer service team on 0344 292 00 00.

When


calling


this


number,


please


quote


the


part


code 

reference numbers shown in this leaflet when

requesting spare or replacement parts.

Please


retain


your


assembly instruction and 

tools provided for future use. 

Periodically check that all bolts are still tight.

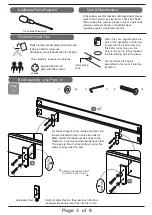
Additional Tools Required

General Hints & Tips

When  they  are  supplied  and  are 

part  of  the  assembly  of  this  bed, 

ensure  that  the  barrel  nuts  are 

fitted  the  correct  way  so  the 

hole  in  the  nut  is  facing  towards 

the intersecting  hole in the panel. 

Intersecting

Hole

Care & Maintenance

Cross-head Screwdriver

We


recommend


the


bed is 

assembled in


the


room it shall be 

located in.

Stage

1

E

C

ARROWS ON LABELS POINT 

TOWARDS  EACH OTHER

E

C

C

E

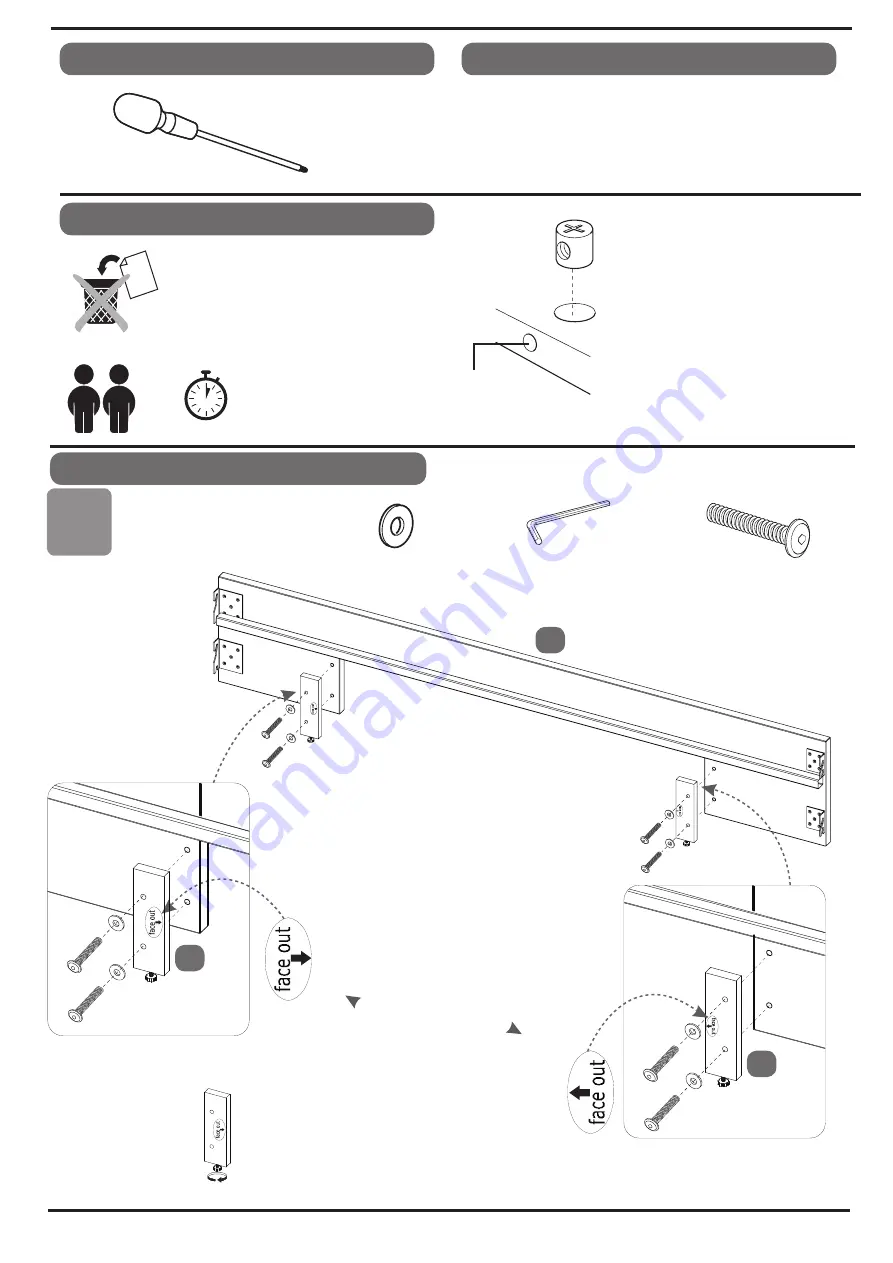
Bed Assembly - Use Pack 'A'

x8

x8

D

x1

Carefully adjust feet so they just touch the floor 

keeping side panels level when bed is in use.

Adjustable Feet 

Fix support legs (4) from inside bed frame into 

the pre-threaded holes in both side rails (3).

Make certain the labels are as shown in the 

diagrams - they must point towards each other.

The legs are then in correct place to stop the 

drawer going under the bed.

This


assembly


requires


two persons.


Approximate time to 

assemble this product

4

5

 MINS

3

4a

4b

 x2

Содержание LANGFORD STORAGE BED Double

Страница 1: ...er Back Panels 12 11 13 1 1 1 Upgraded Sprung Slat Frame Wooden Slat Set Wooden Slat Set Support Leg 10 9 4 2 Drawer Bottom Panels Drawer Bottom Support Rails Sprung Slat Frame Centre Support Leg Sprung Slat Frame Support Legs Drawer Parts PLEASE READ this sheet prior to assembly to familiarise yourself with the various stages of construction Carefully open the pack supplied and check the contents...

Страница 2: ... Allen Key for M6 bolt G x6 Sleeve Nuts M6 x6 x7 Flat Washers for M6 bolt H F HARDWARE NEEDED FOR BED ASSEMBLY PACK A HARDWARE NEEDED FOR DRAWER ASSEMBLY PACK C Description Qty Code WHEELS FOR DRAWER PACK D Screws 5x50mm for assembling drawer panels M x24 Description x24 Code Description Qty Code Description Bolts M6x40mm for fitting the wooden slat set 6 to side panels 3 5 Page 2 of 8 EXTRA HARDW...

Страница 3: ...hole in the nut is facing towards the intersecting hole in the panel Intersecting Hole Care Maintenance Cross head Screwdriver We recommend the bed is assembled in the room it shall be located in Stage 1 E C ARROWS ON LABELS POINT TOWARDS EACH OTHER E C C E Bed Assembly Use Pack A x8 x8 D x1 Carefully adjust feet so they just touch the floor keeping side panels level when bed is in use Adjustable ...

Страница 4: ...Stage 2 Stage 3 Bed Assembly Use Pack A C x8 D x1 A x8 B x8 Page 4 of 8 A D B C 10mm A B C D 90 1 2 3 4 100 C x8 D x1 A x8 B x8 2 2 1 1 ...

Страница 5: ...6 x1 x1 Page 5 of 8 i ii iv iii H S Adjustable foot 11 F K G H 11 F K G H 11 12 F K G H J Fitting Wooden Slat Set Use Pack B Stage 4a F Carefully lay the wooden slat set on the metal supports on each side panel K x6 ...

Страница 6: ...Fitting Sprung Slat Frame Use Pack B Stage 4b H x4 G x4 F x4 K x4 J x1 F G H K Page 6 of 8 15 15 13 13 14 L L L L L L L x8 ...

Страница 7: ...IMPORTANT MAKE SURE WHEN FITTING THE NUTS THAT THE HOLE IS IN CORRECT ALIGNMENT WITH THE HOLE IN THE PANEL EDGE 10 S Q Q Q Q Q Q Q Q Q Q x24 x24 Drawer Assembly Use Pack C Stage 8 ii 9 6 8 7 10 10 iii iv v vi M M M M J J M M M M M M ...

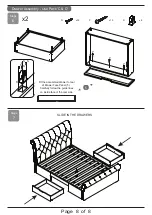
Страница 8: ...LIDE IN THE DRAWERS Page 8 of 8 R Drawer Assembly Use Pack C D x10 x8 N N N N R Fit the assembled drawer to rear of Drawer Face Panel 5 Carefully follow the guide lines on inside face of the rear side 5 P P P P P N x32 x2 ...

Отзывы: