background image

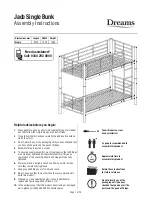
Jade Single Bunk

Assembly Instructions

Need assistance?

Call: 0344 292 0000

Dimensions mm

Length

Width

Height

Single

2010

1000

1600

Approximate time to 
assemble this product

Retain these instructions 
for future reference

2 x people recommended to 
assemble this product

Do not discard any of the 
packaging until you have 
checked that you have all the 
parts and the pack of fixings.

You will require a cross 
head screwdriver

Helpful advise before you begin:

1.

   We suggest you spend a short time reading through this lea

fl

et 

and then follow the simple step by step instructions.

2.

   If you follow the instructions carefully the end result should be 

worth the effort.

3.

   Do not discard any of the packaging until you have checked that 

you have all the parts and the pack of 

fi

ttings.

4.

  Assemble this product on a carpet.

5.

   To ensure an easier assembly, we strongly advise that all 

fi

ttings 

are only 

fi

nger tightened during initial assembly. Only upon 

completion of the assembly should all 

fi

xing points be fully 

tightened.

6.

   We recommend a periodic check on all 

fi

xing points to make 

sure they remain fully tightened.

7.

  Keep glue and 

fi

ttings out of children’s reach.

8.

   Do not use any other tools other than those recommended to 

build this product.

9.

   Please do not use substitute parts. Use only additional or 

replacement parts supplied by Dreams Ltd.

10.

   In the unlikely event that this product has missing or damaged 

parts, please call 0344 292 0000 to obtain spares.

Page 1 of 13

1

Содержание Jade Single Bunk

Страница 1: ...hould be worth the effort 3 Do not discard any of the packaging until you have checked that you have all the parts and the pack of fittings 4 Assemble this product on a carpet 5 To ensure an easier as...

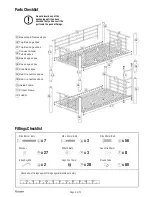
Страница 2: ...Bed Legs 2pcs Top Bed Legs x2pcs 02 Base Head Frames x4pcs 01 03 Connect Round Tubes x4pcs 04 Base Legs x2pcs 05 Base Legs x2pcs Side Rail x4pcs 06 07 Bed Connectors x4pcs 08 Bed Connectors x4pcs 09...

Страница 3: ...Page 3 of 13 Bed Frame Assembly 1 x2 x 8 Washer D x 8 6 x 20mm Bolt C x 1 Allen Key M4 G x 8 Washer D x 8 6 x 20mm Bolt C 05 06 2 x2 D G 01 01 D G 03 C C 02...

Страница 4: ...3 Bed Frame Assembly 3 4 x 4 6 x 20mm Bolt C x 4 6 x 20mm Bolt C C G C G 01 01 03 03 02 02 Note Leave 10 mm protruding as in the diagram Note Leave 10 mm protruding as in the diagram 05 05 05 06 06 02...

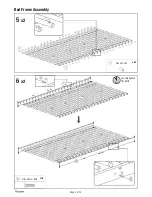
Страница 5: ...x 80 Round Tube I 08 08 09 09 Page 5 of 13 Bed Frame Assembly 5 x2 6 x2 x 16 6 x 20mm Bolt C 08 08 09 09 07 I I C C G G 07 08 08 08 08 09 09 07 90 Loosely tighten the Bolts...

Страница 6: ...Page 6 of 13 Bed Frame Assembly 7 8 07 07 07 07 07 07 02 02 02 03 03 05 05 05 06 06...

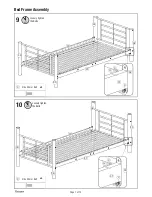
Страница 7: ...x 4 6 x 20mm Bolt C x 4 6 x 20mm Bolt C Page 7 of 13 Bed Frame Assembly 9 10 C G C G 07 07 07 07 07 07 02 02 02 03 03 05 05 05 06 06 C C 90 Loosely tighten the Bolts 90 Loosely tighten the Bolts...

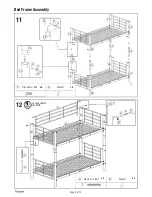
Страница 8: ...Bed Frame Assembly 11 12 x 8 6 x 20mm Bolt C x 2 Washer D x 4 6 x 65mm Bolt A 02 02 03 03 04 04 04 04 05 05 06 06 C C D D D A G 10 10 07 02 02 A G 03 03 03 x 8 Washer D 04 05 G 02 04 90 Loosely tight...

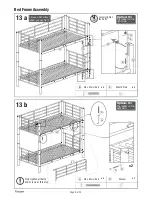
Страница 9: ...x 3 M6x18 Nuts E x 3 6 x 45mm Bolt B A G B E G G A D 12 07 11 03 Option 01 The ladder on the right side Choose which side of ladder you want to fit Option 01 The ladder on the right side 07 12 11 07 0...

Страница 10: ...65mm Bolt A x 3 M6x18 Nuts E x 3 6 x 45mm Bolt B B G G E 12 07 11 11 07 Bed Frame Assembly 03 02 Option 02 The ladder on the left side Option 02 The ladder on the left side 07 12 03 90 Loosely tighten...

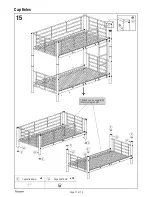
Страница 11: ...Cap Holes 15 x 28 Caps Dia 10mm H x 8 Caps Dia 50mm F Page 11 of 13 The bed can be seperated into two single beds F F F F F F F H H H H H H H H...

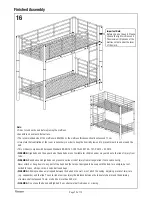
Страница 12: ...G High beds and the upper bed of bunk beds are not suitable for children under six years due to the risk of injury from falls WARNING Bunk beds and high beds can present a serious risk of injury from...

Страница 13: ...ping with a damp cloth Finally dry with a soft clean cloth Dust with a soft clean cloth only Check all bolts screws and legs regularly to make sure they haven t loosened and tighten all joins of your...

Отзывы: