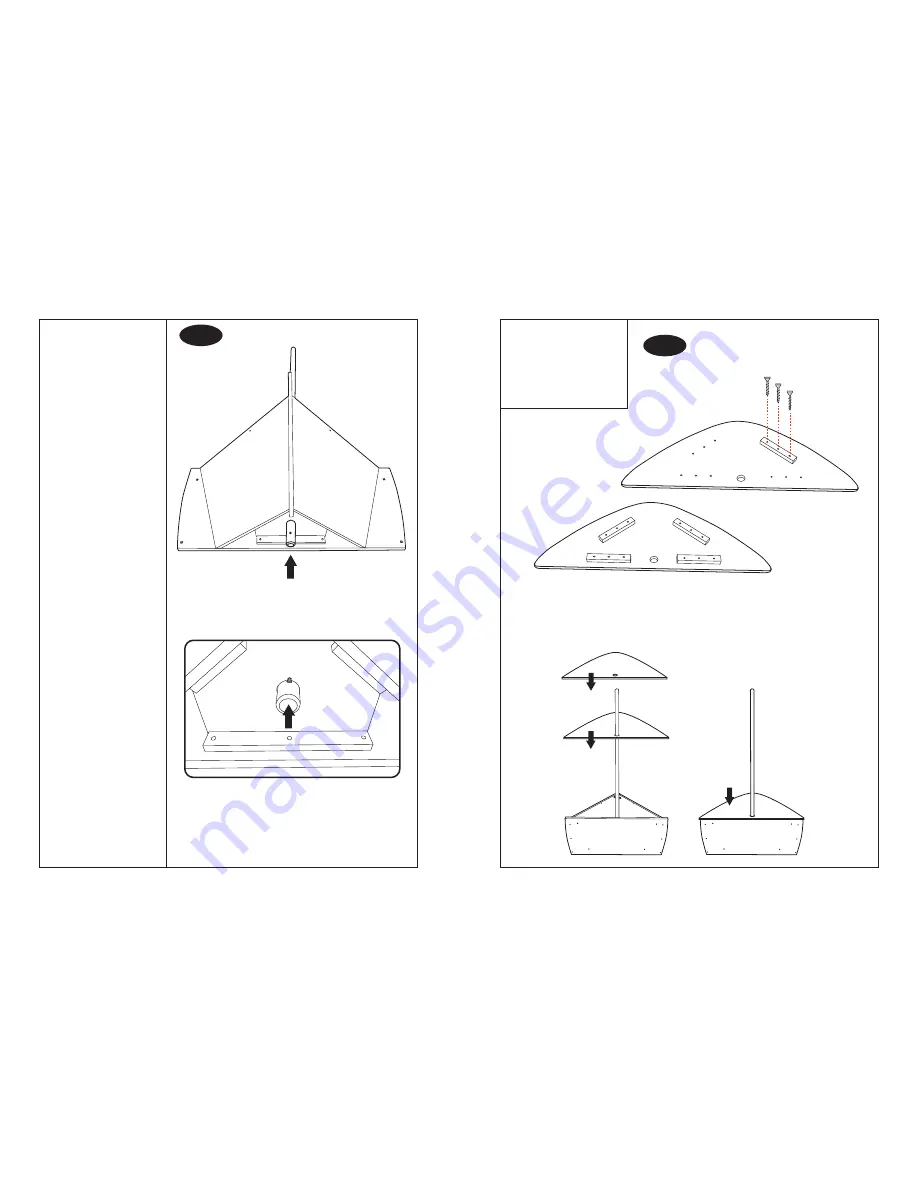
DREAMS BOAT BED Скачать руководство пользователя страница 10

10 of 20

11 of 20

STEP 8

Screw blocks “Q x 4” onto
panel  “J x 1”  using screws
“A14  x 12”.

Slot panel “J x 1” onto the
assembled front section.

J x 1

A14 x 3

J x 1

Q x 1

(190mm)

J x 1

STEP 7

Insert pole “L x 1” into the 
bottom of panel “D”.

L x 1

D x 1

L x 1

Содержание BOAT BED

Страница 1: ...time Before you start here is some helpful advice Do not use 0 90 0 90 t 8 3 FFQ BXBZ GSPN öSF t 8 3 Not suitable for children under 4 years t 8 3 P OPU QMBDF UIJT DIJME T CFE OFBS IFBU TPVSDFT XJOEPXT BOE PUIFS GVSOJUVSF t 8 3 P OPU VTF UIJT DIJME T CFE JG BOZ QBSU JT CSPLFO UPSO PS NJTTJOH t IJMESFO BSF MJLFMZ UP QMBZ CPVODF BOE DMJNC PO CFET UIFSFGPSF UIF DIJMEhT CFE TIPVME OPU CF QMBDFE UPP DM...

Страница 2: ... x 44 B2 x 13 B3 x 12 B8 x 12 12mm E1 x 6 6mm C1 x 2 C2 x 2 E36 x 4 E40 x 2 Front Flag x 1 Bed Canopy x 1 E38 x 2 B6 x 4 20mm 2 of 20 STEP 16 Slide the canopy pole N x 1 into the loops on the bed canopy N x 1 Bed Canopy x 1 ...

Страница 3: ... 15 Secure the bed slats O x 1 into place using screws A14 x 8 A14 x 8 A x 1 B x 1 C x 1 D x 1 S x 2 100MM E x 1 P x 1 280MM F x 1 G x 1 J x 1 K x 1 R x 2 180MM Q x 4 190MM N x 1 1000MM L x 1 1630MM M x 1 1300MM H x 1 I x 1 O x 1 ...

Страница 4: ...ale fixings C1 x 2 C2 x 2 Screw blocks S x 2 onto panel B C x 1 using screws A14 x 4 A x 1 A x 1 C1 x 1 C1 x 1 C2 x 1 E40 x 1 E40 x 1 B C x 1 A14 x 2 STEP 14 Place the bed slats O x 1 onto the bed base Secure the centre slat into place using T nuts B3 x 4 and T bolt B2 x 4 B3 x 2 B3 x 1 B3 x 1 B3 x 1 B3 x 1 B2 x 2 B2 x 2 ...

Страница 5: ...16 of 20 5 of 20 STEP 13 Attach panel K x 1 onto the assembled side panels using bolts B2 x 4 B2 x 2 B2 x 2 K x 1 STEP 2 Attach panels B C onto panel A using bolts B8 x 4 B B C C B C B8 x 2 A A B8 x 2 ...

Страница 6: ...onto panels B C using bolts B8 x 4 E36 x 1 B8 x 1 E36 x 1 B8 x 1 STEP 12 Attach pole M x 1 onto panel K x 1 using brackets E38 x 2 and bolts B8 x 4 Screw the pole to the into place using screw A14 x 1 M x 1 E38 x 1 E38 x 1 B8 x 2 B8 x 2 A14 x 1 K x 1 ...

Страница 7: ...ng bolts B2 x 4 B2 x 1 B2 x 1 B2 x 1 B2 x 1 F H x 1 G I x 1 G I x 1 F H x 1 STEP 4 A14 x 2 Screw panel D x 1 onto block P x 1 using screws A14 x 2 Ensure the counter sunk holes are facing upwards before assembly Screw block P x 1 onto panel E x 1 using screws A14 x 3 D x 1 P x 1 280MM A14 x 3 E x 1 ...

Страница 8: ...ackets E36 B6 x 4 E36 E36 TOP BOTTOM E x 1 STEP 10 Insert dowel E1 x 1 into panels G I Insert dowel E1 x 2 into panels F H Insert T nut B3 x 8 into panels G I F H Attach block R x 2 onto side panels using screws A14 x 4 F H x 1 G I x 1 B3 x 2 E1 x 1 6mm E1 x 2 6mm F H x 1 G I x 1 A14 x 4 B3 x 2 F H x 1 G I x 1 R x 1 180mm ...

Страница 9: ...ecure panel J x 1 into place using screws A14 x 4 as shown A14 x 1 A14 x 1 A14 x 1 A14 x 1 STEP 6 Attach panel D x 1 onto blocks R using screws A14 x 2 Screw bolt B2 x 1 into the bottom of pole L x 1 A14 x 2 B2 x 1 L x 1 J x 1 ...

Страница 10: ...TEP 8 Screw blocks Q x 4 onto panel J x 1 using screws A14 x 12 Slot panel J x 1 onto the assembled front section J x 1 A14 x 3 J x 1 Q x 1 190mm J x 1 STEP 7 Insert pole L x 1 into the bottom of panel D L x 1 D x 1 L x 1 ...

Отзывы: