background image

Assembly

Please note that the product you have purchased is a natural living timber.

Just like nature itself, wood varies in shape and colour. Knots, vein patterns, resin pockets and colour
differences contribute to giving the piece of furniture its beauty and form a natural part of solid wood.

Although the tree has been cut down and dried, it is still alive and therefore will react to high and low
temperatures, light, humidity, drought and time.

In cold and dry periods, the wood contracts which may lead to small cracks in the piece of furniture. The
reverse happens in warm and humid periods where the wood expands and this may result in slight
unevenness.

The colour of the wood also changes with time, particularly if the furniture is place in a light place. This is
natural process and part of owning a piece of furniture made of solid wood.

Any flexing that has occurred during transport will re-correct it self once this product is correctly
assembled.

Tighten all joins of furniture after six months. Please keep these instructions in a safe place for future use.

Dear customer.

IMPORTANT - READ CAREFULLY - RETAIN FOR FUTURE REFERENCE

This product complies with BS EN 747 - 1 : 2007 & BS EN 747 - 2 : 2007

The top surface of the mattress must not be above the line marked on the frame.
(Max. high 177mm).The size of mattress should be : 920 x 1900 mm

Do not allow children under 6 years old to use the upper bunk.

Be aware of the danger of young children (under 6) falling from the upper bunk.

Bed should not be used if any structural part is broken or missing.

Children can strangle in items such as ropes, string, cords, harnesses and belts attached to or hung on a
bunk bed / high bed.

Children can become trapped between the bed and the wall. To avoid risk of serious injury the distance
between the top safety barrier and the wall shall not exceed 75mm or shall be more than 230mm.

Always ensure that the guardrails, ladder and other components are maintained in the proper position and
are free from damage, and that all the fixing screws are tight.

Always use the ladder for entering and leaving the upper bunk.

Do not allow horseplay on or under the bed and prohibit jumping on the bed.

Use a nightlight as an added safety precaution for persons using the upper bunk.

Use guardrails on both long sides of the upper bunk.

Page 8 of 8

Colorado bunk bed

Содержание 413-00146

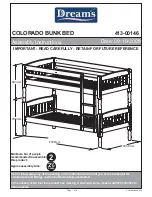
Страница 1: ...ts and fittings and the furniture is fully assembled In the unlikely event that this product has missing or damaged parts please call 0870 3333 612 to obtain spares Minimum No of people recommended to assemble this product Approx assembly time 2 2 hours 1 2 IMPORTANT READ CAREFULLY RETAIN FOR FUTURE REFERENCE Page 1 of 8 2030mm Colorado bunk bed 1035 5mm 780mm 693mm ...

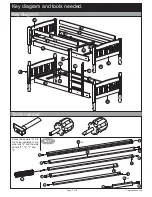
Страница 2: ... 0002 H 7 pcs Screw Ø7 x 50mm 308 0001 I 6 pcs Screw Ø4 x 50mm 302 0035 Headboard lower 2 pcs 219 1007 1007 x 780mm 1 1007 x 693mm Headboard upper left 1 pc 219 1005 2 Headboard upper right 1 pc 219 1006 3 Side rail 4 pcs 114 0256 4 1900 x 110mm Side panel upper long 1 pc 114 1016 5 1900 x 90mm Side panel upper short 1 pc 114 1017 6 1508 x 90mm Side panel lower long 1 pc 114 9016 7 1900 x 65mm Sid...

Страница 3: ...agram Tools needed 2 1 3 4 4 4 4 4 5 6 7 8 9 10 9 10 1 12 13 14 Step 1 Knock the dowels A into the holes indicated on the side rails 4 and the side panels 5 6 7 and 8 4 5 7 6 8 15 A x 4 A A A A A A A A A x 3 Page 3 of 8 Colorado bunk bed ...

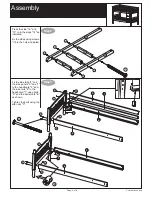
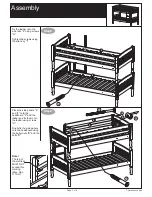
Страница 4: ...es indicated Step 3 Fix the side rails 4 and the side panels 5 and 7 to the headboard 2 and the side rails 4 to the headboard 1 using bolts D and the barrel nuts B as shown Tighten the bolts using the allen key C 12 13 14 14 14 I I I I I I 5 7 4 4 2 4 4 1 B B B B B B D D D D D D Page 4 of 8 Colorado bunk bed B B B ...

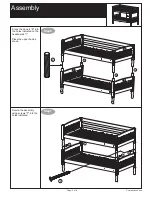
Страница 5: ... barrel nuts B as shown Tighten the bolts using the allen key C 5 7 2 4 4 4 4 1 3 1 B D D D D D D B B B Step 5 10 9 10 10 10 9 x 13 x 13 Place the slats 9 and 10 onto the slatholders Use the distance brick 11 to secure the correct distance between the slats Fix the slats using the screws G 11 G G G G G G G G G G G G G Page 5 of 8 Colorado bunk bed B B B ...

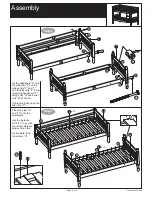
Страница 6: ... Knock the dowels E into the holes indicated on the headboards 1 Place the upper bed as shown Step 7 Secure the assembly using screws F into the holes indicated 3 2 1 1 E E E E F F F F F Page 6 of 8 Colorado bunk bed ...

Страница 7: ...he side panels 6 and 8 onto the headboard 2 and the ladder and fix them onto the ladder using screws H Finally fix the side panels onto the headboard using the barrel nuts B and the bolts D 4 4 H H H H B H H H B D D D 6 8 Note The top of the mattress MUST NOT exceed this marking Max high 177mm Page 7 of 8 Colorado bunk bed ...

Страница 8: ...e Dear customer IMPORTANT READ CAREFULLY RETAIN FOR FUTURE REFERENCE This product complies with BS EN 747 1 2007 BS EN 747 2 2007 The top surface of the mattress must not be above the line marked on the frame Max high 177mm The size of mattress should be 920 x 1900 mm Do not allow children under 6 years old to use the upper bunk Be aware of the danger of young children under 6 falling from the upp...

Отзывы: