

Scissor Lift SLX by Draper
page
8
of 8
www.draperinc.com
(765) 987-7999
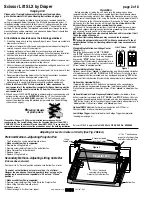
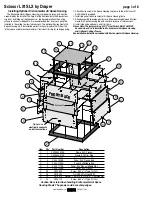
Installing Optional Environmental Air Space Housing
The Environmental Air Space Housing is shipped in pieces, and must be
assembled by the installer. The height of the Environmental Air Space Hous-
ing is set by drilling out the knockouts at the desired locations then using
screws to connect side panels. It is recommended that an access panel be
installed in the ceiling to allow future access. The optional Environmental Air
Space Housing must be installed per instructions to isolate the lift from the
“other space used for environmental air.” Includes trim ring for ceiling opening.
Caution: Be careful when handling Environmental Air Space
Housing Panels. The panels could have sharp edges.
11
11
11
11
11
11
11
7
11
1
3
5
9
3
9
10
2
4
6
3
4
3
8
5
FRONT/BACK
SIDE
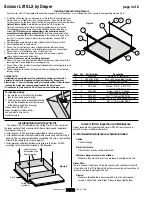
Item Qty Part number
Description
1
1
C028.544.02SA
Frame, SLX Plenum
2
1
C028.545.07SA
Frame, SLX Trim Ring
3
4
C044.178SA
Panel, SLX Plenum Side
4
4
C044.180SA
Panel, SLX Plenum End
5
2
C044.179SA
Panel, SLX Middle End
6
2
C044.177SA
Panel, SLX Plenum Middle Side
7
1
C095.123SA
Cover, SLX Plenum
8
28
C020.325
Screw, 8-32 x
3
/
8
" Type 1 HWH
9
40
C018.051
Nut #8-32 Zinc Hex KEPS
10
12
C013.070 Washer, .188 I.D. x .5 O.D. x .07" TK Nylon Flat
11
24
C020.112
Screw, 8-32 x
3
/
8
" Type F HWH
Do not use
electrical knockouts
on bottom sections
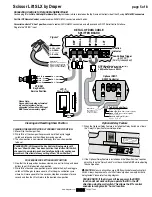
1
Attach Environmental Air Space Housing top frame to top of Scissor Lift
SLX with bolts provided.
2
Install top panel to Environmental Air Space Housing frame.
3
Attach assembly to overhead structure. Allow clearance between Environ-
mental Air Space Housing top and structure for ease of future access.
4
Install side and end panels, and trim frame.
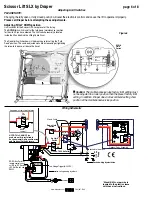
Please Note: The factory wiring of 'UP' Limit Switch MUST ALWAYS
be used when SLX is installed in Environmental Air Space Housing
and Optional Ceiling Closure.
See installation instructions included with Environmental Air Space Housing.
Knockouts


