


FIG. 5
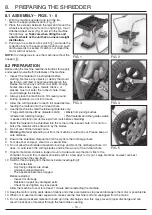
8.1 ASSEMBLY – FIGS. 1 - 5
1. With the machine upside down turn the two
feet to the appropriate location (Fig. 2).
2. Place the axle bar between the legs and mount the
wheels ensuring the nut is not too tight (Figs. 3 & 4).
Attached wheel cover (Fig. 5) and turn the machine
the right way up.
Take care when tilting the unit
onto its wheels as the unit has an uneven weight
distribution.
3. Pull down the collection box catch
(5)
and slide the
collection box to the appropriate location and push
catch upwards to secure. If catch is not closed the
motor will not activate.
NOTE: It is dangerous to use the machine without the
hopper
(8)
.
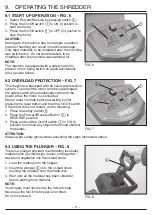
8.2 PREPARATION
Before using the machine, read the instructions thoroughly
and acquaint yourself with the features of the machine.
1. Inspect the material to be shredded before
starting. Remove any objects or debris that could
be thrown, jammed or become entangled in the
blades. Remove any soil from root balls. Foreign
bodies like stones, glass, metals, fabrics, or
plastics must not enter the in-feed chute, these
could damage the blades.
2. Always place the machine on firm level ground.
During operation, do not tilt or move.
3. Allow the cutting blades to reach full speed before
feeding the material into the in-feed chute.
4. Use the machine to shred the following materials only:
• Twigs and branches (Max. diameter 44mm) • Waste from pruning bushes
• Waste from trimming hedges
• Plant material and other garden waste
• Leaves and plant roots (remove soil from roots before shredding)
5. Feed the material to be shredded into the corner of the in-feed chute, if it is not too
bulky, the material will be drawn in by the blades.
6. Do not over fill the in-feed chute.
7.
Warning: Material extending out from the machine could lash out. Please keep at
safe distance.
8. Ensure the shredded material can fall freely from the discharge chute.
9. To make finer compost, shred for a second time.
10. Do not allow the shredded material to build up and block the discharge chute. If it
does, it could reach the cutting blades and be thrown out of the in-feed chute.
11. Organic material contains a large amount of water and sap that can stick to the
shredder. To avoid this, material should be left for a few days to dry out. Large branches however are best
shredded when they are fresh.
12. Switch off and unplug from the mains before investigating if:
- The blade stalls
- Any foreign objects are struck
- Unusual noises/vibrations
- The appliance becomes clogged
Before restarting:
- Inspect for damage
- Replace or repair any damaged parts
- Check for and tighten any loose parts
Allow the machine to cool for at least 1 minute before restarting the machine.
13. Keep the motor cooling vents clean of debris and other accumulations to prevent damage to the motor or possible fire.
14. When not in used and under supervision, make sure the machine is off and unplugged from the mains.
15. Do not allow processed material to build up in the discharge zone; this may prevent proper discharge and can
result in kickback of material through the feed intake opening.
8. PREPARING THE SHREDDER
– 10 –
FIG. 1
FIG. 2
FIG. 3
FIG. 4
– 10 –