


IT
EN
EN - 6
Liquid suction
For appliances equipped with suitable acces-
sories.
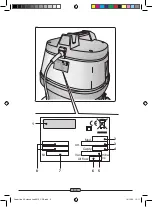
- Release the levers (5 Fig. 2) and remove
the cover (6 Fig. 3) complete with the mo-
tor unit.
- Remove the polyester filter (8 Fig. 4) if
present.
- Remove the paper bag (7 Fig. 4) if pre-
sent.
- Place the cover back on and lock it using
the levers (5 Fig. 2).
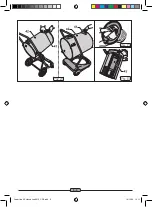
- Insert, as far as possible, the sleeve (11
Fig. 6) of the suction hose into the nozzle
(12 Fig. 6) on the drum.
- To release the sleeve (11 Fig. 6) press
and hold the button (13 Fig. 6) and then
pull out the sleeve (11 Fig. 6).
- Merge the ergonomic handle (15 Fig.
7) or hose (16 Fig. 7) depending on the
model, with the extension (14 Fig. 7).
- Connect the two rigid extensions (17-
18 Fig. 8) by aligning the two reference
points (19-20 Fig. 8).
- Mount on the rigid extension (21 Fig. 9)
the desired accessory,( vacuum nozzle,
floor nozzle etc..)
NOTES:
For models equipped with ergonomic handle
it is possible to adjust the suction force acting
the nut (22 Fig. 10).
By opening the little window (23 Fig. 10) you
get a lower suction force.
USING THE APPLICANCE
- The device is equipped with wheels and
thus can be moved with the proper han-
dles, or it can be pushed with the help of
the handle (26 Fig. 12)
- To lift it up insert your fingers under the
dedicated handle (28 Fig. 13) on the top
of the cover of the single version motor or
lift with the help of two people using the
handles (27 Fig. 12).
Starting up the appliance
- Insert the plug (29 Fig. 14) into the sock-
et.
Single motor
- Press the switch (30 Fig.15) to position
“I” to start the vacuum engine; lights, if
located on the switch will turn on.
Double motor
- Depending on the power required it is
possible to start only one motor by press-
ing the switch (30 Fig. 15) on “I” or both
switches (30 e 31 Fig. 15) if a greater
suction force is required.
Lights, if located on the switch will turn
on.
NOTES:
When the recovery tank is full, the noise
intensity increases and the device can no
longer aspire. Then you must switch off the
device and empty the tank as described in
the relevant paragraphs.
Switching off the appliance
- Push the switches (30, 31 Fig. 15) to the
“0” position to stop the device; the lights,
if any on the switches, will go off.
- Remove the plug (29 Fig. 14) from the
electrical socket.
- Wind up the cable (33 Fig. 16) and hook
it onto its housing (32 Fig. 16).
CLEANING AND
MAINTENANCE
DANGER:
Before performing any maintenance op-
eration, unplug the appliance from the
electrical socket.
Manuale SERIE AS calssic line-2012_CS6.indd 6
14/12/12 15.12
Содержание AS Classic Series
Страница 4: ...0 4 Copertina AS classic line 2012_CS6 indd 4 14 12 12 15 11 ...
Страница 5: ...0 5 0 I 0 I 0 I Copertina AS classic line 2012_CS6 indd 5 14 12 12 15 11 ...
Страница 6: ...0 6 Copertina AS classic line 2012_CS6 indd 6 14 12 12 15 11 ...
Страница 8: ...Copertina AS classic line 2012_CS6 indd 8 14 12 12 15 11 ...
Страница 10: ...Copertina AS classic line 2012_CS6 indd 10 14 12 12 15 11 ...
Страница 39: ...Copertina AS classic line 2012_CS6 indd 11 14 12 12 15 11 ...


