STEP BY STEP USER’S GUIDE
1.- SWITCH ON / OFF
Press the ON/OFF key to switch on and off the system. While the
system is switched on, the LED placed on the receiver speaker will be
illuminated.
When the system is switched on the last radio station and audio levels
will be displayed on the LCD screen.
2.- VOLUME ADJUSTMENT
Press the < or > keys to turn the volume up or down in a scale of 30
steps.
3.- IDEAL LEVEL OF VOLUME
Press both < and > keys at the same time and the volume level will be
automatically adjusted to level 12.
4.- FM RADIO FUNCTIONS
4.1.- AUTOMATIC RADIO STATION SCAN
Press and hold the >> or << keys to scan up or down respectively. The
symbol will flash on the screen while running a search and similarly
the frequency will be showed.
4.2. MANUAL FREQUENCY SELECTION
Give a short press to >> or << keys to search up or down for a new
station.
4.3. MEMORY RECORDING
Press >> or << scan key to select the frequency to be stored in the
memory. Then press the
key twice to go to the “FM STORE”
option in the menu. Select the memory number (from 1 to 9) where
you want to save this frequency by using the < or > key. Finally press
and hold the
key for 2 or 3 seconds to lock-in the chosen
station.
4.4. MEMORY SELECTION
Once we have the radio stations stored on the system, press repeatedly
the
key to scroll through the different memories starting from
the last selected one.
Alternatively you can press the
key to choose the “FM SELECT”
function on the general menu and then select one of the 9 pre-set
memories using the < or > key.
5.- SOUND ADJUSTMENTS
Press repeatedly the
key to select the parameter to be adjusted
(bass, treble, balance, stereo, mono or loudness). Then use the < or >
key to adjust the desired level.
6.- BACKLIGHT LCD SCREEN ADJUSTMENT
Press repeatedly the
key to select “LCD LIGHT”. Then press the
< or > key to adjust the desired level from 0 to 15.
7.- “POWER SAVE” FUNCTION
This function allows you to control the off time of the LCD display and
the stand by of the electronic components to make the batteries last
longer.
Press repeatedly the
key to select the "POWER SAVE" function
and adjust from 5 to 90 sec. using the < or > key.
8.- ADJUSMENT OF AUDIO GAIN
Press repeatedly the
key to select the “FM GAIN” function and
then adjust this level from 0 to 4.
15
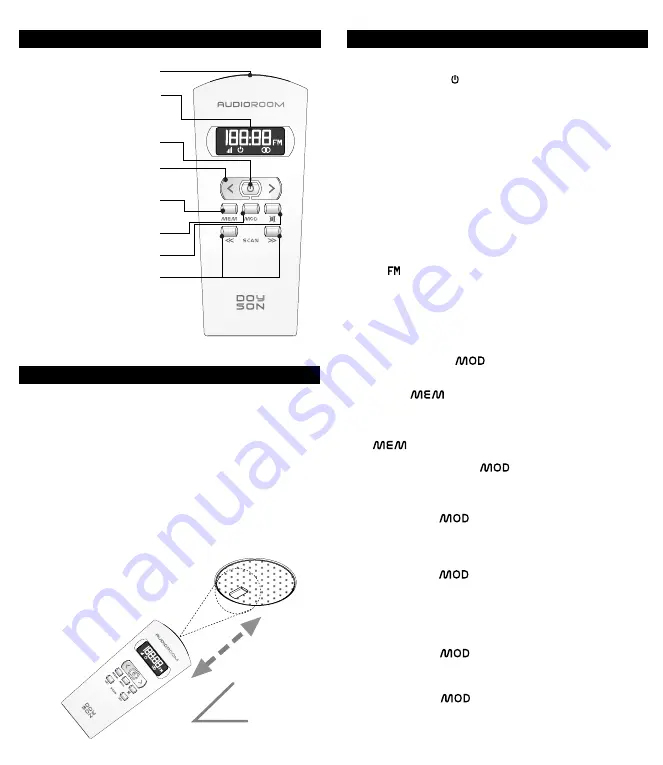
QUICK OPERATION GUIDE
Adjustable backlit LCD screen
displaying FM radio stations, FM
memories and interactive menu
FM station scan keys
FM memory selector
and recorder keys
Keys for volume adjustment
and menu management
Infrared transmitter/receiver
On /off switch
Main menu key
Mute
14
OPERATING REQUIREMENTS
It is important to remember that when controlling the
AUDIOROOM the remote unit should always be pointed
towards the IR receiver in speaker A. Also, the maximum
distance between them does not exceed 6 meters to ensure
optimal performance.
When the system is turned off by use of the remote unit,
it remains on standby, keeping all the stored settings and
quickly retrieving them when the system is turned on again.
When the system is switched on, the LED in speaker A, will
be illuminated.
Ensure the remote control unit is
kept away from water, moisture
and heat sources at all times.
Distance
<6m
Angle
<60º
Содержание AUDIOROOM
Страница 1: ...AUDIOroom Manual de Usuario User Guide ...


