background image

3 4

THIS PAGE INTENTIONALLY LEFT BLANK

Содержание Triton RL5000 Series

Страница 1: ... tem or translated into any human or computer language in any form by any means whatsoever without the express written permission of Triton Systems of Delaware Inc DOVER and the DOVER logo are registered trademarks of Delaware Capital Formation Inc a wholly owned subsidiary of Dover Corporation CORPORATE HEADQUARTERS RMA RETURN MATERIAL AUTHORIZATION RETURNADDRESS 522 E Railroad Street 21405 B Str...

Страница 2: ...cted to a telephone line Excessive RENs on a telephone linemayresultinthedevicesnotringinginresponsetoanincomingcall Inmostbut not all areas the sum of the RENs should not exceed five 5 To be certain of the number devices that may be connected to a line as determined by the local RENs contact the local telephone company Harm to the Network If the RL5000 series ATM causes harm to the telephone netw...

Страница 3: ...fies certified equipment This certification means that the equipment meets telecommunications network protective operational and safety requirements as prescribed in the appropriate terminal equipment technical requirements document s The department does not guarantee the equipment will operate to the user s satisfaction Repairs to certified equipment should be coordinated by a representative desi...

Страница 4: ...s de mise à la terre de la source d énergie électrique des lignes téléphoniques et des canalisations d eau métalliques s fl y en a sont raccordés ensemble Cette précaution est particulièrementimportantedanslesrégionsrurales Avertissement L utilisateurne doitpastenterdefairecesraccordementslui même ildoitavoirrecoursàanservice d inspection des installations électriques ou à un électricien selon le ...

Страница 5: ...ich case the user will be required to correct the interference at his own expense Changes or modifications to this unit not expressly approved by the party responsible for compliance could void the user s authority to operate the equipment CANADIANREQUIREMENTS This digital apparatus does not exceed the Class Alimits for radio noise emissions from digital apparatus set in the Radio Interference Reg...

Страница 6: ...ements with the state where theATM istobeinstalledpriortoinstallation Forstatecontactinformation youmaycall theADAinformationlineat1 800 514 0301 ATM Environmental Precautions Checklist Describes the general environmentalprecautionsconsideredwheninstallingtheATM Tohelpensure proper operation of the ATM ensure the environmental criteria listed in this checklist are met Cabinet Installation Standard...

Страница 7: ...7 ATM INSTALLATION FOR ACCESSIBILITY ...

Страница 8: ...uirements please see the complete specification 4 34 Automated TellerMachines 4 34 1 General Each machine re quired to be accessible by 4 1 3 shall be on an accessible route and shallcomplywith4 3 4 4 34 2 ClearFloorSpace Theauto mated teller machine shall be lo catedsothatclearfloorspacecom plying with 4 2 4 is provided to al low a person using a wheelchair to makeaforwardapproach aparallel appro...

Страница 9: ...r by using an alternate control only one of the controls needed to per formthatfunctionisrequiredtocomply withthissection Ifthecontrolsareiden tifiedbytactilemarkings suchmarkings shall be provided on both controls 4 34 4 Controls Controls for user activationshallcomplywith4 27 4 4 34 5 EquipmentforPersonswith Vision Impairments Instructions and allinformationforuseshallbemadeac cessible to and in...

Страница 10: ...h If the clear floor space only allows forward ap proach to an object the maximum high forwardreachallowedshallbe48inches 1220mm seeFig 5 a Theminimum lowforwardreachis15inches 380mm If the high forward reach is over an ob struction reach and clearances shall be as shown in Fig 5 b 4 2 6 Side Reach If the clear floor spaceallowsparallelapproachbyaper son in a wheelchair the maximum high side reach...

Страница 11: ...nches 760mm by1220mm Figures 4d Clear floor space in alcoves For a front approach if the depth of the alcoveisgreaterthan24inches 610mm theninadditiontothe30 inch 760mm width a maneuvering clearance of 6 inches 150mm inwidthisrequired For a side approach where the depth of thealcoveisgreaterthan15inches 380 mm theninadditiontothe48 inch 1220 mm length anadditionalmaneuvering clearance of 12 inches...

Страница 12: ...12 Figure 5a Forward reach unobstructed Figure 5b Forward reach obstructed RL5000 SERIES INSTALLATION GUIDE ...

Страница 13: ...13 Figure 6a Parallel approach side reach ATM INSTALLATION FOR ACCESSIBILITY Figure 6b Parallel approach high low side reach Figure 6c Side reach obstructed ...

Страница 14: ...14 THIS PAGE INTENTIONALLY LEFT BLANK ...

Страница 15: ...15 ATM ENVIRONMENTAL PRECAUTIONS CHECKLIST ...

Страница 16: ...roperation of theATM ensure the environmental criteria listed in this checklist are met Dedicatedsource TheATMACpower feed will be a dedicated line to which no other electrical devices are con nected The ATM power line will be wired for a single duplex style outlet and connected directly to the AC ser vice panel DEDICATEDTELEPHONE 3 Ensure the following telephone line requirements are met Dedicate...

Страница 17: ...17 CABINET INSTALLATION STANDARD ANCHORS ...

Страница 18: ... inspect the unit for any shipping damage and report any damageimmediatelytothe shipping company Refer to the warranty information in the User or Service manual as applicable for information about reporting shipping damage 2 Remove the unit from the carton by cutting the straps and removing the top of the box 3 Removetheloosepackingmaterial from inside of the box 4 Remove the silver key from the w...

Страница 19: ...stalling a new outlet or plan to use an existing out let to supply power to the ATM make sure the following require mentsaremet 1 The outlet is located near the cabinet 2 The outlet is easily accessible 3 Access to the outlet will not be blocked once the cabinet is in stalled CABINET INSTALLATION STANDARD ANCHORS UNLOCKING ELECTRONIC LOCKS ELECTRONICLOCK Upon arrival the combination of the lock sh...

Страница 20: ...hor bolt holes that will be drilled in the next step Move the ATM aside to provide clear access to the mounting hole marks 2 Usea1 4 diametercarbide tipped masonry bit to drill four pilot holes at the drilling points marked in the previous step Drill the pilot holes approximately 1 2 deep into the floor These holes will help guide the 1 2 masonry bit that will be used to drill the anchor bolt hole...

Страница 21: ...available to verify the cabinet is level 3 After the mounting bolts have been tightened ensure the cabinet door can close without binding It may be necessary to adjust the tightening of the mounting bolts to enable the door to close without binding Iflevelingfeetareused thecabi netbottommayexperiencewarp ingorbendingwhenthemount ing bolts are tightened down This may prevent the cabinet door from c...

Страница 22: ...as installed with leveling feet the feet may have caused the warping of the cabinet bottom under pressure of the mounting bolts 8 Once the nuts are tightened as specified in Step 6 and the door operates without binding as verified in Step 7 install a second nutoneachboltandtightendown firmly 9 If the dispenser tray was removed to facilitate cabinet installation replace it at this time Fig 1 Drilli...

Страница 23: ...ighten bolts with torque wrench Fig 6 Second nut installed 10 The physical installation of the ATM cabinet is complete CABINET INSTALLATION STANDARD ANCHORS Fig 7 Mounting hole drill template example Not to scale ...

Страница 24: ...24 RL5000 SERIES INSTALLATION GUIDE THIS PAGE INTENTIONALLY LEFT BLANK ...

Страница 25: ...CABINET INSTALLATION CHEMICAL ANCHORS 21 ...

Страница 26: ...ny damageimmediatelytothe shipping company Refer to the warranty information in the User or Service manual as applicable for information about reporting shipping damage 2 Remove the unit from the carton by cutting the straps and removing the top of the box SELECTING THE INSTALLATION LOCATION Choosing the right location for yourATMisveryimportant Se curity concerns suggest a loca tion that is away ...

Страница 27: ...inunlockingtheelectronic lock 9 Remove the accessory kit from inside the bottom enclosure open and inspect the contents Check the contents against the enclosed packing list Report any missing parts toTriton immediately UNLOCKING ELECTRONIC LOCKS ELECTRONICLOCK Upon arrival the combination of the lock should already be preset to 1 2 3 4 5 6 Tounlock enterthe preset combination and check for proper ...

Страница 28: ...ng hole drilling template on the floor in the designated location and tape it into position Be certain there are no physical obstructions that could prevent the cabinet from being installed in this location or otherwise limit access to the unit Use a center punch tool or equivalent to mark the center of each mounting hole as indicated on the template Remove the template 1b Alternative Method Busin...

Страница 29: ...e floor Be sure to take into account the depth of any floor covering suchastileorvinylwhen gauging the depth of the anchor holes Make sure the holes are drilled at least 115 mm 4 1 2 into the concrete floor 4 Use a blower or portable vacuum cleaner to remove any dust or debristhatmayhavefallenintothe holes during the drilling process Brush the hole with the wire brush to loosen any additional debr...

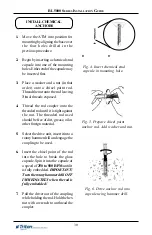
Страница 30: ...ed should be free of dirt grease oil or otherforeignmaterial 5 Select the drive unit insert it into a rotaryhammerdrillandengagethe coupling to be used 6 Insert the chisel point of the rod into the hole to break the glass capsule Spin it into the capsule at a speed of 250 to 500 RPM until it isfullyembedded IMPORTANT TurntherotaryhammerdrillOFF IMMEDIATELY when the rod is fully embedded 7 Pull the...

Страница 31: ...the adhesive to cure for the specified time see chart below prior to applying any load to the anchors Duringthewinter thehole temperature may be different than the room temperature The hole temperatureshouldbemeasuredto determinethecuringtimerequired DO NOT disturb or load the anchorsuntiltheyarefullycured e r u t a r e p m e T l a i r e t a M e s a B e m i T g n i t t e S r e v o d n a C º 0 2 F ...

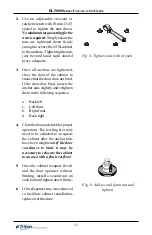
Страница 32: ...nchor nuts slightly and retighten them in the following sequence a Backleft c Leftfront b Right front d Backright Fig 8 Tighten nuts with wrench 4 Closethedoorandcheckforproper operation The leveling feet may need to be adjusted to re square the cabinet after the anchor nuts have been retightened If the door continues to bind it may be necessary to relocate the cabinet to an area with a flat level...

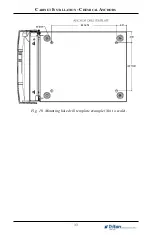
Страница 33: ...33 Fig 10 Mounting hole drill template example Not to scale CABINET INSTALLATION CHEMICAL ANCHORS ...

Страница 34: ...34 THIS PAGE INTENTIONALLY LEFT BLANK ...

Страница 35: ...35 POWER AND COMMUNICATION ...

Страница 36: ...ONS For European applications the power supply cord must conform to the fol lowing specifications 1 Two conductor with Physical Earth PE ground 2 IEC320moldedconnectoronone end and molded plug on the other end 3 Certified for country of installation 4 Rated minimum H05VV F with minimum0 75mm2 exceptwhere specficcountriesrequire1 0mm2 conductors 5 Maximumlength 3meters Figure 1 Ensure power and pho...

Страница 37: ... and shall be easily accessible Figure 3 Install snap bushing on access hole that carries power and phone cords Install dome plug on unused access hole Figure 2b Power and phone cords routed through side access hole Figure 2a Power and phone cords routed through rear access hole POWEROUTLET ACCESSIBILITY Whether you are installing a new outlet or plan to use an existing outlet to supply power to t...

Страница 38: ...38 THIS PAGE INTENTIONALLY LEFT BLANK ...

Страница 39: ...39 TDM 100 150 DISPENSING MECHANISM INSTALLATION ...

Страница 40: ...he dispenser tray out to its fully extended position Check the position of the turntable The turntable must be in the cassette service position to correctly install the dispensing mechanism The turntable is in the service position when the 90 locking pin hole is to theleftasshowninFigure3 Itisin the normal operating position when the hole is to the right as shown in Figure 4 Figure 3 Turntable in ...

Страница 41: ...sette service position with the opening for the currency and reject cassettes facing to the front as you look into the security cabinet Figure 7 Dispenser on swivel mount in cassette service position 7 Refer to Figure 8 Align the four holes in the base of the dispensing mechanism with the four holes in theturntableflangededges Secure the dispensing mechanism to the turntable with the four 6 32 x x...

Страница 42: ... the Management Functions main menu b Select Diagnostics from the Management Functions screen then Dispenser RL5000 SERIES INSTALLATION GUIDE Secure tie wrap 8 For TDM 150 Route the serial communications cable and power cable through the tie wrap loop located on the side of the dispenser shown in Figure 10 Continue to route cables through second tie wrap as shown in Figure 9 Plug the data cable in...

Страница 43: ... to dispense minimum one note from the note cassette into the reject cassette This test exercises the dispenser without sending notes to the exit e After completion of the Test Dispense operation the following prompt is displayed below Test Dispense Completed Successfully DispenseCount A ofnotes Figure12 Figure 11 Enter of notes Figure 12 Test dispense prompt TDM 100 150 DISPENSING MECHANISM INSTA...

Страница 44: ...44 THIS PAGE INTENTIONALLY LEFT BLANK ...

Страница 45: ...45 SDD DISPENSING MECHANISM INSTALLATION ...

Страница 46: ...access the back of the dispensing mechanism so it can be connected to the cables coming from the ATM 6 Refer to Figure 3 Connect cable 9600 0043 to the DB25 connector PL6 on the rear of the dispenser mechanism SecuretheDB25cable to the dispenser with two screws attached to the connector Insert the Molex power plug attached to cable9600 0013intotheconnector markedPL2 Thisplugiskeyedso that it can o...

Страница 47: ...m having a phase to phase voltage not exceeding 250volts The AC socket outlet shall be installed near the equipment and shall be easily accessible POWERSUPPLYCORD SPECIFICATIONS ForEuropeanapplications thepowersupplycordmustconformtothefollowing specifications 1 Two conductor with Protective Earth PE ground 2 IEC 320 molded connector on one end and molded plug on the other end 3 Certified for coun...

Страница 48: ...llow the remaining steps to perform a Test Dispense b Select Diagnostics from the Management Functions screen then Dispenser c Select the Test Dispense option Select cassette A A prompt appears asking how many notes to dispense Figure 5 The Test Dispense operation will start RL5000 SERIES INSTALLATION GUIDE a AccesstheManagementFunctions mainmenuscreen RefertoRL5000 User Manual for instructions on...

Страница 49: ...49 NMD 50 DISPENSING MECHANISM INSTALLATION ...

Страница 50: ...CABINET 2 Open the cabinet door and remove thecassettes packedinboxes and the accessory kit 3 Removeallofthefoamblocksfrom aroundthedispensingmechanism Figure 4 Push in on the mechanical stops on both sides of the dispenser to allow the dispenser to be pulled off the rails Figure 2 The NMD 50 dispensing mechanism fully extended on its mounting rails RL5000 SERIES INSTALLATION GUIDE 1 RefertoFigure...

Страница 51: ...p the dispensing mechanism by the green handles Figure 5 Push the rails into the cabinet before installing the dispensing mechanism into the cabinet Figure 6 Align the rails on the dispenser with the openings on the slide inside the cabinet Figure 7 Connect the DC power plug to the receptacle shown above NMD 50 DISPENSING MECHANISM INSTALLATION 4 RefertoFigure2 Pullthedispens ing mechanism out of ...

Страница 52: ...roller CMC module on the dispensing mechanism 3 RefertoFigure6 Aligntherailson the dispenser with the openings on the slide mechanisms on both sides of the cabinet Once aligned carefully push the dispensing mechanism on to the slides 4 Pushthedispensingmechanismall the way into the cabinet Serial communication cable 9 Installcurrencyinthecassetteand insert and it into the dispensing mechanism Refe...

Страница 53: ...es to dispense Figure 9 The Test Dispense operation will start d The Test Dispense command instructs the dispenser to dispense minimum onenotefrom each installed and operational cassette into the reject vault This testexercisesthedispenserwithout sending notes to the exit e After completion of the Test Dispense the following prompt is displayed Test Dispense CompletedSuccessfully Dispense Count A ...

Страница 54: ... and ease of installation These benefits combined with wide acceptance in the computer marketplace and the ability to support virtually all popu lar network protocols make the Ethernet option an ideal networking solution for yourRL5000ATM TCP IPCABLE INSTALLATION TCP IPCABLE INSTALLATION 1 Open the control panel hood and turn the power switch on the power supply to the OFF 0 position 2 Refertothes...

Страница 55: ...erful dependable private and public network communications solutions 1 Open the control panel hood and turn the power switch on the power supply to the OFF 0 position 2 Refertothesectionon Powerand Communication Route the Commscable throughthecabinet base cable access hole Secure cable inside vault area and continue up to the control panel access holes 3 Connect the RJ 45 connector end of the Comm...

Страница 56: ...56 THIS PAGE INTENTIONALLY LEFT BLANK ...

Отзывы: