


Setting a Switch
Setting a Switch
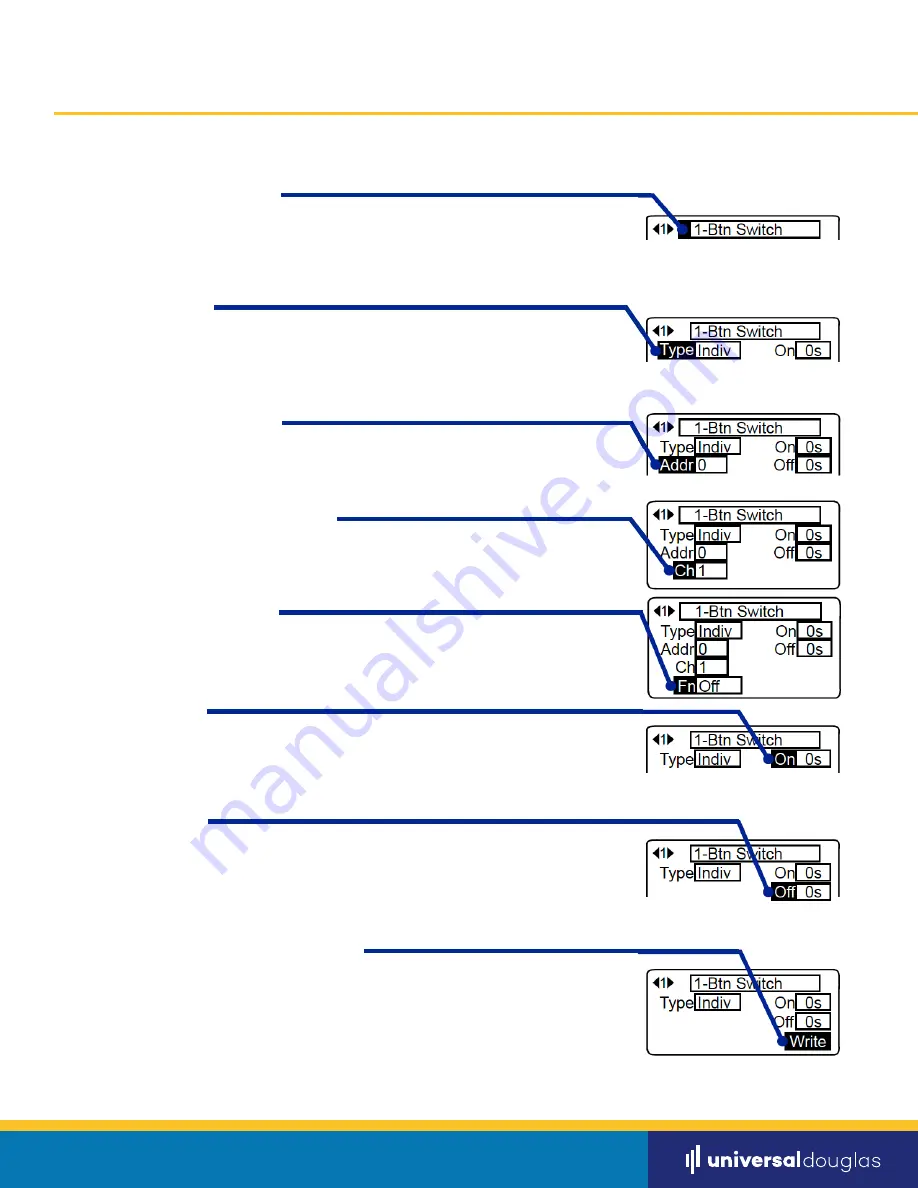
Step 1 -
Switch Configuration
Step 4 -
Assigning an Output Channel
Step 2 -
Input Type
Step 5 -
Assigning a Function
Step 7 -
Delay OFF
Step 3 -
Assigning an Address
Step 6 -
Delay ON
Step 8 -
Writing Programming to a Switch
Using the UP/DOWN buttons, move the cursor until it highlights the ‘#-Button Switch’ field.
Select the switch configuration that matches the switch that you are programming by
rotating the scroll wheel clockwise or counterclockwise.
*Instructions apply for a Key Switch as well
Using the UP/DOWN buttons, move the cursor until it highlights the ‘Type’ field. Select the
switch input type to apply to the switch that you are programming by rotating the scroll
wheel clockwise or counterclockwise.
Using the UP/DOWN buttons, move the cursor until it highlights the ‘Addr’ field. Select
the address you wish to assign the switch by rotating the scroll wheel clockwise or
counterclockwise.
Using the UP/DOWN buttons, move the cursor until it highlights the ‘Addr’ field. Select
the address you wish to assign the switch by rotating the scroll wheel clockwise or
counterclockwise.
Using the UP/DOWN buttons, move the cursor until it highlights the ‘Fn’ field. Select
the function you wish to assign the switch by rotating the scroll wheel clockwise or
counterclockwise.
Using the UP/DOWN buttons, move the cursor until it highlights the ‘On’ field. Select the
amount of time you wish to delay an ON command after it is initiated. The time can be
adjusted from 0 seconds to 40 minutes by rotating the scroll wheel clockwise.
Using the UP/DOWN buttons, move the cursor until it highlights the ‘Off’ field. Select
the amount of time you wish to delay an OFF command after it is initiated. The time
can be adjusted from 0 seconds to 40 minutes by rotating the scroll wheel clockwise or
counterclockwise.
Using the UP/DOWN buttons, move the cursor until it highlights the bottom right field.
Rotate the center scroll wheel until ‘Write’ is highlighted. Point the Infrared transmitter
approximately 0.5”away from the IR lens of the switch being programmed and press the
center button of the IR Setting Unit. You will hear a single solid beep sound indicating that
the switch was successfully programmed.
universaldouglas.com
PAGE 5
Содержание Dialog WIR-3110
Страница 1: ...IR Setting Unit User Manual WIR 3110...


