background image

3

PREPARATION

1.  Turn on the machine by pushing the on/off switch.
Startup/Splash screen is displayed as the controller boots up.

NOTE:

  The current program number and the software revision of the control-

ler are displayed at startup. 

(The default settings are program number  

P 11 for °F, P 12 for °C and software revision RV 1.0)

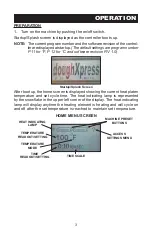
After boot up, the home screen is displayed showing the current heat platen 

temperature and set cycle time. The heat indicating lamp is represented 

by the snowflake in the upper left corner of the display. The heat indicating 

lamp will display anytime the heating element is heating and will cycle on 

and off after the set temperature is reached to maintain set temperature.

OPERATION

MACHINE PRESET 

BUTTONS

ACCESS 

SETTINGS MENU

TEMPERATURE 

READOUT/SETTING

HEAT INDICATING 

LAMP

TEMPERATURE 

MODE

TIME 

READOUT/SETTING

TIME SCALE

HOME MENU SCREEN

Startup/Splash Screen

Содержание DM-18

Страница 1: ...R S MANUAL Receiving Setup 2 Operation 3 Setting Temperature Time 4 Preference Settings 5 Machine Presets 6 7 Cycle Count 8 Temperature Time Modes 9 Pressing Dough 10 11 Dough Weights Shrinkage 12 FAQ...

Страница 2: ...s may be obtained from your supplier for a nominal cost INSTALLATION 1 Lift press from box and place on cart or counter top 2 Remove plywood shipping base from press CAUTION Heavy lifting can cause in...

Страница 3: ...e screen is displayed showing the current heat platen temperature and set cycle time The heat indicating lamp is represented by the snowflake in the upper left corner of the display The heat indicatin...

Страница 4: ...conds and it will lock in the new value automatically ADJUST CYCLE TIME 1 Touch the time readout on the display UP and DOWN arrows will appear on the right side of the display and the cycle time value...

Страница 5: ...he Down button until Disable is displayed will deactivate this setting 3 Press Save to save the setting 4 Press Back to return to the previous screen NOTE After the shutdown time has elapsed with the...

Страница 6: ...press the Preset Quantity sub menu title 2 Press the number of presets to be displayed on the home screen either Two Presets or Four Presets 3 Press Save to save the setting 4 Press Back to return to...

Страница 7: ...ng the preset is stored in memory RECALLING PRESETS 1 Press and release for approximately 1 2 second the preset button to recall The controller will beep and the preset location button will display in...

Страница 8: ...r is activated by closing the press NOTE The cycle count will maintain the total count even if the power has been turned off TO RESET THE COUNTER 1 From the settings menu press the Cycle Count sub men...

Страница 9: ...e time is displayed on the home screen There are three Time Scale display options available in the Time Scale menu MIN SEC Factory Default SEC Seconds 1 10 SEC 1 10 Second Resolution TO CHANGE THE SCA...

Страница 10: ...ature dough and 140 150 F when using refrigerated dough A temperature indicating alarm will sound once the set temperature has been reached WARNING Never attempt to press frozen dough Personal injury...

Страница 11: ...top of the dough ball Do not add flour or dust with flour 6 Pull down the handle all the way applying pressure until it stops 7 After the designated time has elapsed generally 3 10 seconds for room t...

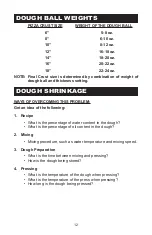
Страница 12: ...following 1 Recipe What is the percentage of water content in the dough What is the percentage of oil content in the dough 2 Mixing Mixing procedure such as water temperature and mixing speed 3 Dough...

Страница 13: ...0 F to 170 F Warm dough or room temperature dough 100 110 F Q How long should I be pressing the dough Warm dough 2 7 seconds Cold dough 5 10 seconds Q Will the heat kill the yeast N0 yeast dies at 180...

Страница 14: ...d in the owners manual With no dough in the machine adjust the thickness adjustment so that with the handle closed the platens are just touching each other Does the alignment between he upper and lowe...

Страница 15: ...ater applied with a soft cloth or sponge Do not use steel wool scrub sponges kitchen or oven cleaners or any other kind of abrasive ma terial This will damage the coating 4 Wipe clean with a dry cloth...

Страница 16: ...responsible for repairs or alterations made by any person without the prior written authorization by HIX This warranty is the sole and exclusive warranty of HIX and no person agent distributor or deal...

Отзывы: