


CD2FHD User Manual
2
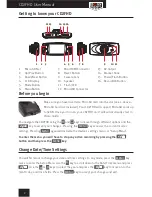
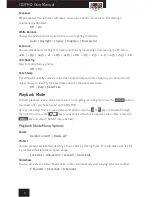
Getting to know your CD2FHD
1. Micro SD Slot
2. Up/Prev Button
3. Down/Next Button
4. LCD Display
5. Mode Button
6. Menu Button
7. Mini HDMI Connector
8. Reset Button
9. Camera Lens
10. Speaker
11. Flash/LED
12. Mini USB Connector
13. AV Output
14. Bracket Shoe
15. Power/Flash Button
16. Record/OK Button
M
E
N
U
M
O
D
E
1
12 13
14 15 16
2 3
4 5 6
7 8
9
10 11
Before you begin
Make sure you have inserted a MicroSD card into the slot (see 1. above—
MicroSD Card not included). Your CD2FHD will support MicroSD cards up
to 32GB. Once you turn on your CD2FHD on, it will automatically start in
Video mode.
You navigate the CD2FHD using the
▶▶
|
and
▶▶
|
keys to move through different options and the
key to accept your changes. Pressing the
MENU
key accesses the current mode’s
settings. Pressing
MENU
again will activate the device’s settings menu, or "Setup Menu".
To enter the menu, you will have to stop any active recording by pressing the
button and then press the
MENU
key.
Change Date/Time Settings
You will first want to change your date and time settings. In any mode, press the
MENU
key
twice to enter the Setup Menu. Use the
▶▶
|
key to scroll down to the Date/Time menu and press
. Use the
▶▶
|
or
▶▶
|
keys to select the year and press the
key to move on to the
month, day, and time fields. Press the
MENU
key to accept your changes and exit.


