


09
07 | CLEANING AND STORAGE
Never use aggressive cleansing agents or benzine to clean the device. We recom-
mend a soft, slightly damp microfiber cloth to clean the outer parts of the device.
Before cleaning make sure to switch off the device and take off from power
supply!
Store the device in a dust-free, dry and cool place.
This device is not a toy – keep it out of reach of children. Keep away from pets.
08 | TECHNICAL SPECIFICATIONS
09 | CONTENT
1x SLIM RGB LED video light BVL-152
1x Universal ball head
1x USB-C charging cable
1x Diffusor plate white
1x Storage pouch
1x Safety hints
BVL-152
Number of LEDs
152 LEDs
(40x 6500 K, 40x 3000 K, 72x RGB)
LED power max.
12 W
Colour temperature
3000 – 6500 K (+/- 300 K)
Illumination power approx.
1450 Lux/at 0,5 m
590 Lux/at 1 m
Colour Rendering Index
(CRI)
> 95 R
a
Power supply
Built-in Li-Ion battery – 7,4 V 1400 mAh
Runtime full power
(with fully charged battery)
1,5 h
Charging current
5 V/2,4 A
Port
USB-C
Dimensions approx.
12,5 x 7,4 x 1,5 cm
Dimensions illuminated area
approx.
11,5 x 6,5 cm
Weight approx.
212 g
Fade
Rainbow Fade
Red Fade
Green Fade
Blue Fade
Yellow Fade
Cyan Fade
Purple Fade
White Fade
Red/Green Fade
Red/Blue Fade
Green/Blue Fade
Warm White Fade
Cold White Fade
BiColor Fade
Strobe
Rainbow Strobe
Red Strobe
Green Strobe
Blue Strobe
Yellow Strobe
Cyan Strobe
Purple Strobe
White Strobe
Warm White Strobe
Cold White Strobe
BiColor Strobe
Scene
Fire Light
Party Light
Police Car
TV Light
Lightening
Explosion
Fireworks
Pulse
Rainbow Pulse
Red/Green Pulse
Red/Blue Pulse
Green/Blue Pulse
BiColor Pulse
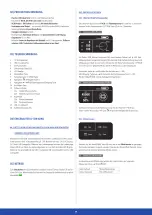
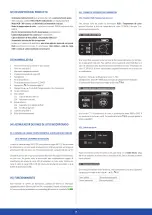
Press confirmation button (10) to enter the effect mode submenu. Choose your
desired effect with buttons
(8):
Use buttons (9) to set the desired
speed
of the chosen effect. To
turn off
the
LED video light slide the On/Off button (3) to position OFF.
NOTE
•
During operation the housing and LED´s will warm up.
•
Turn off the device after usage with On/Off switch (3).
•
Let the device cool down completely, before placing it in the storage pouch.
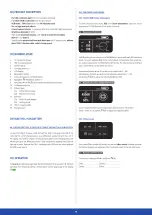
06 | MOUNTING
06.1 MOUNTING ON A CAMERA/CAMCORDER WITH FLASH HOT SHOE
To mount the RGB light on a camera or camcorder, screw the universal ball head
(12) into the ¼" connection thread (1) of the RGB LED video light. Then slide the
flash hot shoe adapter (12a) into the hot shoe mount of your camera or camcorder.
Tighten the locking screw (12b) downwards.
06.2 MOUNTING ON A TRIPOD
Unscrew the flash hot shoe adapter (12a) from the ball head. You have now the
possibility to mount the RGB light on any tripod with ¼" screw thread.
06.3 MOUNTING/DETACHING DIFFUSER PLATE
The diffusor plate (11) softens the light and reduces harsh shadows. In order to
mount the diffusor plate (11) place it on the front side of the RGB light respecting
that the 3 holders (11a) match with the 3 housing notches (11b) correctly. Press
gently until holders (11a) snap into the notches (11b).
Losen the holders (11a) from the notches (11b). Pull off the diffusor plate (11).


