background image

23

REMOVING TRIM FOR CLEANING 

(Cont.)

REMOVING BUCKLE FOR CLEANING

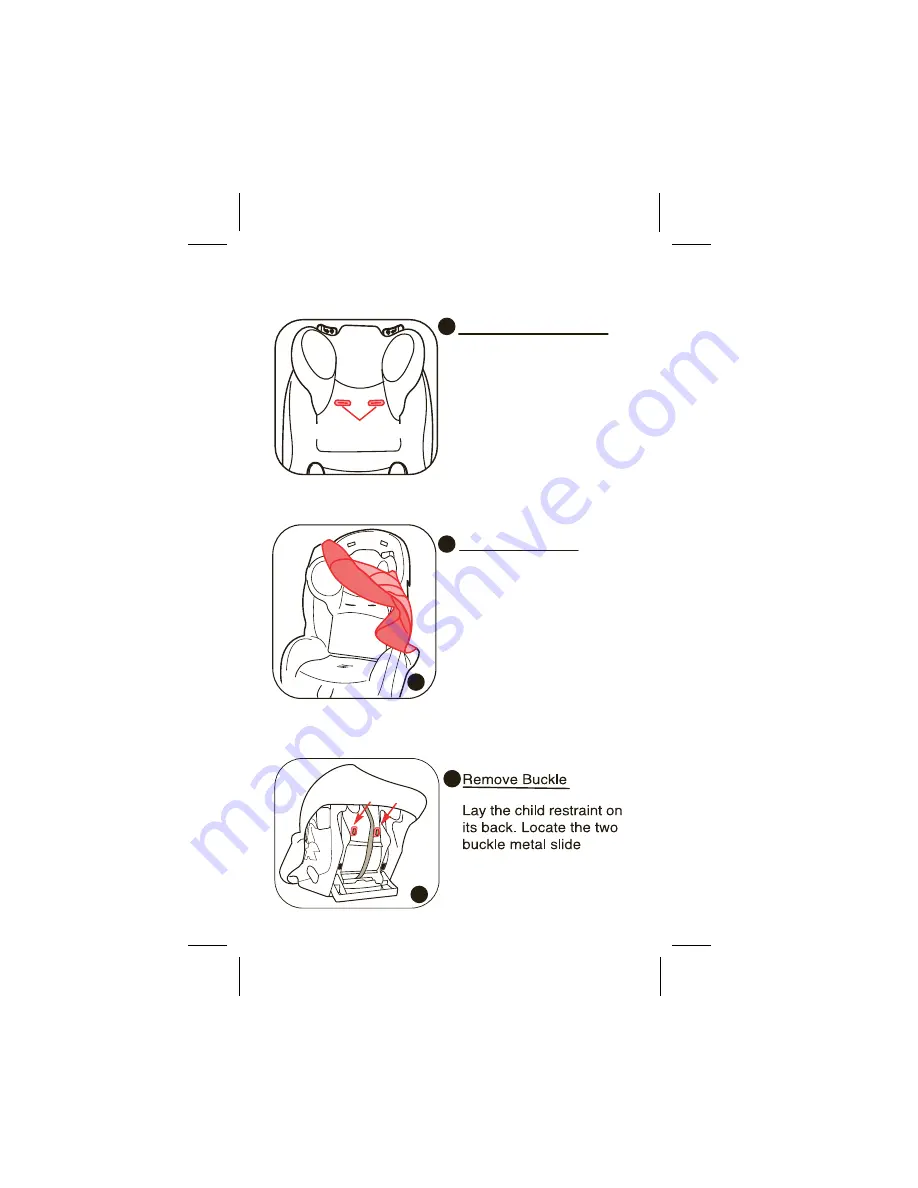
Remove Headrest Trim
Move headrest to highest 

position. Remove trim 

from 2 plastic hooks at 

back of headrest. Pull 

the plastic harness guide 

with one hand while 

pulling off the headrest 

trim around it. Repeat 

same process on the other 

side and remove trim.

4

5

4

5

Remove seat Trim
Adjust backrest to lowest

position. Pull pad off the

top of child restraint and

around headrest. Replace 

trim by reverse order.

1

1

Harness Guides

metal slide

Содержание COMPLETE AIRCA 2010

Страница 1: ...Instruction Manual MODEL CA 2010 COMPLETE AIR FORWARD FACING Illustrations are representative only Design and style may vary IMPORTANT KEEP THIS BOOKLET IN THE PLACE PROVIDED ON THE CHILD RESTRAINT...

Страница 2: ...le position Page 10 11 Features Child Restraint Page 12 15 Forward Facing Only Installation Page 16 17 Preparing Child Restraint to Fit Your Child Page 18 Locking Clip Page 19 Securing Your Child in t...

Страница 3: ...ular attention to attachment points stitching and adjusting devices In the event of an emergency it is important that the child can be released quickly This means that the buckle is not fully tamper p...

Страница 4: ...y s back is evenly supported do not put more than one nappy on the baby and make sure the nappy is not thickly folded at the back Do not allow a child to have anything like a bottle lollipop or ice cr...

Страница 5: ...tinue to use this child restraint until the child reaches this limit Do not use this restraint until child s shoulders are above the lower shoulder height marker Infants are at risk of serious injury...

Страница 6: ...es may have anchor points which are recessed below the vehicle trim spacers are supplied to raise the anchor point if required Extension straps and extra fittings are available from various stores NOT...

Страница 7: ...restraint must be used in the correct way Be especially careful to use the clip in the following way RIGHT Make sure there is no slack in the top strap and the attachment clip is upright in the anchor...

Страница 8: ...estraint fitting station or traffic authority for vehicle inspection to find the best correct position for the placement of anchorage point and for the correct attachment bolt length and use of spacer...

Страница 9: ...pacers if required Vehicle Trim Lock Washer Securing Nut Reinforcing Washer Vehicle Metal Structure Anchor Bolt Fig 3 Fig 2 Front of vehicle Centre line of seating position CORRECT VEHICLE POSITION CO...

Страница 10: ...ment Levers B Adjustable Headrest and Headrest Trim C D Harness Strap Buckle E Harness Adjuster Strap F G Trim H Harness Release Lever under flap Buckle Tongues I Insert A A D B C G E F H I Front View...

Страница 11: ...N K Back View J Top Anchorage Strap Tether K Instruction manual L Locking Clip M Splitter Plate J L M 11 O P N Seat Stand O Anchorage Fitting P Snap Hook...

Страница 12: ...cing belt path using Lap sash belt Forward facing belt path using Lap belt Forward facing belt path Forward facing belt path Front of vehicle Front of vehicle FORWARD FACING The shoulder straps must b...

Страница 13: ...BEL 2 SHOULDER MARKER HEIGHT FORWARD FACING SEAT The child restraint is unsuitable for the occupant when the shoulders are below the lower marker or above the upper marker The child needs to be moved...

Страница 14: ...ead Vehicle Belt Thread the vehicle lap or lap sash belt through the belt path openings at the rear of the seat 2 places and place tongue into buckle Listen for click and gently pulled to ensure buckl...

Страница 15: ...child restraint forward and back and from side to side If the seat belt does not loosen your child seat should be secure If not Change seat position or install locking clip Refer to page 17 6 Tighten...

Страница 16: ...restraint then pulling out on the harness straps 1 Place Child in Child Restraint Place the child s bottom and back flat against the child restraint This will increase comfort and allow the harness st...

Страница 17: ...drest height To Adjust Harness Headrest Height Loosen harness straps if required Rotate harness height adjustment levers inward Move headrest to the proper height and lock into place 4 5 4 NOTE Should...

Страница 18: ......

Страница 19: ...harness snugly NOTE A snug harness should not allow any slack Buckle Harness Push each buckle tongue into buckle until you hear a Click Remember to always pull up on harness straps to make sure buckl...

Страница 20: ...on the harness release lever under flap on the front of child restraint while pulling out on the harness straps 1 1 Unbuckle Harness Press red button on buckle to release the buckle tongues Place har...

Страница 21: ...hen the shoulders are above the upper marker LABEL 1 The child needs to be moved into the next form of child restraint a booster seat when they reach the top shoulder height marker NOTE This illustrat...

Страница 22: ...te Fully loosen harness straps From the back of the restraint remove both harness straps from splitter plate Remove Harness Straps Feed harness straps throught headrest 1 2 2 3 3 1 Remove the Elastic...

Страница 23: ...ks at back of headrest Pull the plastic harness guide with one hand while pulling off the headrest trim around it Repeat same process on the other side and remove trim 4 5 4 5 Remove seat Trim Adjust...

Страница 24: ...ce unscrewed pull the scrivet out of the plastic webbing guide Repeat the process for the other Pull the metal slide and push the plastic webbing guide through the slot on the bottom shell Push the me...

Страница 25: ...buckle should always fasten with an audible click CARE AND MAINTENANCE cont Place the buckle unit under running water 40 degree celcius Let the water flow through the mouth of the buckle for one minu...

Страница 26: ...e is facing out Pick one end and thread the metal slide through the slot in the shell followed by the plastic webbing guide Repeat for other side Put the scrivet through the hole and press Repeat for...

Страница 27: ...epair immediately or replace the child restraint Don t forget to remove the instruction manual if it is in a pocket sewn to the trim Machine wash in cold water delicate cycle Tumble dry for 10 15 minu...

Страница 28: ...f purchase and contact our Customer Service Centre on Ph 1300 809 526 or alternatively via our website at www igcdorel com au for any difficulties with your product Warranty claims and claims for expe...

Отзывы: