Dorel Living 0-65857-18055-8 Скачать руководство пользователя страница 2

*

*

*

*

*

*

*

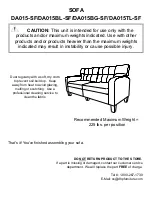
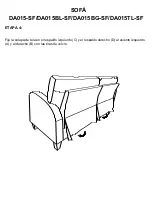
    WARNING:  Should this product become damaged, and/or 

components are broken or missing, DO NOT USE.

Dorel warrants its product to be free from defects in material and workmanship and agrees to remedy any such 
defect. This warranty covers 1 year from the date of original purchase. This warranty is valid only upon 
presentation of proof of purchase.  This is solely limited to the repair or replacement of defective furniture 
components and no assembly labor is included. This warranty does not apply to any product which has been 
improperly assembled, subjected to misuse or abuse or which has been altered or repaired in any way. Any 
wearing, tearing or fading of the fabric is not covered under the warranty. This warranty gives you specific legal 
rights and you may also have other rights which vary from State to State.

CARE AND CLEANING      

Dust regularly with a soft, dry cloth to prevent soil build up.  Keep away from heat to avoid glazing, melting or 
scorching.  Use a professional cleaning service to clean the fabric.

MAINTENANCE

Check bolts/screws periodically and tighten them if necessary.

LIMITED WARRANTY

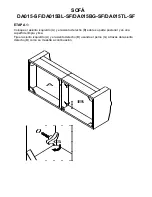
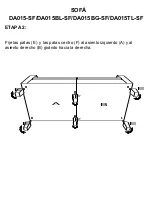
Assemble on a soft, smooth surface to prevent damage to the product finish.

Read all instructions completely before assembly.

DO NOT

 use power tools.

CAUTION: Adult assembly required.

Estimated assembly time: 15


minutes. 

Montreal, Quebec

Canada H1G 3L1

E-MAIL: [email protected]

NOTES

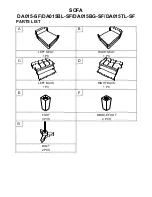
Ensure all parts and components are present before beginning assembly.

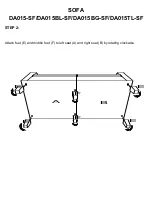
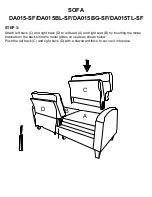
Assembly and handling will require two people.

CUSTOMER SERVICE    

If you are missing parts or have any questions about this product, contact our customer service 
representative first!

CALL 1-800-267-1739      

You can also order parts by writing to the address listed below. Please include the product 
model number, color and a detailed description of the part.

DHP Consumer Services

12345 Albert-Hudon Boulevard, Suite 100

Содержание 0-65857-18055-8

Страница 1: ...ality convenience and style in mind We trust it will provide you with many years of exceptional comfort and service Before beginning assembly we encourage you to familiarize yourself with your new fur...

Страница 2: ...G Dust regularly with a soft dry cloth to prevent soil build up Keep away from heat to avoid glazing melting or scorching Use a professional cleaning service to clean the fabric MAINTENANCE Check bolt...

Страница 3: ...PARTS LIST A B C D E F G BOLT 2 PCS 4 PCS 2 PCS 1 PC 1 PC FOOT MIDDLE FOOT 1 PC 1 PC LEFT BACK RIGHT BACK SOFA DA015 SF DA015BL SF DA015BG SF DA015TL SF LEFT SEAT RIGHT SEAT...

Страница 4: ...FA DA015 SF DA015BL SF DA015BG SF DA015TL SF Lay left seat A and right seat B on its back on a clean smooth surface Connect left seat A and right seat B using bolts G through right seat B as shown bel...

Страница 5: ...STEP 2 SOFA DA015 SF DA015BL SF DA015BG SF DA015TL SF Attach feet E and middle feet F to left seat A and right seat B by rotating clockwise A B E E E E F F...

Страница 6: ...F Attach left back C and right back D to left seat A and right seat B by inserting the metal brackets on the backs into the metal glides on seats as shown below Push the left back C and right back D w...

Страница 7: ...STEP 4 SOFA DA015 SF DA015BL SF DA015BG SF DA015TL SF Secure the fabric flaps on left back C and right back D to left seat A and right seat B using the Velcro strips...

Страница 8: ...d may result in instability or cause possible injury Dust regularly with a soft dry cloth to prevent soil build up Keep away from heat to avoid glazing melting or scorching Use a professional cleaning...

Страница 9: ...mendamos que antes de comenzar a armarlo se familiarice con su nueva compra y tome unos minutos de su tiempo para leer este manual Contiene informaci n importante sobre nuestra garant a y consejos de...

Страница 10: ...eba de compra Esto se limita a la reparaci n o reemplazo de componentes defectuosos del mueble y no se incluye ning n trabajo de ensamblaje Esta garant a no se aplica a ning n producto que haya sido m...

Страница 11: ...TA DE PIEZAS A B C D E F G PERNO 2 PCS 4 PCS 2 PCS 1 PC 1 PC PATA PATA CENTRO 1 PC 1 PC RESPALDO IZQUIERDO RESPALDO DERECHO SOF DA015 SF DA015BL SF DA015BG SF DA015TL SF ASIENTO IZQUIERDO ASIENTO DERE...

Страница 12: ...F Coloque el asiento izquierdo A y el asiento derecho B sobre su parte posterior y en una superficie limpia y lisa Fije el asiento izquierdo A y el asiento derecho B usando el perno G a trav s del asi...

Страница 13: ...ETAPA 2 SOF DA015 SF DA015BL SF DA015BG SF DA015TL SF Fije las patas E y las patas centro F al asiento izquierdo A y al asiento derecho B gir ndo hacia la derecha A B E E E E F F...

Страница 14: ...ho D al asiento izquierdo A y el asiento derecho B respectivamente insertando los soportes met licos del respaldar en los deslizadores de metal del asiento como se muestra a continuaci n Con una fuerz...

Страница 15: ...ETAPA 4 SOF DA015 SF DA015BL SF DA015BG SF DA015TL SF Fije la solapa de tela en el respaldo izquierdo C y el respaldo derecho D al asiento izquierdo A y al derecho B con las tiras de velcro...

Страница 16: ...tele el polvo regularmente con un pa o suave y seco para evitar que la suciedad se acumule Mantenga alejado del calor para evitar que se agriete se funda o se queme Utilice un servicio de limpieza pr...

Страница 17: ...servira durant de nombreuses ann es avec un confort exceptionnel Nous vous encourageons vous familiariser avec les caract ristiques de votre nouveau meuble avant de commencer l assemblage prenez donc...

Страница 18: ...orrectement soumis une mauvaise utilisation ou abus ou qui a t modifi ou r par de quelque fa on Cette garantie vous donne des droits l gaux sp cifiques et vous pouvez galement avoir d autres droits qu...

Страница 19: ...LISTE DE PI CES A B C D E F G BOULON 2 PCS 4 PCS 2 PCS 1 PC 1 PC PIED PIED MILIEU 1 PC 1 PC DOSSIER GAUCHE DOSSIER DROIT SOFA DA015 SF DA015BL SF DA015BG SF DA015TL SF SI GE GAUCHE SI GE DROIT...

Страница 20: ...DA015BG SF DA015TL SF Placez le si ge gauche A et le si ge droit B sur le dos sur une surface propre et lisse Connectez le si ge gauche A et le si ge droit B l aide du boulon G travers le si ge droit...

Страница 21: ...TAPE 2 SOFA DA015 SF DA015BL SF DA015BG SF DA015TL SF Fixez les pieds E et les pieds du milieu F au si ge gauche A et au si ge droit B en tournant dans le sens horaire A B E E E E F F...

Страница 22: ...gauche C et le dossier droit D au si ge gauche A et au si ge droit B en ins rant les supports m talliques du dossier dans les glisses m talliques du si ge tel qu indiqu ci dessous Poussez le dossier g...

Страница 23: ...TAPE 4 SOFA DA015 SF DA015BL SF DA015BG SF DA015TL SF Fixez le rabat en tissu du dossier gauche C et du dossier droit D au si ge gauche A et au si ge droit B l aide des bandes Velcro...

Страница 24: ...lit et causer des blessures poussettez r guli rement avec un chiffon doux et sec pour emp cher la poussi re de s accumuler Gardez loin des sources de chaleur pour viter le gla age la fusion ou les br...

Отзывы: