background image

Paquete de componentes #:

DA6297-X

Instrucciones

Paso 1

Paso 2

Paso 3

Paso 4

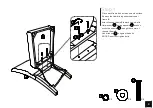
Coloque el respaldo 

A

 en una superficie limpia y lisa.

Quite el forro de tela debajo del marco del asiento 

B.

Use llave Allen        para apretar los pernos.

NOTA:

No apriete los pernos.

NOTA:

No apriete los pernos.

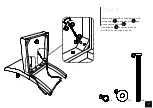
Colocar el marco del asiento 

B

 para el respaldo 

A

 con las arandelas planas       ,

arandelsa con resorte        y los pernos        a traves del centro de la estructura del 

asiento 

B

.

Asegure el marco del asiento 

B

 para respaldo 

A

 con lsa raandelas planas       ,

arandelas con resorte        y pernos       .

Utilice la llave Allen       para apretar los pernos.

Fije las patas delanteras 

Repita los pasos               y        para montar la otra silla.

C

 al marco del asiento 

B

 con las arandelas planas       ,

arandelas con resorte       y los pernos       . Use llave Allen       para apretar los tornillos.

Apriete todos los pernos perviamente instalados.Coloque el revestimiento de nuevo 

tejido en su lugar.

1

3

3

2

2

1  

3

4

3

4

4

6

6

6

5

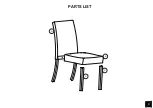
Respaldo

Marco Del Asiento

Patas Delanteras

DA6297

DA6297-GR

(Taupe)

DA6297-A-260307-ZQ

DA6297-B-260307-ZQ

DA6297-C-260307-ZQ

DA6297-GR-A-260307-ZQ

DA6297-GR-B-260307-ZQ

DA6297-GR-C-260307-ZQ

(Gray)

C

B

A

NÚMERO DE PIEZAS

ETIQUETAS 

DE PIEZAS

DESCRIPCION

Содержание DA6297

Страница 1: ...or damaged we will gladly ship your replacement parts free of charge Lot Number Thank you for purchasing from DHP THIS INSTRUCTION BOOKLET CONTAINS IMPORTANT SAFETY Visit www dhpfurniture com eng supp...

Страница 2: ...m authorized retailers This is solely limited to the repair or replacement of defective parts and assembly labor is not included This warranty does not apply to any product which has been improperly a...

Страница 3: ...PARTS LIST B C C 3 A...

Страница 4: ...nt parts Before throwing any packaging please verify all contents and make sure you have received all the parts listed above Front Leg X 4 PCS Seat Frame Back Frame X 2 PCS X 2 PCS Part Number Label D...

Страница 5: ...nless otherwise indicated in the step by step instructions The screw s bolt s to be used at each step are shown in actual size in the lower right corner of the page 5 5 16 x2 3 8 8 PCS HARDWARE LIST A...

Страница 6: ...th surface Remove the fabric lining underneath seat frame B Attach the seat frame B to back frame A with flat washers spring washers and hex socket head bolts through the center of the seat frame B Us...

Страница 7: ...4 5 2 3 4 5 6 X 4 X 4 4 3 Secure seat frame B to back frame A with flat washers spring washers and hex socket head bolts Use Allen Key to tighten the bolts 3 4 6 5 NOTE Do not fully tighten bolts A B...

Страница 8: ...nt legs C to seat frame B with flat washers spring washers and hex socket head bolts Use Allen key to tighten the bolts Tighten all bolts previously installed l P ace the fabric lining back into place...

Страница 9: ...4 Repeat steps 1 2 and 3 to assemble the second chair 9...

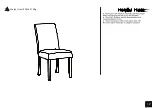
Страница 10: ...Helpful Hints Weight Limit 250Lb 113Kg 10...

Страница 11: ...a a o emente or de nar eal Quebec Canada H1G 3L1 o 1 www dhpfurniture com eng replacement parts 30 DA6297 Taupe DA6297 GR Gray Dining Chair...

Страница 12: ...con lsa raandelas planas arandelas con resorte y pernos Utilice la llave Allen para apretar los pernos Fije las patas delanteras Repita los pasos y para montar la otra silla C al marco del asiento B...

Страница 13: ...e a e e e e 1 www dhpfurniture com eng replacement parts 30 DA6297 Taupe DA6297 GR Gray Dining Chair...

Страница 14: ...oux NE PAS utiliser de produits chimiques ou abrasifs Cadre Arri re Cadre De Si ge Jambe Avant 2 3 4 6 Attachez les pattes avant R p tez les tapes et pour assembler l autre chaise C au cadre du si ge...

Отзывы: