


Inspection, Maintenance and Adjustment
4-52
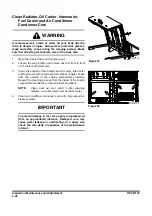
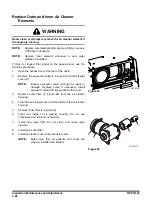
Replace Outer and Inner Air Cleaner
Elements
NOTE:
Replace outer element after cleaning 5 times or every
2,000 hours of service.
NOTE:
Replace inner element whenever a new outer
element is installed.
If there is clogged filter signal on the gauge panel, use the
following procedure.
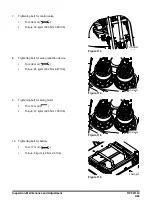
1.
Open the access door at the rear of the cabin.
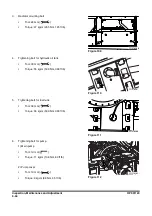
2.
Remove the evacuator valve (1, Figure 93) and air cleaner
cover (2).
NOTE:
Inspect evacuator valve seal lips for wear or
damage. Replace valve if necessary. Install
evacuator valve with lips parallel to the cover.
3.
Remove outer filter (3, Figure 93) from the air cleaner
housing.
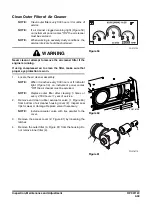
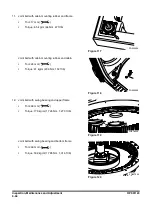
4.
Clean the air cleaner cover and the inside of the air cleaner
housing.
5.
Remove inner filter (4, Figure 94).
6.
Clean out inside of air cleaner housing. Do not use
compressed air to blow out housing.
7.
Install new inner filter. Do not clean and reuse inner
element.
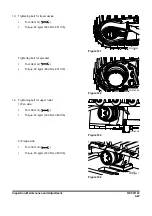
8.
Install new outer filter.
9.
Install air cleaner cover and evacuator valve.
NOTE:
Make sure that all gaskets and cover are
properly installed and seated.
WARNING
Never clean or attempt to remove the air cleaner element if
the engine is running.
Figure 93
FG016134
1
2
FG016115
1
2
4
3
Figure 94
Содержание DX700LC
Страница 2: ......
Страница 72: ...OP001120 Safety 1 66 ...
Страница 142: ...OP001121 Operating Controls 2 70 ...
Страница 188: ...OP001122 Operation 3 46 ...
Страница 197: ...OP001123 4 9 Inspection Maintenance and Adjustment ...
Страница 282: ...OP001123 Inspection Maintenance and Adjustment 4 94 ...
Страница 298: ...OP000030 Troubleshooting 6 6 ...
Страница 301: ...OP001125 7 3 Specification ...
Страница 304: ...OP001125 Specification 7 6 Working Range FG015858 D C F E 8 A B J L I H d G M K Ground Figure 3 ...
Страница 308: ...OP001125 Specification 7 10 ...
Страница 314: ...950106 00012E Index 8 6 ...