background image

6

.

T

empo

 A

d

justment

A

B

D

E

F

G

A

B

C

D

E

F

G

A

B

C

D

E

F

G

A

B

C

D

E

F

G

A

B

C

D

E

F

G

A

B

C

D

E

F

G

A

B

C

C

D

E

F

G

D

1

E

1

F

1

G

1

A

1

B

1

A

B

C

D

E

F

G

a

b

c

d

e

f

g

1

1

1

1

1

1

1

2

2

2

2

2

2

2

3

3

3

3

3

3

3

4

4

4

4

4

4

4

5

c

d

e

f

g

a

b

c

d

e

f

g

a

b

c

d

e

f

g

a

b

c

d

e

f

g

a

b

c

+T

empo

 A

d

justment

-

Chord

Chord K

e

y

s Zone

Sy

nchroniz

e

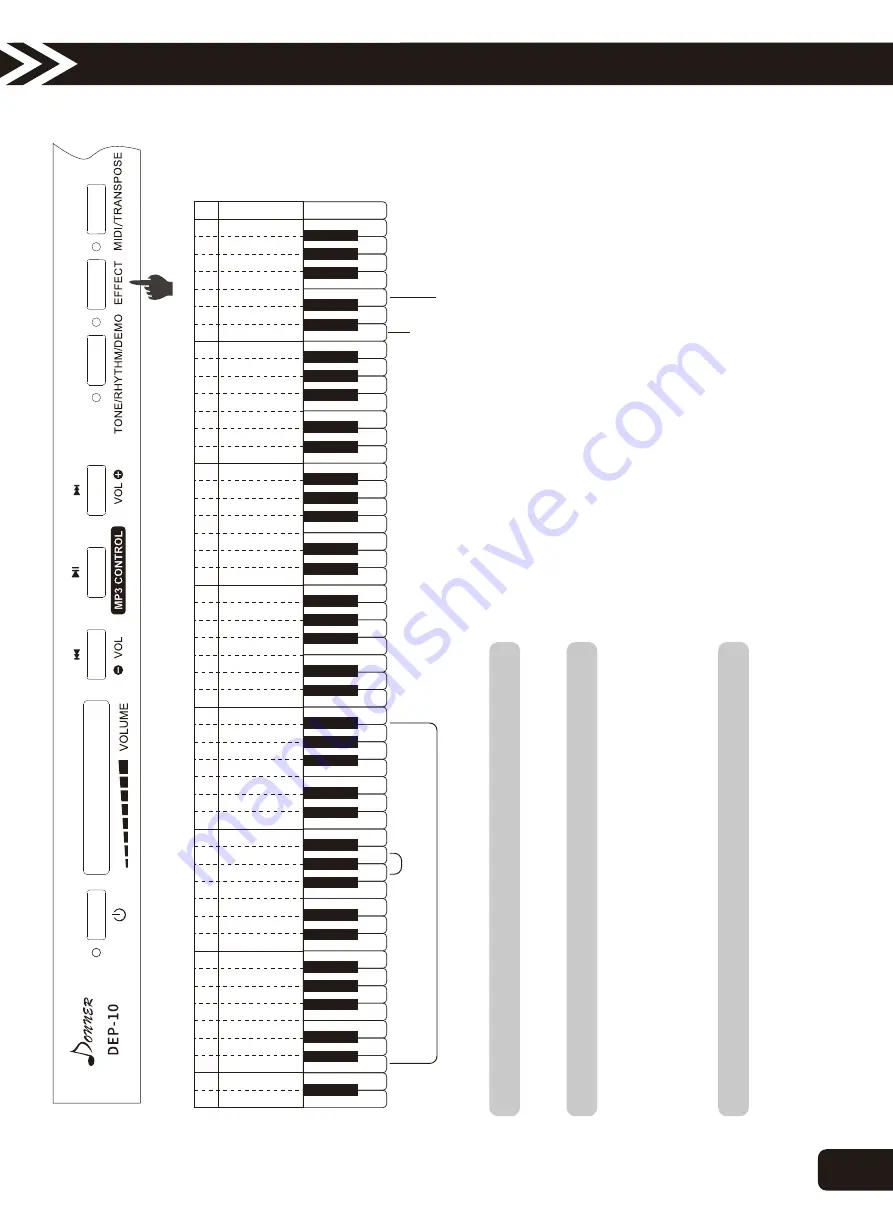
W

hen pla

y

ing r

h

y

thms,

 press

 “EFFEC

T”

 button and mean

w

hile

 press

 “

w

hite

 G/A”

 to

 ad

just the

 tempo

 o

f r

h

y

thm.

7

.

Chords

1.

  W

hen pla

y

ing r

h

y

thms,

 press

 “EFFEC

T”

 button and mean

w

hile

 press

 “

w

hite

 c4”,

 pla

y

 r

h

y

thms

 and 

chords

 w

ith 

one

 fing

er

 in the

 le

ft 

chord k

e

y

    z

one

 (1-3

4 k

e

y

s from le

ft

).

    Press

 “EFFEC

T”

 button and mean

w

hile

 press

 “

w

hite

 c4”

 to

 stop

 pla

y

ing the

 r

h

y

thms

 or

 chords.

2.

 W

hen pla

y

ing r

h

y

thms,

 press

 “EFFEC

T”

 button and mean

w

hile

 press

 “

w

hite

 d4”,

 pla

y

 r

h

y

thms

 w

ith m

ul

ti-fing

er

s

 in the

 le

ft 

chord k

e

y

s z

one

 (1-3

     k

e

y

s from le

ft

).

8

.

Sy

nchroniz

ed S

tar

tu

p

Y

ou 

can s

et this

 product s

o

 that w

hen y

ou pla

y

 chord accompaniment 

on the

 k

e

y

board,

 y

ou 

can star

t pla

y

ing r

h

y

thm at the

 same

 time.

1.

 In the

 state

 o

chord,

 press

 “EFFEC

T”

 button,

 and mean

w

hile

 press

 “

w

hite

 e4”,

 enter

 s

y

nchronous

 star

t standb

y

 state.

2.

 Pla

y

 the

 chord (1-3

4 k

e

y

s

 from le

ft

) and the

 accompaniment and 

chord w

il

l begin to

 pla

y.

3.

 T

o

 cancel the

 s

y

nchronization state,

 press

 the

 "EFFEC

T" button,

 and mean

w

hile

 press

 the

 "w

hite

 e4" button,

 y

ou 

can stop.

C

1

A

B

A

2

B

2

C

Operation Guide

7

Содержание DEP-10

Страница 1: ...DEP 10 DIGITAL PIANO INSTRUCTION MANUAL...

Страница 2: ......

Страница 3: ...appropriate way for future reference Function Speci cations Half Weighted Hammer Keys Multi Media MP3 Player With MP3 player function it could play the full role of music entertainment 88 Hammer Keys...

Страница 4: ...arphone Socket 100V 220V AC Socket 2 Earphone Interface Socket Power Line Audio Output Audio Input Sustain Pedal Socket Pedals Socket smission Socket USB Tran MP3 Socket 2 Connect computer smart phone...

Страница 5: ...ted music or accompaniments built in the music software can be played by the digital piano which is connected to the software or performed along with accompaniments 6 USB Transmission Socket 7 MP3 Soc...

Страница 6: ...into the groove of the piano body 2 Insert pedal into the pedal jacks on the back of the body After the installation is done plug in the power supply and start your music journey Power Outlet is on th...

Страница 7: ...C D E F G A B C D E F G A B C D E F G A B C D E F G A B C C D E F G D 1 E 1 F 1 G 1 A 1 B 1 A B C D E F G a b c d e f g 1 1 1 1 1 1 1 2 2 2 2 2 2 2 3 3 3 3 3 3 3 4 4 4 4 4 4 4 5 c d e f g a b c d e f...

Страница 8: ...Dance 3 Dance 4 Dance 5 Dance 6 Dance 7 Dance 8 Dance 9 Dance 10 Samba 1 16 Beat 10 Funk 1 Funk 2 Funk 3 Funk 4 Funk 5 Funk 6 Funk 7 Funk 8 Funk 9 Funk 10 70s Disco 1 70s Disco 2 Disco 1 Disco 2 Disco...

Страница 9: ...rd keys zone 1 34 keys from left Press EFFECT button and meanwhile press white c4 to stop playing the rhythms or chords 2 When playing rhythms press EFFECT button and meanwhile press white d4 play rhy...

Страница 10: ...ct 2 Press the EFFECT button and press white e1 meanwhile in the Tone Effect zone to turn ON OFF the Suspension effect 3 Press the EFFECT button and press black d1 meanwhile in the Tone Effect zone to...

Страница 11: ...cord the notes l 3 Press EFFECT again and press white D1 on the Track 2 to stop the track 2 recording l 4 Press the EFFECT button and press white E1 meanwhile on the Track 2 start to play the track 2...

Страница 12: ...1 A 1 B 1 A B C D E F G a b c d e f g 1 1 1 1 1 1 1 2 2 2 2 2 2 2 3 3 3 3 3 3 3 4 4 4 4 4 4 4 5 c d e f g a b c d e f g a b c d e f g a b c d e f g a b c Transpose Switch Transpose Selection 1 Insert...

Страница 13: ...1 PCS Power Digital Paino Music Stand Instruction Name Quantity Speci cations Keys 88 Range A2 C5 Model Portable Piano Intonation 3 cents Output Power 25W x 2 Parameters DC 12V 3A 50 60Hz Appendix Ac...

Страница 14: ...llision The product should be moved carefully Violent shake and collision are prohibited to avoid damaging the shell or internal electronic components This product may cause video or audio interferenc...

Страница 15: ...o the user and other people and the nancial issue The speci cation and the product are marked with a series of safety signs All kinds of signs and their meaning are as follows This triangle markindica...

Страница 16: ...or plug is damaged replace the powercord of the same type Do not use wet hands to touch the powercord and plug otherwise there is a riskof electric shock Please use the power lines in the place where...

Страница 17: ...ep thedistance with the product and support Climb the body or its support is in dangerof tipping ordamage The children s families should pay special attention to Display You should avoid placing this...

Страница 18: ...place heavy objects on this product otherwise the top will be overloaded causing the product or the object falling and the riskof injuring persons Heavyobjects Correct assemblyof the support The incor...

Страница 19: ...te must be shown in maintenance time 3 Free warranty will not be provided in the following cases A The same warranty card and shopping notes cannot be provided at the same time B The purchase date of...

Страница 20: ...Maintenance Record Date Maintenance Record Maintenance Man 18...

Страница 21: ......

Страница 22: ...www donner com cn DonnerTechnologyCo Ltd www donnerdeal com www idonner com...

Отзывы: