Domo MS171 Скачать руководство пользователя страница 20

MS171   


     www.domo-elektro.be

20

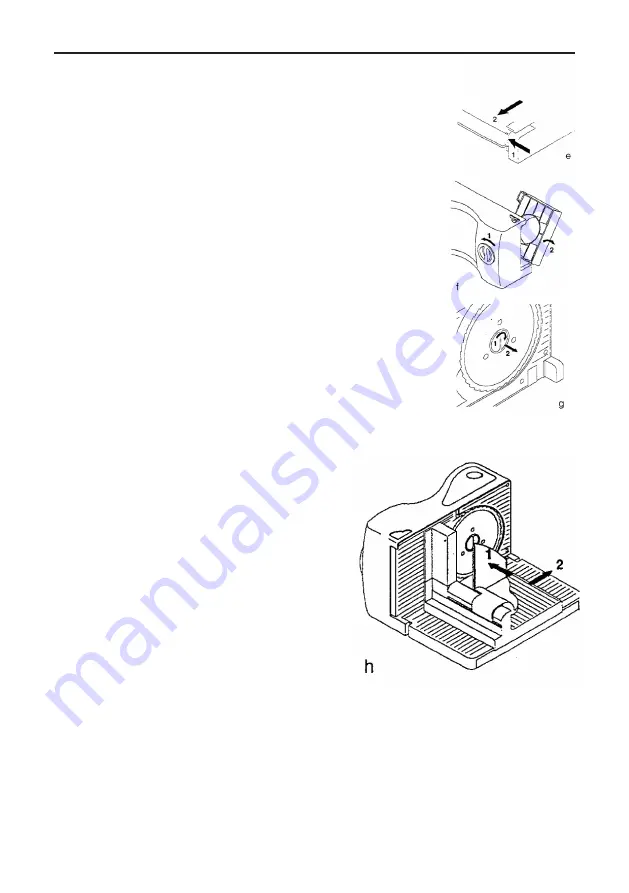
DISMANTLING FOLDABLE TABLET (fig e)

Press the bottom of the carriage (12) in the direction of the base 

as indicated on the drawing and remove the carriage slab from its 

fixture.

DISMANTLING SLIDING CARRIAGE (fig f)

Turn the knob for adjusting thickness (4) anti-clockwise so that 

the support platform  (9) is released from the machine’s casing.

DISMANTLING BLADE (fig g)

Turn the screw for fastening the blade (10) clockwise. Adjust 

the support platform to the thickest setting so that it is easier 

to remove the blade. The blade and the machine casing can be 

cleaned with a disposable damp cloth.

Take great care: The blade is razor sharp! Always hold onto it by 

the screw used for fastening it.

USE (fig h)

Pull the sliding carriage (7) that is attached to the foldable slab 

(12) away from the cutting edge of the blade. 

Place the foodstuff on the sliding carriage (7) and push it against the sliding carriage 

(9) with the hand protector (5). 

Pres the safety button (2) in.


Press on the on/out switch (1) to start the machine 

so that the blade rotates.

Keep the on/off switch (1) pressed in for as long 

as you wish to continue slicing. You can release 

the safety button (2) when you press the on/out 

switch (1) in.

Slide the sliding carriage (7) backwards and 

forwards along the rotating blade (5) on the 

foldable slab (12). 

Release the on/out switch (1) when you are 

finished.

TAKE CARE

You must always use the hand protector when slicing food that is smaller than 15 cm 

x 15 cm. For larger pieces you can remove the hand protection. If you remove the 

protection take extra care!

Hold your fingers well away from the rotating blade.

Never use the machine for longer than 6 minutes in any one session.

First allow the machine to cool down before you use it again. 

The blade is not suitable for cutting frozen products or bones.

Содержание MS171

Страница 1: ...HANDLEIDING MODE D EMPLOI GEBRAUCHSANLEITUNG INSTRUCTION BOOKLET PRODUCT OF SNIJMACHINE FOOD SLICER TRANCHEUSE ALLESSCHNEIDER SLICER MS171...

Страница 2: ...non agr es La garantie ne sera valable que si la date d achat ainsi que le cachet et la signature du magasin figurent sur la carte de garantie Toutes les pi ces d tach es non r sistantes et par cons...

Страница 3: ...ent Bouwelven 12A 2280 Grobbendonk Tel 014 21 71 91 Fax 014 21 54 63 Type nr Apparaat N de mod le de l appareil MS171 Type nr des Ger tes Type nr of appliance Model Naam Nom Name Adres Adresse Address...

Страница 4: ...e de ce produit veuillez prendre contact avec le bureau municipal de votre r gion votre service d liminiation des d chets m nagers ou le magasin o vous avez achet le produit RECYCLING INFORMATIONEN Da...

Страница 5: ...ndommag il doit tre remplac par le fabricant son ser vice apr s vente ou toute autre personne qualifi e pour viter tout accident Wenn das Stromkabel besch digt ist muss es vom Hersteller dessen Kunden...

Страница 6: ...met voedsel Wij raden dan ook aan het toestel na elk gebruik te reinigen Verwijder altijd eerst de stekker uit het stopcontact alvorens het toestel te reinigen Dompel de snijmachine nooit onder in wat...

Страница 7: ...oe te voegen te verwijderen of het toestel te reinigen MONTAGE VINGERBESCHERMING fig b Plaats de vingerbescherming 6 loodrecht op de opening in het schuifplatform 7 en druk goed aan MONTAGE SCHUIFPLAT...

Страница 8: ...Trek het schuifplatform 7 dat op de vouwbare tablet 12 gemonteerd is weg van de snijrand van het mes Plaats het voedsel op het schuifplatform 7 en duw het tegen het schuifplatform 9 met de handbescher...

Страница 9: ...el het toestel nooit onder in water Maak de snijmachine na elk gebruik onmiddellijk schoon om het drogen van de achtergebleven voedselresten te voorkomen Het kan nodig zijn het toestel met detergent e...

Страница 10: ...lons donc de nettoyer celle ci apr s chaque utilisation Enlevez d abord la fiche de la prise de courant avant de nettoyer l appareil Ne plongez jamais la trancheuse dans l eau ou un autre liquide Ne p...

Страница 11: ...de nettoyer l appareil MONTAGE PROTECTION DES DOIGTS fig b Placez la protection des doigts 6 verticalement sur l ouverture dans la plateforme coulissante 7 et appuyez fortement MONTAGE PLATEFORME COU...

Страница 12: ...irez la plateforme coulissante 7 mont e sur la tablette pliable 12 du bord tranchant de la lame Placez la nourriture sur la plateforme coulissante 7 et poussez contre la plateforme coulissante 9 avec...

Страница 13: ...tirez la fiche de la prise de courant Ne plongez jamais l appareil dans de l eau Nettoyez la trancheuse imm diatement apr s chaque utilisation pour viter que les restes de nourriture s chent Il pourra...

Страница 14: ...ie das Netzkabel niemals um das Ger t Das Messer kommt mit dem Schnittgut in Ber hrung Wir empfehlen daher das Ger t nach jedem Gebrauch zu reinigen Entfernen Sie immer erst den Stecker aus der Steckd...

Страница 15: ...r aus diesem herausnehmen oder bevor Sie das Ger t reinigen MONTAGE FINGERSCHUTZ Abb b Setzen Sie den Fingerschutz 6 senkrecht auf die ffnung in der Schiebeplatte 7 und dr cken Sie ihn gut an MONTAGE...

Страница 16: ...dem faltbaren Tablett 12 montiert ist vom Schneiderand des Messers weg Legen Sie das Schnittgut auf die Schiebeplatte 7 und dr cken Sie es mit dem Handschutz 5 gegen die St tzplatte 9 Dr cken Sie den...

Страница 17: ...tecker aus der Steckdose Tauchen Sie das Ger t nie in Wasser Reinigen Sie den Allesschneider nach jedem Gebrauch sofort um das Antrocknen zur ckgebliebener Essensreste zu verhindern Es kann notwendig...

Страница 18: ...o clean the machine each time you use it Make sure that you always remove the plug from the mains socket before starting to clean the machine Never immerse the machine in water or any other liquid Nev...

Страница 19: ...ASSEMBLY FINGER THUMB PROTECTION fig b Place the finger protection 6 perpendicular to the opening in the sliding carriage 7 and press firmly ASSEMBLY SLIDING CARRIAGE fig c Place the markings on the s...

Страница 20: ...cutting edge of the blade Place the foodstuff on the sliding carriage 7 and push it against the sliding carriage 9 with the hand protector 5 Pres the safety button 2 in Press on the on out switch 1 t...

Страница 21: ...ays clean the cutting machine immediately after use in order to prevent drying of the remains of foodstuffs In order to remove foodstuffs rich in oil it may be necessary to use a detergent and water t...

Страница 22: ...LINEA 2000 Industriezone Klein Gent Bouwelven 12A 2280 Grobbendonk Tel 014 21 71 91 Fax 014 21 54 63...

Отзывы: