background image

NL

RML9xxx

Veiligheidsinstructies

71

2

Veiligheidsinstructies

De fabrikant kan in de volgende gevallen niet aansprakelijk worden gesteld voor 
schade:

montage- of aansluitfouten

beschadiging van het product door mechanische invloeden en overspanningen

veranderingen aan het product zonder uitdrukkelijke toestemming van de 
fabrikant

gebruik voor andere dan de in de handleiding beschreven toepassingen

!

WAARSCHUWING! 

Open het absorptieaggregaat nooit. Het staat onder hoge druk en 
kan letsel veroorzaken, als het wordt geopend.

Let op een schone en restloze verwerking, als siliconenafdichtmassa 
en dergelijke wordt gebruikt. Bij contact van siliconendraden met 
hete delen of open vuur bestaat brandgevaar.

Als de koelkast zichtbaar is beschadigd, mag hij niet in gebruik wor-
den genomen.

Als de wisselstroomaansluitkabel van deze koelkasten wordt bescha-
digd, moet deze om gevaar uit te sluiten worden vervangen door de 
fabrikant, diens klantenservice of een gelijkwaardig gekwalificeerd 
persoon.

De koelkast nooit met open vuur op lekkage controleren.

Reparaties aan deze koelkast mogen uitsluitend door vakmonteurs 
worden uitgevoerd. Door niet-vakkundige reparaties kunnen grote 
gevaren ontstaan.

Gebruik uitsluitend propaan- of butaangas (

geen

 aardgas).

De koelkast mag 

uitsluitend


met de op het typeplaatje aangegeven 

druk worden gebruikt. Gebruik alleen vast ingestelde drukregelaars 
die voldoen aan de nationale voorschriften (in Europa EN 12864).

Demonteer bij de afvoer van de oude koelkast alle koelkastdeuren, en 
laat de aflegplaten in de koelkast om onbedoeld naar binnen klimmen 
door kinderen en stikken te voorkomen.

!

VOORZICHTIG! 

Beknellingsgevaar! Grijp niet in de scharnier.

Let er voor de ingebruikneming op dat toevoerleiding en stekker 
droog zijn.

RML9xxx-I-West.book  Seite 71  Donnerstag, 7. Dezember 2017  11:24 11

Содержание RML933 Series

Страница 1: ...1 RML9435 Absorber refrigerator Installation Manual 14 Absorber K hlschrank Montageanleitung 31 R frig rateur absorption Instructions de montage 49 Absorptiekoelkast Montagehandleiding 69 RML943x RML9...

Страница 2: ......

Страница 3: ...RML9xxx 3 1 586 5 mm 420 mm 1293 mm RML 9330 RML 9331 RML 9335 553 mm 468 mm 1293 mm RML 9430 RML 9431 RML 9435 2...

Страница 4: ...RML9xxx 4 2 3 4 1 3 1050 1050 1 4...

Страница 5: ...RML9xxx 5 15 25 mm 25 mm 25 mm 5 1350 15 25 mm 1 6...

Страница 6: ...RML9xxx 6 300 1 2 7 9 1 8 1 2 3 4 1 3 2 4 LS 230 LS 330 0...

Страница 7: ...RML9xxx 7 LS 230 LS 330 a LS 230 LS 330 b LS 230 LS 330 1 2 3 c 1 2 d...

Страница 8: ...RML9xxx 8 1 2 e f 1 2 3 4 g 1 2 h 1 2 3 RML 9430 i 1 3 2 RML 9431 RML 9435 j...

Страница 9: ...RML9xxx 9 k 1 2 l 2x n 2x m p o q...

Страница 10: ...RML9xxx 10 448 194 5 1216 46 2 5 2 5 2 5 402 189 1270 5 49 583 5 402 189 1270 5 49 583 5 A B r 1 3 2 A B s SW 17 SW 14 t...

Страница 11: ...leu Marron Jaune Vert Rouge Noir Blanc NL Blauw Bruin Geel Groen Rood Zwart Wit 15 14 3 6 7 8 1 2 4 5 12 11 9 10 10 N L G ge gn ge gn V85 bl 1a 1b 3a 3b 5a 5b 2b 2a 4b 4a 6b 6a 87 85 86 30 br ws sw bl...

Страница 12: ...White DE Braun Rot Schwarz Wei FR Marron Rouge Noir Blanc NL Bruin Rood Zwart Wit IN OUT L L N N AC TO GV 12VDCOUT TO FC TOP ABS HE OUT 12 VDC HE IN sw sw rt br br br ws S D rt rt L N L A B C D E F G...

Страница 13: ...RML9xxx 13 RML93 RML94 w...

Страница 14: ...ories 17 5 Intended use 17 6 Installing the refrigerator 17 7 Connecting the refrigerator 24 8 Technical data 29 1 Explanation of symbols A I NOTE You can find details on the operation in the manual W...

Страница 15: ...cturer customer service or a similarly qualified person in order to prevent safety hazards Never use a naked flame to check the refrigerator for leaks This refrigerator may only be repaired by qualifi...

Страница 16: ...s ensure sufficient ventilation so that the heat generated during operation can dissipate Make sure that the refrigerator is sufficiently far away from walls and other objects so that the air can circ...

Страница 17: ...power supply and an AC socket and can be independently powered by liquid gas propane or butane The refrigerators may not be run on natural gas or city gas 6 Installing the refrigerator 6 1 Preparing...

Страница 18: ...e installed flush to the ground an additional inlet vent fig 3 4 page 4 must be provided in the floor for releasing leaked gas A distance of more than 25 mm between the refrigerator and rear wall lead...

Страница 19: ...wered refrigerators in caravans or motorhomes must be installed in a draught free location according to EN 1949 This means that the combustion air is not extracted from the interior and the exhaust fu...

Страница 20: ...oor Make an air inlet vent in the floor fig 3 4 page 4 behind the refrigerator near the gas burner Shield the end of the opening with a deflector to prevent sludge or dirt from get ting inside while d...

Страница 21: ...age 7 Insert the slider and lock the ventilation grille with it fig c page 7 6 5 Install the roof vent Ensure the installation frame is water resistant fig e page 8 Insert the installation frame and s...

Страница 22: ...I Proceed as follows fig h page 8 Move the refrigerator into its final location Fasten the four screws 1 through the four plastic washers in the sides of the refrigerator and further into the wall Pu...

Страница 23: ...e again and tighten it with the two screws fig n page 9 Undo the hinge pin fig o page 9 and position it on the other side fig p page 9 Turn the door by 180 fig q page 9 Place the door on the hinge pin...

Страница 24: ...issued with a certificate of inspection NOTICE This refrigerator may only be connected to the gas supply by a specialist in accordance with the applicable guidelines and standards Only use cylinders...

Страница 25: ...mponents The inverter may only be connected by a specialist NOTE The mains socket must be easily accessible so that you can unplug the power cord if required thereby disconnecting the refrigerator fro...

Страница 26: ...nt earth terminal DC power 3 Heating cartridge terminal strip DC power 4 Lighting negative terminal 5 Lighting positive terminal 6 Lighting terminal strip DC power 7 LED lighting DC power 8 LED lighti...

Страница 27: ...n 5 Ignition 6 Burner 7 Heating cartridge DC power supply 8 Heating cartridge DC power 9 LED lighting 10 Electronics DC power supply 11 Gas inlet 12 Gas outlet 13 Gas valve 14 DC power outlet 15 Gas v...

Страница 28: ...only In automatic mode the refrigerator selects the most favourable mode available The refrigerator is only operated with direct current when the vehicle engine is running The electronics of the refri...

Страница 29: ...t capacity excluding ice compartment 133 5 l Power consumption 170 W 230 Vw 170 W 12 Vg Power consumption 3 2 kWh 24 h 230 Vw 340 Ah 24 h 12 Vg Gas consumption 380 g 24 h Climatic class SN Noise emiss...

Страница 30: ...y excluding ice compartment 148 l Power consumption 170 W 230 Vw 170 W 12 Vg Power consumption 3 2 kWh 24 h 230 Vw 340 Ah 24 h 12 Vg Gas consumption 380 g 24 h Climatic class SN Noise emission 0 dB A...

Страница 31: ...estimmungsgem er Gebrauch 34 6 K hlschrank einbauen 35 7 K hlschrank anschlie en 42 8 Technische Daten 47 1 Erkl rung der Symbole A I HINWEIS Hinweise zur Bedienung finden Sie in der Bedienungsanleitu...

Страница 32: ...ch digungen aufweist d rfen Sie ihn nicht in Betrieb nehmen Wenn das Wechselstrom Anschlusskabel dieses K hlschranks besch digt wird muss es durch den Hersteller seinen Kundendienst oder eine hnlich q...

Страница 33: ...Sie den K hlschrank nicht in der N he von offenen Flammen oder anderen W rmequellen Heizung Gas fen usw ein berhitzungsgefahr Achten Sie stets darauf dass beim Betrieb entstehende W rme aus reichend...

Страница 34: ...ie K hl schr nke sind nicht f r die fachgerechte Lagerung von Medikamenten vorgesehen Die K hlschr nke sind f r den Betrieb am Gleichstromnetz und an einer Wechsel stromsteckdose ausgelegt und k nnen...

Страница 35: ...uss eine Bel ftungs ffnung Abb 3 1 Seite 4 und eine Entl ftungs ffnung Abb 3 2 Seite 4 mit L ftungsgitter vorgesehen werden damit die entstehende W rme gut nach au en abgegeben werden kann Bel ftungs...

Страница 36: ...mm betragen Der K hlschrank darf nicht seitlich zu den Be und Entl ftungs ffnungen ein gebaut werden da dies zu Leistungseinbu en und erh htem Energieverbrauch des K hlschranks f hrt Die Bel ftungs un...

Страница 37: ...Seite 6 aneinerAnschlagleiste hinter dem K hlschrank z B durch Kleben Schieben Sie den K hlschrank bei der Montage gegen die Anschlagleisten mit den Dichtlippen Dadurch ist der Raum hinter dem K hlsch...

Страница 38: ...Sie statt der Entl ftungs ffnung einen Dachentl fter nutzen m ssen Fertigen Sie einen Rahmenausschnitt im Dach an Entnehmen Sie das erforder liche Ma der Anleitung des Dachentl fters Beachten Sie dabe...

Страница 39: ...Adapter 2 und auf das Abgasrohr 3 Richten Sie das T St ck im 45 Winkel auf die R ckwand aus Fixieren Sie T St ck Adapter und Abgasrohr mit einer Schraube 4 6 7 K hlschrank befestigen I Pos in Abb d Se...

Страница 40: ...n Sie die Schrauben an der Unterseite der Bedienblende Abb j Seite 8 Schrauben Sie die Scharnierschraube am oberen T rscharnier heraus und bewahren Sie sie auf Abb k Seite 9 Heben Sie die T r an und e...

Страница 41: ...nd wird von kleinen Haken gehalten A Schieben Sie das neue Dekor in die ffnung B Stecken Sie die T rleiste wieder auf B Die T rleiste ist fest wenn sie h rbar einrastet Falls Sie den K hlschrank zum E...

Страница 42: ...n ACHTUNG Der K hlschrank darf nur von einer Fachkraft gem den geltenden Vorschriften und Normen an die Gasversorgung angeschlossen werden Verwenden Sie nur Propan oder Butangasflaschen kein Erdgas od...

Страница 43: ...ichters darf nur von einer Fachkraft ausgef hrt werden HINWEIS Die Netzsteckdose muss gut erreichbar sein sodass Sie bei Bedarf den Netzstecker ziehen und den K hlschrank dadurch vom Netz trennen k nn...

Страница 44: ...nt Masse Klemme Gleichstrom 3 Heizpatrone Klemmleiste Gleichstrom 4 Beleuchtung Minuspol 5 Beleuchtung Pluspol 6 Beleuchtung Klemmleiste Gleichstrom 7 LED Beleuchtung Gleichstrom 8 LED Beleuchtung Sch...

Страница 45: ...Wechselstrom 4 Ionisation 5 Z ndung 6 Brenner 7 Heizpatrone Gleichstrom Versorgung 8 Heizpatrone Gleichstrom 9 LED Beleuchtung 10 Elektronik Gleichstrom Versorgung 11 Eingang Gas 12 Ausgang Gas 13 Gas...

Страница 46: ...RML9335 9435 Der K hlschrank w hlt im automatischen Betriebsmodus die g nstigste vorhandene Betriebsart aus Der K hlschrank wird nur mit Gleichstrom betrieben wenn der Fahr zeugmotor l uft Die Elektro...

Страница 47: ...l Nettoinhalt Frosterfach entnommen 133 5 l Leistungsaufnahme 170 W 230 Vw 170 W 12 Vg Energieverbrauch 3 2 kWh 24 h 230 Vw 340 Ah 24 h 12 Vg Gasverbrauch 380 g 24 h Klimaklasse SN Schallemissionen 0...

Страница 48: ...halt Frosterfach entnommen 148 l Leistungsaufnahme 170 W 230 Vw 170 W 12 Vg Energieverbrauch 3 2 kWh 24 h 230 Vw 340 Ah 24 h 12 Vg Gasverbrauch 380 g 24 h Klimaklasse SN Schallemissionen 0 dB A Z ndun...

Страница 49: ...veuillez le transmettre au nouvel acqu reur I Sommaire 1 Explication des symboles 50 2 Consignes de s curit 50 3 Pi ces fournies 52 4 Accessoires 53 5 Usage conforme 53 6 Installation du r frig rateu...

Страница 50: ...on et peut provoquer des blessures si il est ouvert Assurez un traitement propre et sans traces lorsque du mastic au sili cone ou un produit similaire est utilis Tout contact de fils de silicone avec...

Страница 51: ...s portes du r frig rateur lors du retraitement d un ancien r frig rateur et laissez les tablettes dans le r frig rateur afin d viter tout risque d enfermement et d asphyxie accidentels ATTENTION Risqu...

Страница 52: ...a plaque signal tique correspond l alimentation lectrique dont vous disposez N ouvrez jamais le circuit frigorifique Pour raccorder le r frig rateur au courant alternatif veuillez utiliser exclusiveme...

Страница 53: ...stockage conforme des m dicaments Les r frig rateurs sont con us pour fonctionner sur l alimentation CC et sur une prise de courant et peuvent fonctionner ind pendamment de l lectricit avec des gaz l...

Страница 54: ...ntilation fig 3 1 page 4 et une ouverture d a ration fig 3 2 page 4 quip e d une grille d a ration afin que la chaleur form e puisse tre vacu e correctement vers l ext rieur Ouverture de ventilation p...

Страница 55: ...doit pas tre install lat ralement par rapport aux ouvertures d a ration et de ventilation car cela entra nerait une baisse des performances et une augmentation de la consommation d nergie du r frig r...

Страница 56: ...page 6 une barre de but e derri re le r frig rateur p ex en les collant Lors du montage poussez le r frig rateur contre les barres de but e avec les l vres d tanch it L espace se trouvant derri re le...

Страница 57: ...ous avez besoin d utiliser un ventilateur de toit au lieu de l ouverture d a ration Faites une d coupe du cadre dans le toit Pour conna tre les mesures requises consultez les instructions de la ventil...

Страница 58: ...d chappement 3 Alignez la pi ce en T un angle de 45 sur la paroi arri re Fixez la pi ce en T l adaptateur et le tuyau d chappement avec une vis 4 6 7 Fixation du r frig rateur I Pos dans fig d page 7...

Страница 59: ...i page 8 RML9431 9435 Ouvrez la porte du r frig rateur et desserrez les vis sur la partie inf rieure du panneau de commande fig j page 8 D vissez la vis de charni re sur la charni re sup rieure et con...

Страница 60: ...iqu e et retenue par un petit crochet A Ins rez le nouveau d cor dans l ouverture B Replacez la plinthe de la porte B La plinthe de la porte est fix e quand elle s enclenche audiblement Si vous avez a...

Страница 61: ...r frig rateur l alimentation au gaz conform ment aux directives et normes en vigueur Utilisez uniquement des bouteilles de gaz propane ou butane pas de gaz naturel ou gaz de ville dont la vanne de r d...

Страница 62: ...oit tre effectu e uniquement par un sp cialiste REMARQUE La prise secteur doit tre facile d acc s de telle sorte que vous puissiez d brancher la fiche secteur en cas de besoin et ainsi d brancher le r...

Страница 63: ...courant continu 3 Cartouche chauffante bornier courant continu 4 clairage p le n gatif 5 clairage p le positif 6 clairage bornier courant continu 7 clairage LED courant continu 8 clairage LED commutat...

Страница 64: ...continu 8 Cartouche chauffante courant continu 9 clairage LED 10 lectronique alimentation en courant continu 11 Entr e gaz 12 Sortie gaz 13 Vanne du gaz 14 Sortie courant continu 15 Vanne du gaz lign...

Страница 65: ...asser la ligne d alimentation vers l l ment de chauffage raccordements 3 et 4 par un relais serrure de contact pour viter que la batterie soit compl tement d charg e lorsque le moteur est teint accide...

Страница 66: ...e charge solaire pour d tecter un syst me solaire Le r gulateur de charge solaire doit disposer d une sortie AES Connectez le raccordement S au niveau de la commande fig w E page 13 la borne correspon...

Страница 67: ...l Capacit nette Compartiment cong lateur retir 133 5 l Puissance absorb e 170 W 230 Vw 170 W 12 Vg Consommation lectrique 3 2 kWh 24 h 230 Vw 340 Ah 24 h 12 Vg Consommation de gaz 380 g 24 h Classe c...

Страница 68: ...e Compartiment cong lateur retir 148 l Puissance absorb e 170 W 230 Vw 170 W 12 Vg Consommation lectrique 3 2 kWh 24 h 230 Vw 340 Ah 24 h 12 Vg Consommation de gaz 380 g 24 h Classe climatique SN miss...

Страница 69: ...geven van het product aan de gebruiker I Inhoudsopgave 1 Verklaring van de symbolen 70 2 Veiligheidsinstructies 71 3 Omvang van de levering 72 4 Toebehoren 73 5 Gebruik volgens bestemming 73 6 Koelkas...

Страница 70: ...ng Het niet naleven kan leiden tot overlijden of ernstig letsel VOORZICHTIG Veiligheidsaanwijzing Het niet naleven kan leiden tot letsel LET OP Het niet naleven ervan kan leiden tot materi le schade e...

Страница 71: ...genomen Als de wisselstroomaansluitkabel van deze koelkasten wordt bescha digd moet deze om gevaar uit te sluiten worden vervangen door de fabrikant diens klantenservice of een gelijkwaardig gekwalif...

Страница 72: ...warmte bronnen verwarming gasovens etc Oververhittingsgevaar Let er altijd op dat de warmte die bij het gebruik ontstaat goed afge voerd kan worden Zorg ervoor dat de koelkast op voldoende afstand to...

Страница 73: ...nietbedoeldvoorde vakkundig opslag van geneesmiddelen Dekoelkasten worden gebruiktmet een gelijkstroom enwisselstroomcontactdoos en kunnen bovendien onafhankelijk van stroom met vloeibaar gas propaan...

Страница 74: ...pening afb 3 1 pagina 4 en een ontluchtingsopening afb 3 2 pagina 4 metventilatieroostervoorhandenzijn om de warmte die ontstaat goed naar buiten te kunnen leiden Beluchtingsopening Beluchtingsrooster...

Страница 75: ...koelkast mag niet zijdelings ten opzichte van de be en ontluchtingsopenin gen worden ingebouwd omdat dit leidt tot vermogensverlies en een verhoogd energieverbruik van de koelkast De be en ontluchting...

Страница 76: ...chter de koelkast richting de binnenruimte van het voertuig afgedicht 6 3 Be en ontluchtingsopeningen maken I Maak een be en ontluchtingsopening in de buitenwand van 410 mm x 249 mm Neem hierbij de aa...

Страница 77: ...waterdicht af afb a pagina 7 Plaats het montageframe en schroef het vast afb b pagina 7 Plaats het ventilatierooster afb c pagina 7 Plaats de schuif en vergrendel het met het ventilatierooster afb c p...

Страница 78: ...agina 8 Zet de koelkast in de uiteindelijke positie Draai de vier schroeven 1 door de vier kunststof bussen in de zijwanden van de koelkast en verder in de niswand Plaats de afdekkappen 2 op de schroe...

Страница 79: ...oef er aan de bovenste deurscharnier uit en bewaar deze afb k pagina 9 Til de deur op en eruit afb l pagina 9 Maak de twee schroeven van de deurvergrendeling los en neem de deurvergrendeling eruit afb...

Страница 80: ...ken en wordt alleen door kleine haken vastgehouden A Schuif het nieuwe decor in de opening B Steek de deurlijst er weer op B De deurlijst is vast als deze hoorbaar vergrendelt Als de koelkast voor het...

Страница 81: ...ken LET OP De koelkast mag alleen door een vakman volgens de geldende voor schriften en normen op de gasvoorziening worden aangesloten Gebruik uitsluitend propaan of butaangasflessen geen aardgas of s...

Страница 82: ...an een omvormer mag alleen door een vakman worden uitgevoerd INSTRUCTIE De netcontactdoos moet goed bereikbaar zijn zodat de netstekker indien nodig kan worden uitgetrokken en de koelkast daardoor van...

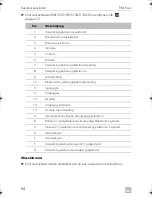
Страница 83: ...m gelijkstroom 3 Verwarmingspatroon klemmenlijst gelijkstroom 4 Verlichting minpool 5 Verlichting pluspool 6 Verlichting klemmenlijst gelijkstroom 7 Ledverlichting gelijkstroom 8 Ledverlichting schake...

Страница 84: ...nder 7 Verwarmingspatroon gelijkstroomvoeding 8 Verwarmingspatroon gelijkstroom 9 Ledverlichting 10 Elektronisch systeem gelijkstroomvoeding 11 Ingang gas 12 Uitgang gas 13 Gasklep 14 Uitgang gelijkst...

Страница 85: ...itingen 5 en 6 D alleen RML9335 9435 De koelkast kiest in automatische bedrijfsmodus de gunstigste bedrijfsmodus De koelkast wordt alleen met gelijkstroom bedreven als de motor draait Het elektro nisc...

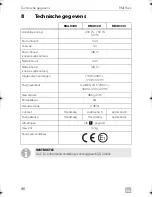
Страница 86: ...oinhoud vriesvak uitgenomen 133 5 l Opgenomen vermogen 170 W 230 Vw 170 W 12 Vg Energieverbruik 3 2 kWh 24 h 230 Vw 340 Ah 24 h 12 Vg Gasverbruik 380 g 24 h Klimaatklasse SN Geluidsemissie 0 dB A Cont...

Страница 87: ...esvak uitgenomen 148 l Opgenomen vermogen 170 W 230 Vw 170 W 12 Vg Energieverbruik 3 2 kWh 24 h 230 Vw 340 Ah 24 h 12 Vg Gasverbruik 380 g 24 h Klimaatklasse SN Geluidsemissie 0 dB A Contact Handmatig...

Страница 88: ...64 9 622 1573 Mail customerservices dometic co nz NORWAY Dometic Norway AS ster yveien 46 N 3232 Sandefjord 47 33428450 47 33428459 Mail firmapost dometic no POLAND Dometic Poland Sp z o o Ul Pu awsk...

Отзывы: