MSI912, MSI1812T
Sine wave inverter
Installation and Operating Manual
EN
ENERGY & LIGHTING
SINEPOWER
MSI912-1812T-IO-AU.book Seite 1 Freitag, 23. Dezember 2016 3:11 15
Страница 1: ...MSI912 MSI1812T Sine wave inverter Installation and Operating Manual EN ENERGY LIGHTING SINEPOWER MSI912 1812T IO AU book Seite 1 Freitag 23 Dezember 2016 3 11 15 ...
Страница 2: ...MSI912 1812T IO AU book Seite 2 Freitag 23 Dezember 2016 3 11 15 ...
Страница 3: ... Explanation of symbols 4 2 General safety instructions 4 3 Scope of delivery 6 4 Accessories 7 5 Target group for this manual 7 6 Intended use 8 7 Technical description 8 8 Fitting the inverter 13 9 Connecting the inverter 15 10 Using the inverter 22 11 Cleaning and caring for the inverter 26 12 Troubleshooting 26 13 Warranty 28 14 Disposal 28 15 Technical data 29 MSI912 1812T IO AU book Seite 3 ...
Страница 4: ...rials Do not operate the device in areas that are potentially explosive Maintenance and repair work may only be carried out by qualified personnel who are familiar with the risks involved and the relevant regulations People including children whose physical sensory or mental capacities or whose lack of experience or knowledge prevent them from using this product safely should not use it without th...
Страница 5: ...TICE Ensure that the device is standing firmly The device must be set up and fastened in such a way that it cannot tip over or fall down Do not expose the device to a heat source such as direct sunlight or heating Avoid additional heating of the device in this way If cables have to be fed through metal walls or other walls with sharp edges use ducts or tubes to prevent damage Do not lay cables whi...
Страница 6: ...ly when working on the device A NOTICE Make sure the air inlets and outlets of the device are not covered Ensure good ventilation The inverter produces dissipated heat which has to be diverted Do not connect the 230 V output of the inverter fig 4 5 page 11 and fig 5 5 page 12 to a different 230 V source 3 Scope of delivery MSI912 No Designation 1 Sine wave inverter Operating manual 1 1 MSI912 1812...
Страница 7: ...y in which the equipment is to be installed and or used All other chapters are intended for the users No Designation 1 Sine wave inverter 2 Connection cable with safety coupling for 230 Vw output 3 Connection cable with safety plug for 230 Vw supply Operating manual Designation Ref no Remote control MCR 7 on off sleep mode Remote control MCR 9 LED power monitoring 1 3 2 2 MSI912 1812T IO AU book S...
Страница 8: ...age shutdown The inverter shuts itself off when the voltage sinks below the cut off value It restarts when the voltage rises to the restart value Excess temperature shutdown The inverter switches off when the temperature inside the device or the temperature on the cooling element exceeds a cut off value It restarts when the voltage rises to the restart value Overload shutdown The LED on the invert...
Страница 9: ... from discharging too quickly The inverter can be easily controlled using the remote control accessory The SinePower MSI1812T inverters are fitted with a 230 Vw priority circuit If an external 230 Vw voltage is available this will have priority If no external 230 Vw voltage is connected then the connected battery will be used as the power supply NOTE The individual values are found in the chapter ...
Страница 10: ...remote control 2 REMOTE port Connection of a PC using a serial RS 232 interface or connection of the MCR 7 or MCR 9 remote control 3 POS Positive terminal 4 NEG Negative terminal 5 Earth terminal Earthing on the vehicle bodywork NEG REMOTE CHASSIS DC INPUT GROUND B A 1 POS 1 A B ENB N O ENB COM GND N C 2 x x x x 3 4 5 5 1 2 4 3 3 MSI912 1812T IO AU book Seite 10 Freitag 23 Dezember 2016 3 11 15 ...
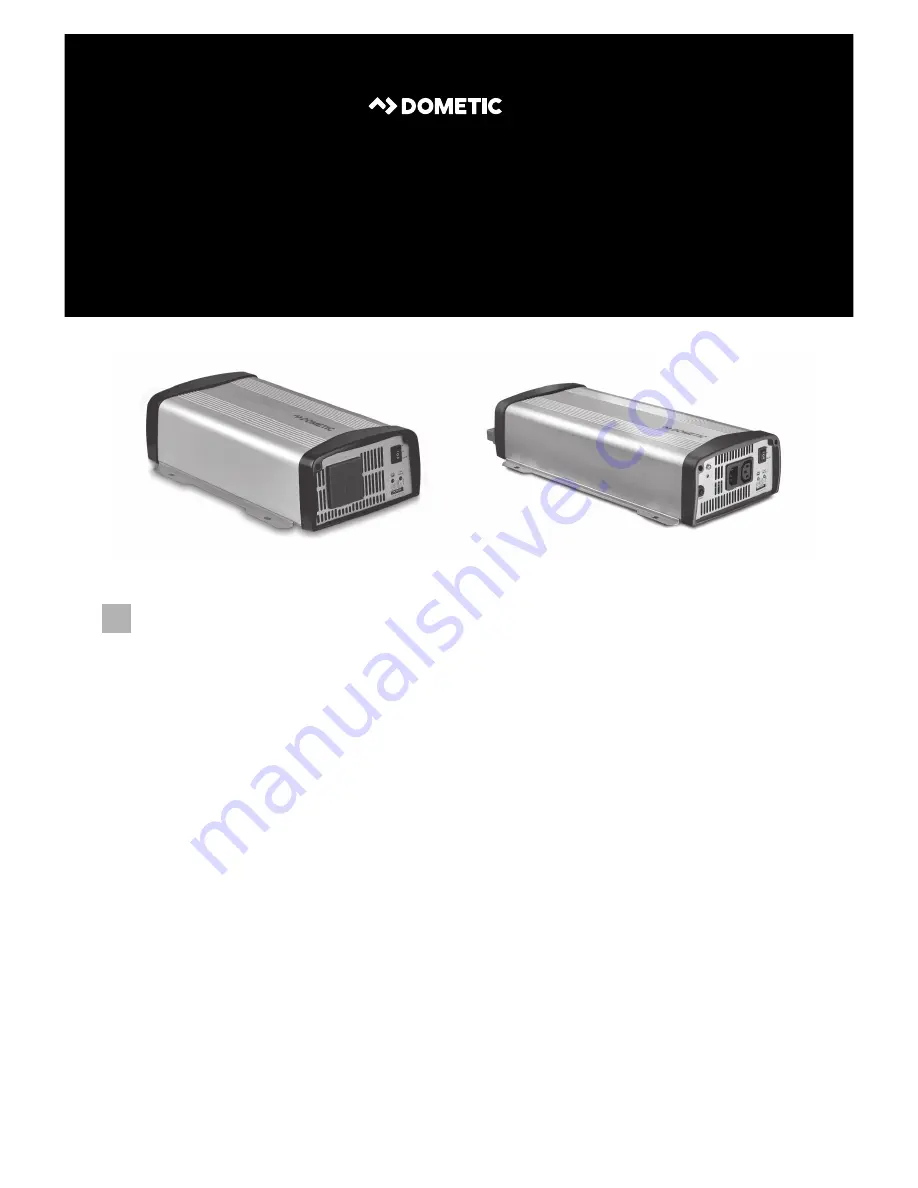
Страница 11: ...e remote control accessory 2 Input Level LED Displays the input voltage range 3 Load Level LED Displays the power being supplied 4 Dip switch Makes settings on the inverter such as mains voltage mains frequency energy saving mode 5 Safety socket 230 V output ON OUT VOLT FREQ POWER SAVING N A OPTION 1 0 1 2 3 4 5 6 7 8 OFF REMOTE LOAD STATUS AC OUTPUT 5 1 2 3 4 MSI912 4 MSI912 1812T IO AU book Seit...
Страница 12: ...ys the power being supplied 4 Dip switch Makes settings on the inverter such as mains voltage mains frequency energy saving mode 5 AC output 230 V output 6 AC input 230 V input 7 Fuse Protects the inverter from overload The fuse can be pressed in again once it has triggered 8 Grounding screw Sets or removes the grounding bridge ON OUT VOLT FREQ POWER SAVING N A OPTION 1 0 1 2 3 4 5 6 7 8 OFF REMOT...
Страница 13: ... following tools Machine bolts M4 with washers and self locking nuts or self tapping screws or wood screws 8 2 Mounting instructions When selecting the installation location observe the following instructions The inverter can be mounted horizontally or vertically The inverter must be installed in a place that is protected from moisture The inverter may not be installed in the presence of flammable...
Страница 14: ...ating compartments or direct sunlight the heat from the inverter under load can lead to automatic shutdown The device must be installed on a level and sufficiently sturdy surface A 8 3 Mounting the inverter Hold the inverter against the installation location and mark the fastening points fig 7 A Attach the inverter using your chosen fastening method fig 7 B NOTICE Before drilling any holes make su...
Страница 15: ...ollowinginformationisintendedfortechnicianswhoarefamiliar with the guidelines and safety precautions to be applied Never use the inverter on vehicles where the positive terminal of the battery is connected to the chassis If you do not fit a fuse to the positive cable the cables can overload which might result in a fire Reversed polarity can damage the inverter MSI912 only The inverter should not b...
Страница 16: ... screw Connect the negative cable to the black negative terminal fig 8 4 Lay the positive cable from the inverter to the positive terminal of the vehicle battery and connect it Lay the negative cable from the inverter to the negative terminal of the vehicle battery and connect it Connect the earth terminal to the vehicle chassis NOTE Tighten the nuts and bolts to a maximum torque of 12 13 Nm Loose...
Страница 17: ...page 12 Connect the safety plug to the 230 V AC mains 9 4 Connecting the 230 V output cable MSI1812T only Connect the 230 Vw connection cable with safety plug to the 230 Vw output jack fig 5 5 page 12 WARNING Before connecting the 230V output cable make sure the inverter is switched off at the main switch MSI912 1812T IO AU book Seite 17 Freitag 23 Dezember 2016 3 11 15 ...
Страница 18: ...of multiple appliances it is essential that a circuit breaker residual current circuit breaker is built into the socket distribution circuit see sample circuit diagram in fig 9 9 Input 230 V AC Output 230 V AC N MSI DC Input DC 230 V AC FI 2 RCD FI 1 RCD PE L1 N PE L1 N PE L1 N PE L1 6 5 4 1 3 7 2 MSI912 1812T IO AU book Seite 18 Freitag 23 Dezember 2016 3 11 15 ...
Страница 19: ...er 5 Set grounding bridge At delivery not set shown by dotted line 6 Circuit breaker residual current circuit breaker 7 Socket distribution circuit for appliances WARNING Danger of electrocution If you wish to connect more than one appliance to the inverter and install a socket distribution circuit you must arrange a circuit breaker residual current circuit breaker and set a grounding bridge in th...
Страница 20: ...ion fig c Set the main switch fig 4 1 page 12 and fig 5 1 page 12 to OFF and make sure that the connection for the remote control fig 3 2 page 10 is not assigned Set the main switch fig 4 1 page 12 and fig 5 1 page 12 to REMOTE Connect the external on off switch with the connection cable to the terminal fig 3 1 page 10 NOTE Use cables with a cable cross section of 0 25 0 75 mm ENB GND OFF ON OFF I...
Страница 21: ...ort as possible 10 m so there is no loss in the signal transmission Inverter Computer Pin Description Description Pin 1 Not assigned Not assigned 1 2 GND RXD 2 3 RXD TXD 3 4 TXD DTR 4 5 Not assigned GND 5 6 Not assigned DSR 6 RTS 7 CTS 8 Not assigned 9 Inverter Pin Description 1 2 GND 3 RS 232 RXD 4 RS 232 TXD 5 RMT remote control 6 Not assigned MSI912 1812T IO AU book Seite 21 Freitag 23 Dezember...
Страница 22: ...lowing when using the device see also chapter Troubleshooting on page 26 The inverter switches off if the battery voltage drops below 10 5 V 12 Vg connection the battery voltage exceeds 16 V 12 Vg connection the inverter overheats If this happens shut down the inverter with the main switch fig 4 1 page 11 and fig 5 1 page 12 Check that the inverter is sufficiently ventilated and that the ventilati...
Страница 23: ... the power being supplied by the inverter Display Input voltage MSI912 MSI1812T Red slow flash 10 6 V Red 10 6 11 0 V Orange 11 0 12 0 V Green 12 0 14 2 V Orange flash 14 2 15 0 V Red quick flash 15 0 Display Input voltage MSI 912 MSI1812T Off 0 80 W 0 160 W Green 80 320 W 160 640 W Orange 320 720 W 640 1440 W Red slow flash 720 800 W 1440 1600 W Red quick flash 800 W 1600 W MSI912 1812T IO AU boo...
Страница 24: ... You can set the mains frequency using the S3 dip switch NOTE Settings can only be made using the dip switch if the S8 dip switch is On Dip switch Mains voltage S1 S2 200 V Off Off 220 V On Off 230 V Off On 240 V On On WARNING Danger of electrocution Only adjust the S3 DIP switch when the respective frequency for the output voltage should be used Dip switch Net frequency S3 50 Hz Off 60 Hz On MSI9...
Страница 25: ...l mode The values to be set on your inverter can be found in the following table Defining settings Using the S8 dip switch you can define whether the default settings or the settings of dip switches S1 S7 are used Default settings Energy saving mode Dip switch MSI912 MSI1812T S4 S5 S6 Off Off Off Off Off 110 190 W On Off Off 70 110 W 190 240 W On On Off 180 240 W 240 300 W On On On Dip switch Para...
Страница 26: ...p red to indicate the fault NOTICE Donot usesharp orhardobjectsorcleaningagents forcleaningasthese may damage the product WARNING Do not open the device You risk sustaining an electric shock by doing this NOTE If you have detailed questions on the specifications of the inverter please contact the manufacturer addresses on the back of the instruction manual MSI912 1812T IO AU book Seite 26 Freitag ...
Страница 27: ...oad and make sure the inverter has better ventilation Then switch the consumer back on Constantly lit Short circuit or reversed polarity Excessive load Switch off the inverter and remove the consumer Then switch the inverter back on without the consumer If no excessive load is now shown then there is a short circuit in the consumer or the total load was higher than the power specified on the data ...
Страница 28: ...wing documents when you send in the device A copy of the receipt with purchasing date A reason for the claim or description of the fault 14 Disposal Place the packaging material in the appropriate recycling waste bins wherever possible M If you wish to finally dispose of the product ask your local recycling centre or specialist dealer for details about how to do this in accordance with the applica...
Страница 29: ... 200 240 Vw pure sine wave THD 3 Output frequency 50 or 60 Hz Idle current consumption 1 8 A 2 1 A Standby current consumption 0 5 A Input voltage range 10 5 V 16 V Efficiency up to 89 90 Bypass relay 25 A 277 Vw Ambient temperature for operation 20 C to 40 C 40 C to 60 C reduced power Ambient temperature for storage 30 C to 70 C Priority circuit 230 V input protection 10 A Switchover time of bypa...
Страница 30: ... SAVING N A OPTION 1 0 1 2 3 4 5 6 7 8 OFF REMOTE LOAD STATUS AC OUTPUT AC INPUT BREAKER ON OUT VOLT FREQ POWER SAVING N A OPTION 1 0 1 2 3 4 5 6 7 8 OFF REMOTE LOAD STATUS AC OUTPUT MSI912 MSI1812T 186 6 mm 200 6 mm 10 mm Ø7 mm MSI1812T 284 mm MSI912 313 mm 94 5 mm 200 6 mm 94 5 mm d MSI912 1812T IO AU book Seite 30 Freitag 23 Dezember 2016 3 11 15 ...
Страница 31: ...uding 2009 19 EC and the Low voltage Directive 2006 95 EC EN55012 Class B EN55014 Class B EN61000 6 1 6 3 Class B EN61000 6 2 6 4 Class A EN61204 3 Device Overvoltage Shutdown Restart MSI912 MSI1812T 16 V 14 5 V Device Undervoltage warning Undervoltage Shutdown Restart MSI912 MSI1812T 11 V 10 5 V 12 5 V Internal temperature Temperature on cooling element Shutdown Restart Shutdown Restart 60 C 40 C...
Страница 32: ...1573 Mail customerservices dometic co nz NORWAY Dometic Norway AS Østerøyveien 46 N 3232 Sandefjord 47 33428450 47 33428459 Mail firmapost dometic no POLAND Dometic Poland Sp z o o Ul Puławska 435A PL 02 801 Warszawa 48 22 414 3200 48 22 414 3201 Mail info dometic pl PORTUGAL Dometic Spain S L Branch Office em Portugal Rot de São Gonçalo nº 1 Esc 12 2775 399 Carcavelos 351 219 244 173 351 219 243 ...