background image

- 6 -

                        MoDel

Data

DMr/DMc

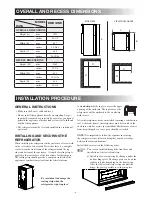
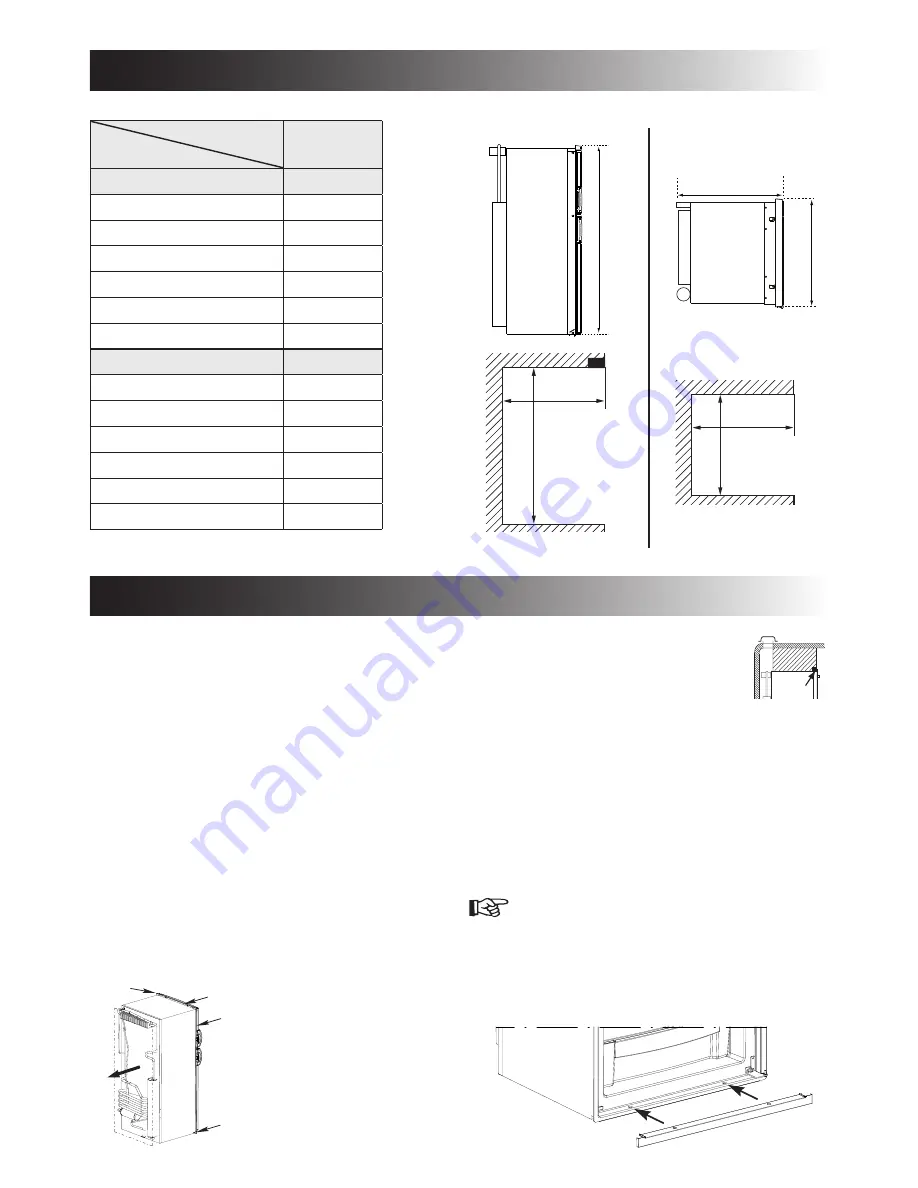
OveRAll DIMeNSIONS 

Height (A)

mm

1391

inches

54-3/4

Width (B)

mm

637

inches

25-5/64

Depth (C)

mm

668

inches

26-19/64

ReCeSS DIMeNSIONS

Height  (H)

mm

1365

inches

53-3/4

Width (W)

mm

602

inches

23-11/16

Depth (D)

mm

616

inches

24-1/4

Side view

B

C

view from above

D

H

A

D

W

B

C

overall anD recess DiMensions

A

installation proceDure

general instructions

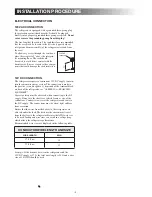
Make sure the floor is solid and level. 

• 

Do not install the appliance directly on carpeting. Carpet-

• 

ing must be removed or protected by a metal or wood panel 
beneath the appliance, which extends at least full width and 
depth of the appliance. 
The refrigerator must be level and installed in a substantial 

• 

enclosure. 

installing anD securing the  

refrigerator

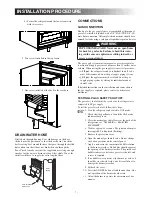
When installing the refrigerator in the enclosure, all areas with-
in the recess have to be sealed. Verify that there is a complete 
seal between the front frame of the refrigerator and the top, 
sides and bottom of the enclosure.  A length of sealing strip is 
applied to the rear surface of the front frame for this purpose. 
The sealing strip should provide  a complete isolation of the 
appliance’s combustion system from the vehicle interior.  

Be careful not to damage the 
sealing strip when the  
refrigerator is put in place!

Wood strip

wood strip 

must be in place across the upper 

opening of the enclosure. The top frame of the 
refrigerator will be anchored to the wood strip 
with screws.  

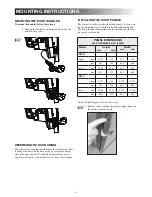
After the refrigerator has been installed (ensuring a combustion 
seal at the front frame), the refrigerator must be secured in the 
enclosure with five screws (not included). Furthermore, a lower 
front strip (shipped as a loose part) should be attached. 

NOTe!

 It is important to follow the sequence in securing 

the refrigerator since failure in doing that can cause leakage 
between the frame and cabinet!  

Install the five screws in the following order: 

Two screws installed through the front base and 

1. 

installation of the lower front strip. 

Install the lower front strip by sliding it under the 

a) 

bottom hinge plate. The hinge plate can be on the 
right or left side depending on the door swing.  
Once the lower front strip is slipped under the 
hinge, the part is possible to swing into place. 


Содержание DMR 7-Series

Страница 1: ...re s curit Ne pas entreposer ni utiliser de l essence ni d autres vapeurs ou liquides inflamma bles proximit de cet appareil ou de tout autre appareil Improper installation adjustment alteration servi...

Страница 2: ......

Страница 3: ...roperty damage Information Step by step instructions CAUTION WARNING CAUTION introduction 4 Installation Instructions certification code requirements 4 ventilation requirements 5 overall and recess di...

Страница 4: ...l electrical source is utilized the refrigerator when installed must be electrically grounded in accordance with local codes or in the absence of local codes the Canadian Electrical Code CSA C22 1 Par...

Страница 5: ...Items placed in the vicinity of the refrigerator compartment accordingly must be secured away from the refrigerator tubing and flue The ventilation kits must be installed and used without modi ficati...

Страница 6: ...r surface of the front frame for this purpose The sealing strip should provide a complete isolation of the appliance s combustion system from the vehicle interior Be careful not to damage the sealing...

Страница 7: ...e the protection cover 5 Open the manual gas shutoff valve Do not change 6 any button positions on the control panel Apply a non corrosive commercial bubble solution 7 to the burner jet orifice No bub...

Страница 8: ...C supply to main tain the automatic energy system The connection is made to the positive and negative terminals of the terminal block on back of the refrigerator see APPENDIX A Rearview equipment Corr...

Страница 9: ...lingthe door panels The refrigerator is delivered without door panels Before start ing the mounting work read this instruction thoroughly and check that the panel dimensions are in compliance with tho...

Страница 10: ...ruction To install the door panel step 1 Remove the door panel 3 Install the new panel according to the previous in 4 struction To install the door panel steps 3 5 Open the door 90 degrees 2 Insert th...

Страница 11: ...partments ON OFF 1 button main power Press the button to turn the refrigerator on or off AUTO GAS 2 mode selector button Press the button to turn the AUTO mode on or off TEMP SET button 3 The thermost...

Страница 12: ...lay is on Refrigerator on Display is off Refrigerator off The AUTO indication dot is lit AUTO mode and AC operation The AUTO and LP indication dots are lit AUTO mode and GAS operation The LP indicatio...

Страница 13: ...pped with an automatic Low Ambient Control LAC function which guarantees the correct tempera ture in the freezer even at low ambient temperatures Turning off the refrigerator You can turn off your ref...

Страница 14: ...substances in the refrigerator such as cigarette lighter fuel gasoline ether or the like Failure to heed this warning could cause an explosion result ing in death or severe personal injury 6 Refrigera...

Страница 15: ...ponents once or twice a year is recommended Check the lower vent upper vent and area between these openings for any obstructions such as bird insect nests spider webs etc Make sure the refrigerator ar...

Страница 16: ...enting system and that service is performed on a regular schedule This ser vice must be performed by qualified service personnel only Electric equipment Heater The heat necessary for the operation of...

Страница 17: ...rmation indicates improper functioning of the burner Be sure to check the burner flame for proper appearance The flame should be light blue If it has a yellow tip it means that it is burning incorrect...

Страница 18: ...To prevent frost buildup which can reduce efficiency do not leave the unit s door open longer than necessary Door closing properly Check the door gasket Overpacked refrigerator The unit will have to w...

Страница 19: ...ning the refrig erator off and on several times in order to purge the air out of the gas lines Error codes For information about error codes refer to the following table The codes are displayed by fla...

Страница 20: ...20...

Страница 21: ...21...

Страница 22: ...volt Terminal block Drain water hose Inlet fitting Manual gas shutoff valve Burner jet Screw for protection cover Protection cover Flue baffle Heater Thermofuse 385 13 31 01 5 12V DC HVT J2 J3 J1 F4 5...

Страница 23: ...EATER 120V AC 9 8 W H I T E G R E Y BLUE RED BROWN BLACK 1 2 3 4 5 6 7 H THERMO FUSE GREEN GREEN YELLOW YELLOW O CHASSIS GROUND P TERMINAL BLOCK LAMP 1 3 T S R 8 1 8 10 L I G H T B L U E P 2 E D P 6 P...

Страница 24: ...n will allow for enhanced communication and service under the terms of the warranty see APPENDIX D dometic warranty To register the appliance fill in the pre printed registration card on the last page...

Страница 25: ...ay void the warranty The preventative mainte nance must be performed at a Dometic Authorized Service Center Dealer The preventative maintenance required is an inspec tion cleaning and full diagnostics...

Страница 26: ...Modes Approx 5 seconds Use PAL RV Diagnostic Tool for these tests ICEMAKER MODELS Inspect Water Valve and All Connections Yes No Inspect Heat Tape Switch for Proper Operation Yes No SECOND YEAR Date D...

Страница 27: ...s wise investment We at Dometic back our products with one of the most comprehensive warranties in the industry Complete the registration card and mail to us or register your Product on line at www ed...

Страница 28: ...res you of an invitation to take advantage of an Optional 2 Plus 3 Full Service Contract which allows you to add up to 3 years of additional warranty coverage Return the card within 10 days to ensure...

Отзывы: