14
See “C. Turn Refrigerator Off” on
page (11) for full instructions.
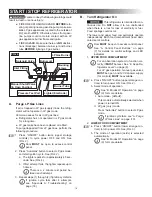
2. Empty refrigerator of all contents.
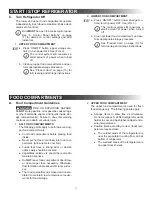
3. Verify drip tray is in place (under evaporator) in-
side upper food compartment. See (FIG. 10).
FIG. 10
Evaporator Fins
Evaporator Cover
Drip Tray
4. Place both drawer and door in airing position un-
til frost is melted.
To reduce defrost time, fill ice trays with
warm water and place in lower food com-
partment.
See “C. Airing Position (Store Refrigera-
tor)” on page (14) for full instructions.
5. When all frost has melted, continue with “B.
Clean Food Compartment(s)” on page (14).
B. Clean Food Compartment(s)
ELECTRICAL SHOCK HAZARD.
Do
NOT
spray liquids near electrical components,
outlets, or connections. Failure to obey this warning
could result in death or serious injury.
Do
NOT
use strong chemicals or
abrasives to clean parts, as their protective surfac-
es will be damaged.
Always keep refrigerator clean. A clean refrigerator
reduces odors and helps prevent stains from devel-
oping. Follow the recommended cleaning schedule:
●
Clean spills immediately.
●
Thoroughly clean immediately after defrosting.
●
Clean before storing refrigerator, or when taking
out of storage (before use).
●
Thoroughly clean lower and upper food com-
partments once every 3 months (during continu-
ous use).
Discard expired items. Clean shelves,
door shelves, baskets, and bins.
1. To clean door liner and interior liner of refrigera-
tor:
a.
Mix 4 tablespoons of baking soda to 1 quart
of warm water.
b. Wipe down surfaces with baking soda solu-
tion.
c. Wipe down surfaces with warm water to re-
move baking soda solution.
d. Dry surfaces with clean cloth.
To clean lower food compartment,
drawer
MUST
be removed. See “D.
Lower Food Compartment Drawer” on
page (13).
2.
To clean finned evaporator, gasket, and shelves:
a.
Wipe down surfaces with warm water only.
b. Dry surfaces with clean cloth.
Make sure interior surfaces are com-
pletely dry before turning unit back on.
Otherwise, drawer slides may freeze
up, making drawer operation difficult.
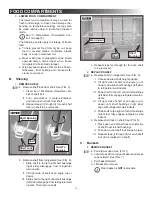
3. To remove cover from light(s) for cleaning, main-
tenance, etc:
a.
Spread rear of cover slightly, releasing tabs
(top and bottom).
b. Remove cover.
C. Airing Position (Store Refrigerator)
ALWAYS
place refrigerator in airing
position before storage. Otherwise, moisture will be
trapped inside refrigerator, and could result in mold
/ mildew, stains, and lingering odors.
When refrigerator is not in use, perform the follow-
ing procedures to place drawer and door in airing
position:
1.
PREPARE FOR AIRING POSITION
a.
Turn refrigerator off.
See “C. Turn Refrigerator Off” on
page (11) for full instructions.
b. Defrost refrigerator (if applicable).
See “A. Defrost Food Compartment(s)”
on page (13) for full instructions.
c. Clean refrigerator.
See “B. Clean Food Compartment(s)”
on page (14) for full instructions.
2.
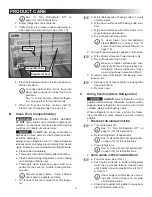
DOOR AIRING (UPPER COMPARTMENT)
a.
Pull door open. See (FIG. 1).
b. Push airing slide tab in (toward refrigerator
wall), then pull slide forward (toward user)
until it clicks into airing position. See (FIG. 1)
& (FIG. 11).
If door hinge is on RH side, use LH air-
ing slide. If door hinge is on LH side,
use RH airing slide.
c. Close door against airing slide (to keep door
ajar) until latch clicks once.
PRODUCT CARE

