background image

EN

Origo

Using the cooker

15

Close the stovetop (fig.

2

6, page 3). The stovetop can only fold when the 

regulator is in the zero position (0) are.

The catch locks.

Make sure that the unit is properly closed and that the cooker ports are fully 
closed.

7.3

Turn on the cooker

!

Turn

 the knob all the way up (fig.

2

1, page 3)

.

The burner is open.

Light the burner by placing a long match or a long lighter to the burner opening 
(fig.

9

, page 7).

Choose the desired power setting via knob. The flame must not extend beyond 
the edge of the pot.

I

7.4

Switching off the hob

Turn the respective controls to the zero position (0) (fig.

2

3, page 3).

Wait about five seconds.

Turn the knob all the way up (fig.

2

1, page 3) to check whether the flame is 

extinguished.

Turn the 

knob to the zero position (0) (fig.

2

3, page 3)

.

WARNING! Beware of injury.

Use long matches or long lighters to light the burner

Quickly remove your hand as soon as the burner ignites.

NOTE 

If the flame immediately goes out after ignition, blow air into the burner 
opening.
Then ignite the cooker as described.

Содержание 9103303977

Страница 1: ... per l uso 19 Spirituskooktoestellen Gebruiksaanwijzing 19 Spritkoger Betjeningsvejledning 19 Spritkök Bruksanvisning 19 Sprit kokeapparat Bruksanvisning 19 Spriikeitin Käyttöohje 19 Спиртовая плита Инструкция по эксплуатации 19 Kuchenki spirytusowe Instrukcja obsługi 19 Liehové variče Návod na obsluhu 19 Lihové vařiče Návod k obsluze 19 Alkohollal működő tűzhelyek Használati utasítás 19 EN DE FR ...

Страница 2: ......

Страница 3: ...Origo 3 1 1 2 4 3 5 6 7 2 ...

Страница 4: ...Origo 4 1 2 3 4 3 1 2 4 ...

Страница 5: ...Origo 5 5 6 ...

Страница 6: ...Origo 6 7 8 ...

Страница 7: ...Origo 7 9 0 ...

Страница 8: ...other person hand over this instruction manual along with it Table of contents 1 Explanation of symbols 9 2 General safety instructions 9 3 Scope of delivery 12 4 Accessories 12 5 Intended use 12 6 Technical description 13 7 Using the cooker 13 8 Maintaining and cleaning the cooker 16 9 Guarantee 17 10 Disposal 17 11 Technical data 17 ...

Страница 9: ...r ventilation before putting the cooker into operation Keep a suitable fire extinguisher in the immediate vicinity Ensure that the fire extinguisher is regularly checked by a specialist People including children whose physical sensory or mental capac ities or whose lack of experience or knowledge prevent them from using this product safely should not use it without the supervision or instruction o...

Страница 10: ...ured alcohol Never fill the canisters in the cooker Never pour alcohol through the burner openings in the cover fig 1 page 3 Fill the canister only to the maximum capacity see chapter Fill the cooker with denatured alcohol on page 14 Heated denatured alco hol expands in the canister Overflowing denatured alcohol causes uncontrolled burning in the cooker Overfilled canisters spilled denatured alcoh...

Страница 11: ...at pans and pots are securely in position It is advisable to use potholders accessory fig 4 1 page 4 Neverallowpothandlestoextendbeyondtheedgeofthestove Turn pot handles inward but not extending over other burners This will minimize the possibility of spillage ignition of flammable materials and or serious burns Be careful when heating grease or oil Grease and oil catch fire when exposed to great ...

Страница 12: ... is installed on a freestanding basis For use on boats the cooker can be fit ted with a gimbal mounting accessory The cooker cannot be operated in enclosed spaces e g tents or awnings Let the cooker cool completely before transporting it No in fig 3 page 4 Quantity Description ORIGO ONE ORIGO TWO 1 1x Cooker with 1 burner 2 1x Cooker with 2 burners 3 1x 2x Sealing washer 4 1x 2x Canister No in fig...

Страница 13: ...g up the cooker When selecting the installation location observe the following instructions Select a well ventilated location for the device Ensure that there are no drafts in the installation location Do not operate the device in areas that are potentially explosive Ensure the following minimum clearances 50 mm to side and back walls 750 mm to the ceiling No in fig 2 page 3 Description 1 Large fl...

Страница 14: ...7 page 6 Fill denatured alcohol into the mouth of the canister The maximum capacity of 1 2 litres per canister must not be exceeded The maximum fuel level is reached when the fuel is visible at the bottom of the opening fig 8 page 6 I Check the permissible load capacity by holding the canister vertically down wards Keep it in this position for 20 seconds to make sure it s not overfilled The excess...

Страница 15: ...page 7 Choose the desired power setting via knob The flame must not extend beyond the edge of the pot I 7 4 Switching off the hob Turn the respective controls to the zero position 0 fig 2 3 page 3 Wait about five seconds Turn the knob all the way up fig 2 1 page 3 to check whether the flame is extinguished Turn the knob to the zero position 0 fig 2 3 page 3 WARNING Beware of injury Use long matche...

Страница 16: ... button on the front of the cooker fig 5 page 5 Lift the stovetop fig 5 page 5 Close the opening of the canister with the gaskets Close the stovetop The catch locks Make sure that the unit is properly closed and that the cooker ports are fully closed I 8 Maintaining and cleaning the cooker A Occasionally clean the product with a damp cloth Remove the grate from the top of the device by gently pull...

Страница 17: ...he packaging material in the appropriate recycling waste bins wherever possible M If you wish to finally dispose of the product ask your local recycling centre or specialist dealer for details about how to do this in accordance with the applicable disposal regulations 11 Technical data ORIGO ONE ORIGO TWO Item no 9103303977 9103303978 Number of burners 1 2 Burning duration Approx 4 5 h Power of bu...

Страница 18: ...iner Weitergabe des Produktes an den Nutzer weiter Inhaltsverzeichnis 1 Erklärung der Symbole 19 2 Allgemeine Sicherheitshinweise 19 3 Lieferumfang 22 4 Zubehör 22 5 Bestimmungsgemäßer Gebrauch 23 6 Technische Beschreibung 23 7 Kocher verwenden 24 8 Kocher pflegen und reinigen 27 9 Garantie 27 10 Entsorgung 27 11 Technische Daten 28 ...

Страница 19: ...nnstoffe wie zum Beispiel Benzin oder Dieselkraftstoffe Methylalkohol Propangas oder Grillkohleanzünder Erstickungsgefahr Sorgen Sie vor der Inbetriebnahme des Kochers für ausreichende Belüftung Montieren Sie in Greifnähe einen Feuerlöscher der Klasse A für Spiritusflammen Lassen Sie den Feuerlöscher regelmäßig von zugelassenem Fach personal prüfen WARNUNG Sicherheitshinweis Nichtbeachtung kann zu...

Страница 20: ...ennspiritus nur in geeigneten Behältnissen und in aus reichender Entfernung vom Kocher Sorgen Sie dafür dass am Aufbewahrungsort für Brennspiritus oder am Auffüllort keine Gefahr von Funken und Flammenbildung besteht Befüllen Sie die Brennertöpfe niemals im Kocher Füllen Sie niemals Spiritus durch die Brenneröffnungen in der Abdeckung ein Abb 1 Seite 3 Befüllen Sie den Brennertopf nur mit der maxi...

Страница 21: ...bung um den Kocher herum frei von Fetten alkoholischen Substanzen Plastik und entflammbaren Stoffen zum Beispiel Vorhänge Handtücher Küchenutensilien Verwenden Sie nur Töpfe und Pfannen mit einem maximalen Durch messer von 23 cm 20 cm mit optionalem Topfhalter Achten Sie beim Kochen darauf dass die Töpfe und Pfannen sicher stehen Es ist ratsam Topfhalter Zubehör Abb 4 1 Seite 4 zu ver wenden Lasse...

Страница 22: ...zum Heizen des Raums Heiße Geräteteile sollten nicht mit Fett Wasser oder anderen Flüssig keiten in Kontakt kommen 3 Lieferumfang 4 Zubehör Als Zubehör erhältlich nicht im Lieferumfang enthalten Nr in Abb 3 Seite 4 Anzahl Beschreibung ORIGO ONE ORIGO TWO 1 1x Kocher mit 1 Brenner 2 1x Kocher mit 2 Brennern 3 1x 2x Dichtscheibe 4 1x 2x Brennertopf Nr in Abb 4 Seite 4 Beschreibung Art Nr 1 Topfhalte...

Страница 23: ... oder Vorzelte betrieben werden Lassen Sie den Kocher vollständig abkühlen bevor Sie ihn transportieren 6 Technische Beschreibung 6 1 Funktionsbeschreibung Die Kocher bestehen aus rostfreiem Edelstahl und arbeiten nach dem Absorptions prinzip Die Brennertöpfe haben ein Fassungsvermögen von 1 2 l Als Brennstoff dient Brennspiritus Der Brennspiritus wird im Brennertopf von einem nicht brennbaren Mat...

Страница 24: ...itus befüllen Drehen Sie alle Regler in die Nullstellung 0 Abb 2 3 Seite 3 Anderenfalls lässt sich das Kochfeld nicht öffnen Vergewissern Sie sich dass der Kocher auf Umgebungstemperatur abgekühlt ist Halten Sie die Taste an der Vorderseite des Kochers gedrückt Abb 5 Seite 5 Heben Sie das Kochfeld an Abb 5 Seite 5 Prüfen Sie die Öffnung des Brennertopfs um sicherzustellen dass weder Feuer noch Glu...

Страница 25: ... den Brennertopf so ein dass alle Halteklammern einrasten Schließen Sie das Kochfeld Abb 2 6 Seite 3 Das Kochfeld lässt sich nur ein klappen wenn sich die Regler in der Nullstellung 0 befinden Der Verschluss rastet ein Stellen Sie sicher dass das Gerät korrekt geschlossen werden kann und dass vor allem die Brenneröffnungen vollständig geschlossen sind 7 3 Kocher einschalten Drehen Sie den Regler a...

Страница 26: ...nstet Drehen Sie alle Regler in die Nullstellung 0 Abb 2 3 Seite 3 Anderenfalls lässt sich das Kochfeld nicht öffnen Vergewissern Sie sich dass der Kocher auf Umgebungstemperatur abgekühlt ist Halten Sie die Taste an der Vorderseite des Kochers gedrückt Abb 5 Seite 5 Heben Sie das Kochfeld an Abb 5 Seite 5 Verschließen Sie die Öffnung des Brennertopfs mit der Dichtscheibe Schließen Sie das Kochfel...

Страница 27: ...n Ihrem Land Adressen siehe Rückseite der Anleitung Zur Reparatur bzw Gewährleistungsbearbeitung müssen Sie folgende Unterlagen mitschicken eine Kopie der Rechnung mit Kaufdatum einen Reklamationsgrund oder eine Fehlerbeschreibung 10 Entsorgung Geben Sie das Verpackungsmaterial möglichst in den entsprechenden Recycling Müll M Wenn Sie das Produkt endgültig außer Betrieb nehmen informieren Sie sich...

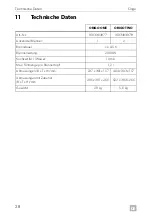
Страница 28: ...103303978 Anzahl der Brenner 1 2 Brenndauer ca 4 5 h Brennerleistung 2000 W Kochzeit für 1 l Wasser 10 min Max Füllmenge pro Brennertopf 1 2 l Abmessungen B x T x H mm 237 x 301 x 157 464 x 303 x 157 Abmessungen mit Zubehör B x T x H mm 295 x 301 x 266 522 x 303 x 266 Gewicht 2 9 kg 5 6 kg ...

Страница 29: ... DEALER dometic com dealer YOUR LOCAL SUPPORT dometic com contact dometic com A complete list of Dometic companies which comprise the Dometic Group can be found in the public filings of DOMETIC GROUP AB Hemvärnsgatan 15 SE 17154 Solna Sweden 4445101912 01 2020 ...

Отзывы: