background image

EN

CRE

Installing and connecting the refrigerator

21

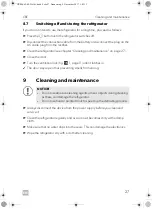
7.4

Installing the refrigerator

Proceed as follows to install the refrigerator:

If you wish to drain the condensate through a hose:
Mount the outlet port (see chapter “Mounting the outlet port (optional)” on 
page 20)

Undo the transport lock (chapter “Releasing the lock” on page 26).

Open the refrigerator door.

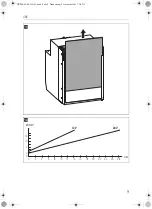
Remove the blanking plugs (fig.

7

2, page 5).

Push the refrigerator into the recess.

Fix the refrigerator in place using suitable screws (fig.

7

1, page 5).

Press the blanking plugs (fig.

7

2, page 5) into the openings.

7.5

Changing the door hinge

You can change the hinge of the door, so that it opens to the left rather than the right.

Proceed as shown in fig.

8

, page 6 to fig.

9

, page 6, to change the hinges.

7.6

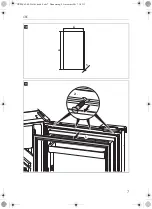
Replacing the door panel

A

The decorative trim has the following measurements (see fig.

0

, page 7):

Removing and installing the decorative trim

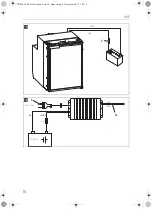
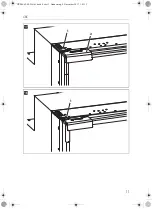
Proceed as shown (fig.

a

, page 7 to fig.

c

, page 9) to remove the decorative 

trim.

Proceed in reverse sequence to install the decorative trim.

NOTICE! Risk of damage!

The door panel must be replaced only when the refrigerator is upright.

Model

A

B

C

CRE0050

350 ± 0.5 mm

474 ± 0.5 mm

0.5 mm

CRE0065

 419 ± 0.5 mm

468 ± 0.5 mm

CRE0080

 445 ± 0.5 mm

582 ± 0.5 mm

CRE50-65-80-IO-16s.book  Seite 21  Donnerstag, 9. November 2017  1:03 13

Содержание 088827

Страница 1: ...gehandleiding en gebruiksaanwijzing 144 Kompressor K leskab Monterings og betjeningsvejledning 164 Kylsk p med kompressor Monterings och bruksanvisning 184 Kompressorkj leskap Monterings og bruksanvis...

Страница 2: ...CRE 2 1 2 3 5 4 CRE50 1 1 2 3 5 4 CRE65 2 CRE50 65 80 IO 16s book Seite 2 Donnerstag 9 November 2017 1 03 13...

Страница 3: ...CRE 3 1 2 3 5 4 CRE80 3 1 2 3 7 6 5 4 4 CRE50 65 80 IO 16s book Seite 3 Donnerstag 9 November 2017 1 03 13...

Страница 4: ...CRE 4 ca 50 mm 1 3 3 4 2 2 1 B A 5 1 2 6 CRE50 65 80 IO 16s book Seite 4 Donnerstag 9 November 2017 1 03 13...

Страница 5: ...CRE 5 2 1 7 CRE50 65 80 IO 16s book Seite 5 Donnerstag 9 November 2017 1 03 13...

Страница 6: ...CRE 6 1 2 4 3 5 8 1 2 4 3 5 9 CRE50 65 80 IO 16s book Seite 6 Donnerstag 9 November 2017 1 03 13...

Страница 7: ...CRE 7 0 A B C 1 2 a CRE50 65 80 IO 16s book Seite 7 Donnerstag 9 November 2017 1 03 13...

Страница 8: ...CRE 8 b CRE50 65 80 IO 16s book Seite 8 Donnerstag 9 November 2017 1 03 13...

Страница 9: ...CRE 9 c mm l m 12V 24V 0 2 4 6 8 10 12 14 16 18 20 22 24 26 28 0 2 6 10 14 d CRE50 65 80 IO 16s book Seite 9 Donnerstag 9 November 2017 1 03 13...

Страница 10: ...CRE 10 rd bk 1 e 12 V 24 V 10 A 2 1 rd bk rd bk bk 100 240 V f CRE50 65 80 IO 16s book Seite 10 Donnerstag 9 November 2017 1 03 13...

Страница 11: ...CRE 11 1 2 g 1 h CRE50 65 80 IO 16s book Seite 11 Donnerstag 9 November 2017 1 03 13...

Страница 12: ...CRE 12 500 380 534 CRE50 i 545 448 525 CRE65 j 528 475 640 CRE80 k CRE50 65 80 IO 16s book Seite 12 Donnerstag 9 November 2017 1 03 13...

Страница 13: ...h it Table of contents 1 Explanation of symbols 14 2 Safety instructions 14 3 Scope of delivery 17 4 Accessories 17 5 Intended use 17 6 Technical description 18 7 Installing and connecting the refrige...

Страница 14: ...rate the device if it is visibly damaged If this device s power cable is damaged it must be replaced by the manufacturer customer service or a similarly qualified person in order to prevent safety haz...

Страница 15: ...lants in the device CAUTION Danger of crushing Do not put your fingers into the hinge Foodstuff may only be stored in its original packaging or in suitable containers A NOTICE Check that the voltage s...

Страница 16: ...contact with the battery acid A NOTICE Do not use electrical devices inside the cooling device unless they are recommended by the manufacturer for that purpose Donotplaceitnearnakedflamesor otherheats...

Страница 17: ...oling freezing and storing foodstuffs Quantity Description 1 Refrigerator with shelves 1 Outlet port 1 Installation and operating manual Description Explanation Ref no Rectifier Transforms an input vo...

Страница 18: ...tion of 30 The temperature is set using the control panel on the inside left of the refrigerator Four temperature ranges from 0 C to 12 C are available for selection 6 1 Control elements inside the fr...

Страница 19: ...election button 7 LEDs Temperature levels DANGER If the device is powered by the mains ensure that the voltage supply has a residual current circuit breaker NOTICE Thedevicecanbefortiltedsidewaysupto3...

Страница 20: ...rator in regular intervals or drain it through an outlet in the floor of the refrigerator see chapter Mounting the outlet port optional on page 20 7 3 Mounting the outlet port optional Connect a hose...

Страница 21: ...e openings 7 5 Changing the door hinge You can change the hinge of the door so that it opens to the left rather than the right Proceed as shown in fig 8 page 6 to fig 9 page 6 to change the hinges 7 6...

Страница 22: ...fore starting up the device for the first time check whether the operating voltage and the battery voltage match see type plate Connect your refrigerator to a plug socket which is fuse protected with...

Страница 23: ...ver battery operation Proceed as follows when you connect the refrigerator to the AC supply Attach the rectifier on the back of the refrigerator Connect the rectifier to the battery as shown in fig f...

Страница 24: ...inside the cooler The only exceptions are devices approved for the purpose by the manufacturer Ensure that food or liquids in glass containers are not excessively refrigerated Liquids expand when they...

Страница 25: ...lly stated on the package NOTE After switching on the refrigerator needs some time before the compressor starts up NOTE The cooling performance can be affected by the ambient temperature the amount of...

Страница 26: ...he freshness will be better conserved 8 5 Defrosting the freezer A This is how to defrost the refrigerator Empty the contents If necessary put them in another cooling device to keep them chilled Press...

Страница 27: ...11 until it latches in The door stays open thus preventing smells from arising 9 Cleaning and maintenance A Always disconnect the device from the power supply before you clean and service it Clean the...

Страница 28: ...A reason for the claim or description of the fault 11 Disposal Place the packaging material in the appropriate recycling waste bins wherever possible M If you wish to finally dispose of the product a...

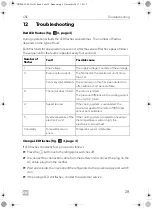
Страница 29: ...t on If the orange LED still flashes contact the customer service Number of flashes Fault Possible cause 1 Line Voltage The supply voltage is outside of the set range 2 Excessive fan current The fan l...

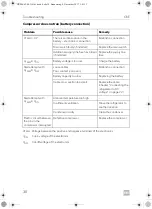
Страница 30: ...a connection Battery capacity too low Replacing the battery Cable cross section too small Replace the cable chapter Connecting the refrigerator to DC voltage on page 22 Start attempt with UTERM UON Am...

Страница 31: ...ic circuit between the pins in the compressor interrupted Defective compressor Replace the compressor Problem Possible cause Remedy Compressor runs for a long time continuously Ambient temperature too...

Страница 32: ...l 78 l Voltage 12 Vg or 24 Vg Rated current 12 Vg 24 Vg 5 2 A 2 5 A 5 8 A 2 8 A 6 5 A 3 1 A Cooling temperature range Refrigerator Freezer 0 C to 12 C 12 C to 6 C Climatic class ST Relative humidity...

Отзывы: